Adobe 65045315 Photoshop Elements Manual - Page 12
Use the Photo Downloader to download files, Organizing your photos and video clips
 |
UPC - 883919176512
View all Adobe 65045315 manuals
Add to My Manuals
Save this manual to your list of manuals |
Page 12 highlights
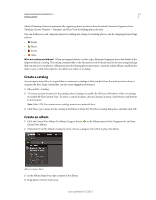
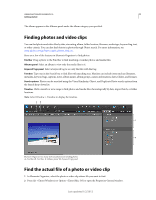
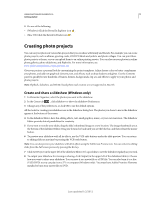
USING PHOTOSHOP ELEMENTS 10 6 Getting started Import Options Use the Photo Downloader to download files 1 Connect your camera or card reader to your computer. (See the documentation that came with your device, if necessary.) Note: (Windows) If AutoPlay is enabled, the Windows AutoPlay dialog box opens with a list of options for getting the photos. In the Windows AutoPlay dialog box, select Organize, and Edit using Adobe Elements 10 Organizer. If Elements Organizer is not already open, the Photo Downloader dialog box opens. Click Get Photos. Elements Organizer opens and imports the media files. 2 In the Organize workspace, select File > Get Photos and Videos > From Camera or Card Reader. 3 In the Photo Downloader dialog box under Source, choose from the Get Photos From drop-down list to specify where to copy/import the photos from. 4 In the Import Settings area, set the following options: Location Specifies the folder to which images are downloaded. To change the default folder location, click Browse, and then specify a new location. Create Subfolder Creates a subfolder using the naming scheme chosen from the pop-up menu. If you choose Custom Name, type a subfolder name in the box. Rename Files Changes the filenames using the naming scheme selected from the pop-up menu. If you choose Custom Name, type a base filename and a starting number for assigning sequentially numbered filenames to the photos. Note: If the name you entered exists, the copied image filename is appended with "-1" or another appropriately numbered designator. Preserve Current Filename In XMP Select this option to use the current filename as the filename stored in the metadata of the photo. Delete Options Specifies whether to leave the photos on your camera or card, verify and delete the files, or delete the files after they are copied. Photos that you do not import into Adobe Photoshop Elements are not deleted from the camera or card. 5 (Optional) (Windows) To automatically download photos to Photoshop Elements after a device is connected, select Automatic Download. Automatic download options are set in the Camera Or Card Reader preferences. 6 (Optional) For more download options, click the Advanced Dialog button. 7 Click Get Photos. The photos are copied to your hard drive. 8 Click OK in the Files Successfully Copied dialog box. Note: If Elements Organizer is launched while copying the photos, click Yes in the Files Successfully Copied box. Organizing your photos and video clips Use Elements Organizer to manage your files. Elements Organizer enables you to find photos, video files, audio clips, and Adobe PDF documents, even if they're stored in different locations on your computer. Last updated 1/2/2012
-
 1
1 -
2
-
3
-
4
-
5
-
6
-
 7
7 -
 8
8 -
 9
9 -
 10
10 -
 11
11 -
 12
12 -
 13
13 -
 14
14 -
 15
15 -
 16
16 -
 17
17 -
18
-
19
-
20
-
21
-
22
-
23
-
24
-
25
-
26
-
27
-
28
-
29
-
30
-
31
-
32
-
33
-
34
-
35
-
36
-
37
-
38
-
39
-
40
-
41
-
42
-
43
-
44
-
45
-
46
-
47
-
48
-
49
-
50
-
51
-
52
-
53
-
54
-
55
-
56
-
57
-
58
-
59
-
60
-
61
-
62
-
63
-
64
-
65
-
66
-
67
-
68
-
69
-
70
-
71
-
72
-
73
-
74
-
75
-
76
-
77
-
78
-
79
-
80
-
81
-
82
-
83
-
84
-
85
-
86
-
87
-
88
-
89
-
90
-
91
-
92
-
93
-
94
-
95
-
96
-
97
-
98
-
99
-
100
-
101
-
102
-
103
-
104
-
105
-
106
-
107
-
108
-
109
-
110
-
111
-
112
-
113
-
114
-
115
-
116
-
117
-
118
-
119
-
120
-
121
-
122
-
123
-
124
-
125
-
126
-
127
-
128
-
129
-
130
-
131
-
132
-
133
-
134
-
135
-
136
-
137
-
138
-
139
-
140
-
141
-
142
-
143
-
144
-
145
-
146
-
147
-
148
-
149
-
150
-
151
-
152
-
153
-
154
-
155
-
156
-
157
-
158
-
159
-
160
-
161
-
162
-
163
-
164
-
165
-
166
-
167
-
168
-
169
-
170
-
171
-
172
-
173
-
174
-
175
-
176
-
177
-
178
-
179
-
180
-
181
-
182
-
183
-
184
-
185
-
186
-
187
-
188
-
189
-
190
-
191
-
192
-
193
-
194
-
195
-
196
-
197
-
198
-
199
-
200
-
201
-
202
-
203
-
204
-
205
-
206
-
207
-
208
-
209
-
210
-
211
-
212
-
213
-
214
-
215
-
216
-
217
-
218
-
219
-
220
-
221
-
222
-
223
-
224
-
225
-
226
-
227
-
228
-
229
-
230
-
231
-
232
-
233
-
234
-
235
-
236
-
237
-
238
-
239
-
240
-
241
-
242
-
243
-
244
-
245
-
246
-
247
-
248
-
249
-
250
-
251
-
252
-
253
-
254
-
255
-
256
-
257
-
258
-
259
-
260
-
261
-
262
-
263
-
264
-
265
-
266
-
267
-
268
-
269
-
270
-
271
-
272
-
273
-
274
-
275
-
276
-
277
-
278
-
279
-
280
-
281
-
282
-
283
-
284
-
285
-
286
-
287
-
288
-
289
-
290
-
291
-
292
-
293
-
294
-
295
-
296
-
297
-
298
-
299
-
300
-
301
-
302
-
303
-
304
-
305
-
306
-
307
-
308
-
309
-
310
-
311
-
312
-
313
-
314
-
315
-
316
-
317
-
318
-
319
-
320
-
321
-
322
-
323
-
324
-
325
-
326
-
327
-
328
-
329
-
330
-
331
-
332
-
333
-
334
-
335
-
336
-
337
-
338
-
339
-
340
-
341
 |
 |