Adobe 65045315 Photoshop Elements Manual - Page 95
Color and camera raw, Using the histogram and RGB values in camera raw
 |
UPC - 883919176512
View all Adobe 65045315 manuals
Add to My Manuals
Save this manual to your list of manuals |
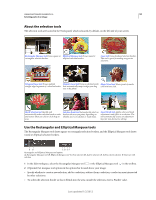
Page 95 highlights
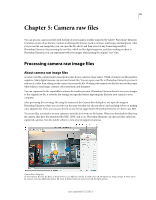
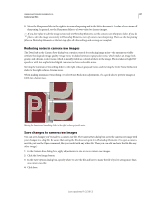
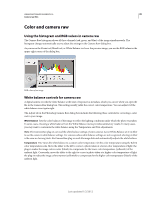
USING PHOTOSHOP ELEMENTS 10 89 Camera raw files Color and camera raw Using the histogram and RGB values in camera raw The Camera Raw histogram shows all three channels (red, green, and blue) of the image simultaneously. The histogram changes automatically as you adjust the settings in the Camera Raw dialog box. As you move the Zoom tool, Hand tool, or White Balance tool over the preview image, you see the RGB values in the upper-right corner of the dialog box. RGB values of an image White balance controls for camera raw A digital camera records the white balance at the time of exposure as metadata, which you can see when you open the file in the Camera Raw dialog box. This setting usually yields the correct color temperature. You can adjust it if the white balance is not quite right. The Adjust tab in the Photoshop Camera Raw dialog box includes the following three controls for correcting a color cast in your image: White Balance Sets the color balance of the image to reflect the lighting conditions under which the photo was taken. In some cases, choosing a white balance from the White Balance menu provides satisfactory results. In many cases, you may want to customize the white balance using the Temperature and Tint adjustments. Note: The Camera Raw plug-in can read the white balance settings of some cameras. Leave White Balance set to As Shot to use the camera's white balance settings. For cameras whose white balance settings are not recognized, selecting As Shot is the same as choosing Auto: the Camera Raw plug-in reads the image data and automatically adjusts the white balance. Temperature Fine-tunes the white balance to a custom color temperature. Set the color temperature using the Kelvin color temperature scale. Move the slider to the left to correct a photo taken at a lower color temperature of light: the plug-in makes the image colors cooler (bluish) to compensate for the lower color temperature (yellowish) of the ambient light. Conversely, move the slider to the right to correct a photo taken at a higher color temperature of light: the plug-in makes the image colors warmer (yellowish) to compensate for the higher color temperature (bluish) of the ambient light. Last updated 1/2/2012
-
 1
1 -
2
-
3
-
4
-
5
-
6
-
7
-
8
-
9
-
10
-
11
-
12
-
13
-
14
-
15
-
16
-
17
-
18
-
19
-
20
-
21
-
22
-
23
-
24
-
25
-
26
-
27
-
28
-
29
-
30
-
31
-
32
-
33
-
34
-
35
-
36
-
37
-
38
-
39
-
40
-
41
-
42
-
43
-
44
-
45
-
46
-
47
-
48
-
49
-
50
-
51
-
52
-
53
-
54
-
55
-
56
-
57
-
58
-
59
-
60
-
61
-
62
-
63
-
64
-
65
-
66
-
67
-
68
-
69
-
70
-
71
-
72
-
73
-
74
-
75
-
76
-
77
-
78
-
79
-
80
-
81
-
82
-
83
-
84
-
85
-
86
-
87
-
88
-
89
-
 90
90 -
 91
91 -
 92
92 -
 93
93 -
 94
94 -
 95
95 -
 96
96 -
 97
97 -
 98
98 -
 99
99 -
 100
100 -
101
-
102
-
103
-
104
-
105
-
106
-
107
-
108
-
109
-
110
-
111
-
112
-
113
-
114
-
115
-
116
-
117
-
118
-
119
-
120
-
121
-
122
-
123
-
124
-
125
-
126
-
127
-
128
-
129
-
130
-
131
-
132
-
133
-
134
-
135
-
136
-
137
-
138
-
139
-
140
-
141
-
142
-
143
-
144
-
145
-
146
-
147
-
148
-
149
-
150
-
151
-
152
-
153
-
154
-
155
-
156
-
157
-
158
-
159
-
160
-
161
-
162
-
163
-
164
-
165
-
166
-
167
-
168
-
169
-
170
-
171
-
172
-
173
-
174
-
175
-
176
-
177
-
178
-
179
-
180
-
181
-
182
-
183
-
184
-
185
-
186
-
187
-
188
-
189
-
190
-
191
-
192
-
193
-
194
-
195
-
196
-
197
-
198
-
199
-
200
-
201
-
202
-
203
-
204
-
205
-
206
-
207
-
208
-
209
-
210
-
211
-
212
-
213
-
214
-
215
-
216
-
217
-
218
-
219
-
220
-
221
-
222
-
223
-
224
-
225
-
226
-
227
-
228
-
229
-
230
-
231
-
232
-
233
-
234
-
235
-
236
-
237
-
238
-
239
-
240
-
241
-
242
-
243
-
244
-
245
-
246
-
247
-
248
-
249
-
250
-
251
-
252
-
253
-
254
-
255
-
256
-
257
-
258
-
259
-
260
-
261
-
262
-
263
-
264
-
265
-
266
-
267
-
268
-
269
-
270
-
271
-
272
-
273
-
274
-
275
-
276
-
277
-
278
-
279
-
280
-
281
-
282
-
283
-
284
-
285
-
286
-
287
-
288
-
289
-
290
-
291
-
292
-
293
-
294
-
295
-
296
-
297
-
298
-
299
-
300
-
301
-
302
-
303
-
304
-
305
-
306
-
307
-
308
-
309
-
310
-
311
-
312
-
313
-
314
-
315
-
316
-
317
-
318
-
319
-
320
-
321
-
322
-
323
-
324
-
325
-
326
-
327
-
328
-
329
-
330
-
331
-
332
-
333
-
334
-
335
-
336
-
337
-
338
-
339
-
340
-
341
 |
 |
