Adobe 65045315 Photoshop Elements Manual - Page 146
Adjustment filters, Apply the Equalize filter, Apply the Gradient Map filter
 |
UPC - 883919176512
View all Adobe 65045315 manuals
Add to My Manuals
Save this manual to your list of manuals |
Page 146 highlights
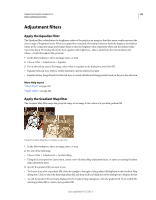
USING PHOTOSHOP ELEMENTS 10 140 Color and tonal correction Adjustment filters Apply the Equalize filter The Equalize filter redistributes the brightness values of the pixels in an image so that they more evenly represent the entire range of brightness levels. When you apply this command, Photoshop Elements finds the brightest and darkest values in the composite image and remaps them so that the brightest value represents white and the darkest value represents black. Photoshop Elements then equalizes the brightness-that is, distributes the intermediate pixel values-evenly throughout the grayscale. 1 In the Edit workspace, select an image, layer, or area. 2 Choose Filter > Adjustments > Equalize. 3 If you selected an area of the image, select what to equalize in the dialog box, and click OK: • Equalize Selected Area Only to evenly distribute only the selection's pixels. • Equalize Entire Image Based On Selected Area to evenly distribute all image pixels based on those in the selection. More Help topics "About filters" on page 200 "Apply a filter" on page 202 Apply the Gradient Map filter The Gradient Map filter maps the grayscale range of an image to the colors of a specified gradient fill. Using the Gradient Map filter to simulate a sepia tone 1 In the Edit workspace, select an image, layer, or area. 2 Do one of the following: • Choose Filter > Adjustments > Gradient Map. • Using the Layers panel or Layer menu, create a new Gradient Map adjustment layer, or open an existing Gradient Map adjustment layer. 3 Specify the gradient fill you want to use: • To choose from a list of gradient fills, click the triangle to the right of the gradient fill displayed in the Gradient Map dialog box. Click to select the desired gradient fill, and then click in a blank area of the dialog box to dismiss the list. • To edit the gradient fill currently displayed in the Gradient Map dialog box, click the gradient fill. Then modify the existing gradient fill or create a new gradient fill. Last updated 1/2/2012
-
 1
1 -
2
-
3
-
4
-
5
-
6
-
7
-
8
-
9
-
10
-
11
-
12
-
13
-
14
-
15
-
16
-
17
-
18
-
19
-
20
-
21
-
22
-
23
-
24
-
25
-
26
-
27
-
28
-
29
-
30
-
31
-
32
-
33
-
34
-
35
-
36
-
37
-
38
-
39
-
40
-
41
-
42
-
43
-
44
-
45
-
46
-
47
-
48
-
49
-
50
-
51
-
52
-
53
-
54
-
55
-
56
-
57
-
58
-
59
-
60
-
61
-
62
-
63
-
64
-
65
-
66
-
67
-
68
-
69
-
70
-
71
-
72
-
73
-
74
-
75
-
76
-
77
-
78
-
79
-
80
-
81
-
82
-
83
-
84
-
85
-
86
-
87
-
88
-
89
-
90
-
91
-
92
-
93
-
94
-
95
-
96
-
97
-
98
-
99
-
100
-
101
-
102
-
103
-
104
-
105
-
106
-
107
-
108
-
109
-
110
-
111
-
112
-
113
-
114
-
115
-
116
-
117
-
118
-
119
-
120
-
121
-
122
-
123
-
124
-
125
-
126
-
127
-
128
-
129
-
130
-
131
-
132
-
133
-
134
-
135
-
136
-
137
-
138
-
139
-
140
-
 141
141 -
 142
142 -
 143
143 -
 144
144 -
 145
145 -
 146
146 -
 147
147 -
 148
148 -
 149
149 -
 150
150 -
 151
151 -
152
-
153
-
154
-
155
-
156
-
157
-
158
-
159
-
160
-
161
-
162
-
163
-
164
-
165
-
166
-
167
-
168
-
169
-
170
-
171
-
172
-
173
-
174
-
175
-
176
-
177
-
178
-
179
-
180
-
181
-
182
-
183
-
184
-
185
-
186
-
187
-
188
-
189
-
190
-
191
-
192
-
193
-
194
-
195
-
196
-
197
-
198
-
199
-
200
-
201
-
202
-
203
-
204
-
205
-
206
-
207
-
208
-
209
-
210
-
211
-
212
-
213
-
214
-
215
-
216
-
217
-
218
-
219
-
220
-
221
-
222
-
223
-
224
-
225
-
226
-
227
-
228
-
229
-
230
-
231
-
232
-
233
-
234
-
235
-
236
-
237
-
238
-
239
-
240
-
241
-
242
-
243
-
244
-
245
-
246
-
247
-
248
-
249
-
250
-
251
-
252
-
253
-
254
-
255
-
256
-
257
-
258
-
259
-
260
-
261
-
262
-
263
-
264
-
265
-
266
-
267
-
268
-
269
-
270
-
271
-
272
-
273
-
274
-
275
-
276
-
277
-
278
-
279
-
280
-
281
-
282
-
283
-
284
-
285
-
286
-
287
-
288
-
289
-
290
-
291
-
292
-
293
-
294
-
295
-
296
-
297
-
298
-
299
-
300
-
301
-
302
-
303
-
304
-
305
-
306
-
307
-
308
-
309
-
310
-
311
-
312
-
313
-
314
-
315
-
316
-
317
-
318
-
319
-
320
-
321
-
322
-
323
-
324
-
325
-
326
-
327
-
328
-
329
-
330
-
331
-
332
-
333
-
334
-
335
-
336
-
337
-
338
-
339
-
340
-
341
 |
 |
