Adobe 65045315 Photoshop Elements Manual - Page 94
Open a camera raw image in the Edit workspace, Settings and controls, Camera raw controls - flash 10
 |
UPC - 883919176512
View all Adobe 65045315 manuals
Add to My Manuals
Save this manual to your list of manuals |
Page 94 highlights
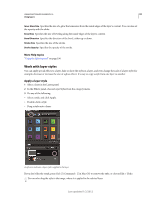
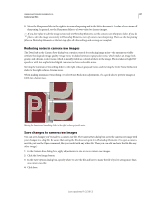
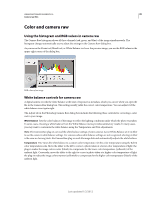
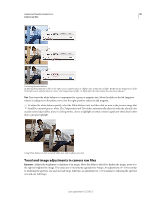
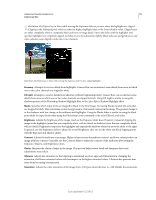
USING PHOTOSHOP ELEMENTS 10 88 Camera raw files Open a camera raw image in the Edit workspace After you process a camera raw image in the Camera Raw dialog box, you can open the image and edit it in the Edit workspace. 1 In the Camera Raw dialog box, apply adjustments to one or more camera raw images. 2 Click the Open Image button. The Camera Raw dialog box closes, and the photo opens in the Edit workspace. Settings and controls Camera raw controls Zoom tool Sets the preview zoom to the next preset zoom value when you click within the preview image. Alt-click (Option-click in Mac OS) to zoom out. Drag the Zoom tool in the preview image to zoom in on a selected area. To return to 100%, double-click the Zoom tool. Hand tool Moves the image in the preview window if the preview image is set at a zoom level higher than 100%. Hold down the spacebar to access the Hand tool while using another tool. Double-click the Hand tool to fit the preview image in the window. White Balance tool Sets the area you click to a neutral gray tone to remove color casts and adjust the color of the entire image. The Temperature and Tint values change to reflect the color adjustment. Crop tool Removes part of an image. Drag the tool within the preview image to select the portion you want to keep, and then press Enter. Straighten tool You can use the Straighten tool to realign an image vertically or horizontally. This tool also resizes or crops the canvas to accommodate straightening the image. Red Eye Removal Removes red eye in flash photos of people and green or white eye in pets. Open Preferences Dialog Opens the Camera Raw Preferences dialog. Rotate buttons Rotates the photo either counterclockwise or clockwise. Set custom camera settings When you open a camera raw file, Photoshop Elements reads information in the file to see which model of camera created it, and then applies the appropriate camera settings to the image. If you are always making similar adjustments, you can change the default settings of your camera. You can also change settings for each model of camera you own, but not for multiple cameras of the same model. 1 In the Edit workspace, open a camera raw file and adjust the image. 2 To save the current settings as the default for the camera that created the image, click the triangle next to the Settings menu and choose Save New Camera Raw Default. 3 To use the Photoshop Elements default settings for your camera, click the triangle next to the Settings menu and choose Reset Camera Raw Default. Last updated 1/2/2012
-
 1
1 -
2
-
3
-
4
-
5
-
6
-
7
-
8
-
9
-
10
-
11
-
12
-
13
-
14
-
15
-
16
-
17
-
18
-
19
-
20
-
21
-
22
-
23
-
24
-
25
-
26
-
27
-
28
-
29
-
30
-
31
-
32
-
33
-
34
-
35
-
36
-
37
-
38
-
39
-
40
-
41
-
42
-
43
-
44
-
45
-
46
-
47
-
48
-
49
-
50
-
51
-
52
-
53
-
54
-
55
-
56
-
57
-
58
-
59
-
60
-
61
-
62
-
63
-
64
-
65
-
66
-
67
-
68
-
69
-
70
-
71
-
72
-
73
-
74
-
75
-
76
-
77
-
78
-
79
-
80
-
81
-
82
-
83
-
84
-
85
-
86
-
87
-
88
-
 89
89 -
 90
90 -
 91
91 -
 92
92 -
 93
93 -
 94
94 -
 95
95 -
 96
96 -
 97
97 -
 98
98 -
 99
99 -
100
-
101
-
102
-
103
-
104
-
105
-
106
-
107
-
108
-
109
-
110
-
111
-
112
-
113
-
114
-
115
-
116
-
117
-
118
-
119
-
120
-
121
-
122
-
123
-
124
-
125
-
126
-
127
-
128
-
129
-
130
-
131
-
132
-
133
-
134
-
135
-
136
-
137
-
138
-
139
-
140
-
141
-
142
-
143
-
144
-
145
-
146
-
147
-
148
-
149
-
150
-
151
-
152
-
153
-
154
-
155
-
156
-
157
-
158
-
159
-
160
-
161
-
162
-
163
-
164
-
165
-
166
-
167
-
168
-
169
-
170
-
171
-
172
-
173
-
174
-
175
-
176
-
177
-
178
-
179
-
180
-
181
-
182
-
183
-
184
-
185
-
186
-
187
-
188
-
189
-
190
-
191
-
192
-
193
-
194
-
195
-
196
-
197
-
198
-
199
-
200
-
201
-
202
-
203
-
204
-
205
-
206
-
207
-
208
-
209
-
210
-
211
-
212
-
213
-
214
-
215
-
216
-
217
-
218
-
219
-
220
-
221
-
222
-
223
-
224
-
225
-
226
-
227
-
228
-
229
-
230
-
231
-
232
-
233
-
234
-
235
-
236
-
237
-
238
-
239
-
240
-
241
-
242
-
243
-
244
-
245
-
246
-
247
-
248
-
249
-
250
-
251
-
252
-
253
-
254
-
255
-
256
-
257
-
258
-
259
-
260
-
261
-
262
-
263
-
264
-
265
-
266
-
267
-
268
-
269
-
270
-
271
-
272
-
273
-
274
-
275
-
276
-
277
-
278
-
279
-
280
-
281
-
282
-
283
-
284
-
285
-
286
-
287
-
288
-
289
-
290
-
291
-
292
-
293
-
294
-
295
-
296
-
297
-
298
-
299
-
300
-
301
-
302
-
303
-
304
-
305
-
306
-
307
-
308
-
309
-
310
-
311
-
312
-
313
-
314
-
315
-
316
-
317
-
318
-
319
-
320
-
321
-
322
-
323
-
324
-
325
-
326
-
327
-
328
-
329
-
330
-
331
-
332
-
333
-
334
-
335
-
336
-
337
-
338
-
339
-
340
-
341
 |
 |
