Adobe 65045315 Photoshop Elements Manual - Page 63
Install actions created in Photoshop, The Line Drawing Guided Edit, Add a Lomo camera effect
 |
UPC - 883919176512
View all Adobe 65045315 manuals
Add to My Manuals
Save this manual to your list of manuals |
Page 63 highlights
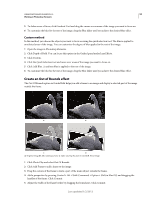
USING PHOTOSHOP ELEMENTS 10 57 Working in Photoshop Elements Install actions created in Photoshop The Action Player in the Automated Actions guided edit can play actions created in Photoshop. Keep in mind that you can only play actions that use features supported in Photoshop Elements. ❖ Copy the .atn file to one of the following locations: Windows XP C:\Documents and Settings\All Users\Application Data\Adobe\Photoshop Elements\10.0\Locale\en_US\Workflow Panels\actions Vista C:\ProgramData\Adobe\Photoshop Elements\10.0\Locale\en_US\Workflow Panels\actions Mac System library/Application Support /Adobe /Photoshop Elements /10.0/Locale/en_US/Workflow Panels/actions The next time you start Photoshop Elements, the action will appear in the Automated Actions guided edit menu. The Line Drawing Guided Edit For more information on the features used in this Guided Edit. See "Precisely convert to black and white" on page 138, "About Levels adjustments" on page 125, "Add Noise" on page 214, and "Adjust saturation and hue" on page 134. Add a Lomo camera effect In Guided Edit, apply the effect of the Lomo camera. 1 Click Photography Effects and select Lomo Camera Effect. 2 Click Cross Process Image. 3 Click Apply Vignette. Each time you click Cross Process Image or Apply Vignette, Photoshop Elements intensifies the last applied effect. At any point, you can click Reset to remove all the applied effects and restore the original image. The Old Fashioned Photo Guided Edit For more information on the features used in this Guided Edit, see "Using the Effects panel" on page 196, "Specify the opacity of a layer" on page 75, and "About Levels adjustments" on page 125. The Saturated Slide Film Effect Guided Edit For more information on saturation adjustment, see "Adjust saturation and hue" on page 134. Depth of Field effect The Depth of Field effect allows you to focus on selected areas of the image by blurring out the rest of the image. Simple method In this method, a copy of the background layer is created and a uniform blur applied to it. Use the gradient tool to select areas that you want to focus on. You can customize the degree of blur applied to the rest of the image. 1 Open the image in Photoshop Elements. 2 Click Depth of Field. You can locate this option in the Guided panel under Lens Effects. 3 Click Simple. 4 Click Blur. A uniform blur appears across the image. Last updated 1/2/2012
-
 1
1 -
2
-
3
-
4
-
5
-
6
-
7
-
8
-
9
-
10
-
11
-
12
-
13
-
14
-
15
-
16
-
17
-
18
-
19
-
20
-
21
-
22
-
23
-
24
-
25
-
26
-
27
-
28
-
29
-
30
-
31
-
32
-
33
-
34
-
35
-
36
-
37
-
38
-
39
-
40
-
41
-
42
-
43
-
44
-
45
-
46
-
47
-
48
-
49
-
50
-
51
-
52
-
53
-
54
-
55
-
56
-
57
-
 58
58 -
 59
59 -
 60
60 -
 61
61 -
 62
62 -
 63
63 -
 64
64 -
 65
65 -
 66
66 -
 67
67 -
 68
68 -
69
-
70
-
71
-
72
-
73
-
74
-
75
-
76
-
77
-
78
-
79
-
80
-
81
-
82
-
83
-
84
-
85
-
86
-
87
-
88
-
89
-
90
-
91
-
92
-
93
-
94
-
95
-
96
-
97
-
98
-
99
-
100
-
101
-
102
-
103
-
104
-
105
-
106
-
107
-
108
-
109
-
110
-
111
-
112
-
113
-
114
-
115
-
116
-
117
-
118
-
119
-
120
-
121
-
122
-
123
-
124
-
125
-
126
-
127
-
128
-
129
-
130
-
131
-
132
-
133
-
134
-
135
-
136
-
137
-
138
-
139
-
140
-
141
-
142
-
143
-
144
-
145
-
146
-
147
-
148
-
149
-
150
-
151
-
152
-
153
-
154
-
155
-
156
-
157
-
158
-
159
-
160
-
161
-
162
-
163
-
164
-
165
-
166
-
167
-
168
-
169
-
170
-
171
-
172
-
173
-
174
-
175
-
176
-
177
-
178
-
179
-
180
-
181
-
182
-
183
-
184
-
185
-
186
-
187
-
188
-
189
-
190
-
191
-
192
-
193
-
194
-
195
-
196
-
197
-
198
-
199
-
200
-
201
-
202
-
203
-
204
-
205
-
206
-
207
-
208
-
209
-
210
-
211
-
212
-
213
-
214
-
215
-
216
-
217
-
218
-
219
-
220
-
221
-
222
-
223
-
224
-
225
-
226
-
227
-
228
-
229
-
230
-
231
-
232
-
233
-
234
-
235
-
236
-
237
-
238
-
239
-
240
-
241
-
242
-
243
-
244
-
245
-
246
-
247
-
248
-
249
-
250
-
251
-
252
-
253
-
254
-
255
-
256
-
257
-
258
-
259
-
260
-
261
-
262
-
263
-
264
-
265
-
266
-
267
-
268
-
269
-
270
-
271
-
272
-
273
-
274
-
275
-
276
-
277
-
278
-
279
-
280
-
281
-
282
-
283
-
284
-
285
-
286
-
287
-
288
-
289
-
290
-
291
-
292
-
293
-
294
-
295
-
296
-
297
-
298
-
299
-
300
-
301
-
302
-
303
-
304
-
305
-
306
-
307
-
308
-
309
-
310
-
311
-
312
-
313
-
314
-
315
-
316
-
317
-
318
-
319
-
320
-
321
-
322
-
323
-
324
-
325
-
326
-
327
-
328
-
329
-
330
-
331
-
332
-
333
-
334
-
335
-
336
-
337
-
338
-
339
-
340
-
341
 |
 |
