Adobe 65045315 Photoshop Elements Manual - Page 65
Split an image into multiple snapshots, Apply the Orton Effect, Create a perfect portrait
 |
UPC - 883919176512
View all Adobe 65045315 manuals
Add to My Manuals
Save this manual to your list of manuals |
Page 65 highlights
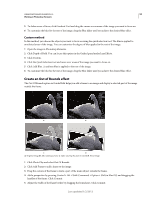
USING PHOTOSHOP ELEMENTS 10 59 Working in Photoshop Elements 6 Using the Quick Selection tool, select the part of the image that should extend outside the frame. 7 Click Create Out Of Bounds. 8 (Optional) Add a shadow. 9 (Optional) Click Add A Gradient. Split an image into multiple snapshots The Picture Stack effect splits an image into multiple snapshots each with its own border. When you switch to the full edit mode after applying the effect, you can move the snapshots around. 1 In the Edit panel, select Guided. 2 In the Photo Play options, select Photo Stack. 3 You can split an image into 4, 8, or 12 snapshots. Click the option that you want to use. 4 (Optional) Click the border width that best suits your requirements. 5 To change the background of the Photo Stack, click Gradient or Solid Color. Gradient The New Layer dialog that opens when you click Gradient provides you with options to add a gradient effect to the background. Solid The New Layer dialog that opens when you click Solid Color provides you with options to add a solid color to the background. Select Use Previous Layer To Create Clipping Mask if you want only the layer below to be affected. A regular adjustment layer affects all layers below it. Apply the Orton Effect The Orton effect provides a dreamy effect to your photographs. 1 In the Edits panel, click Guided. 2 In the Photography Effects section, click Orton Effect. 3 In the Create Orton Effect panel, click Add Orton Effect. 4 Edit the following parameters according to your requirements: Increase Blur Specifies the amount of blur in the out-of-focus layer. Increase Noise Adds noise to the blurred layer. Apply Brightness Increases brightness of the blurred layer. Use the zoom option in the editor to identify how the effect is applied to different areas of the photograph. Create a perfect portrait In Guided Edit, create a perfect portrait by removing blemishes and enhancing various parts of the image with easyto-use tools. 1 Click Advanced Edits and select Perfect Portrait. Last updated 1/2/2012
-
 1
1 -
2
-
3
-
4
-
5
-
6
-
7
-
8
-
9
-
10
-
11
-
12
-
13
-
14
-
15
-
16
-
17
-
18
-
19
-
20
-
21
-
22
-
23
-
24
-
25
-
26
-
27
-
28
-
29
-
30
-
31
-
32
-
33
-
34
-
35
-
36
-
37
-
38
-
39
-
40
-
41
-
42
-
43
-
44
-
45
-
46
-
47
-
48
-
49
-
50
-
51
-
52
-
53
-
54
-
55
-
56
-
57
-
58
-
59
-
 60
60 -
 61
61 -
 62
62 -
 63
63 -
 64
64 -
 65
65 -
 66
66 -
 67
67 -
 68
68 -
 69
69 -
 70
70 -
71
-
72
-
73
-
74
-
75
-
76
-
77
-
78
-
79
-
80
-
81
-
82
-
83
-
84
-
85
-
86
-
87
-
88
-
89
-
90
-
91
-
92
-
93
-
94
-
95
-
96
-
97
-
98
-
99
-
100
-
101
-
102
-
103
-
104
-
105
-
106
-
107
-
108
-
109
-
110
-
111
-
112
-
113
-
114
-
115
-
116
-
117
-
118
-
119
-
120
-
121
-
122
-
123
-
124
-
125
-
126
-
127
-
128
-
129
-
130
-
131
-
132
-
133
-
134
-
135
-
136
-
137
-
138
-
139
-
140
-
141
-
142
-
143
-
144
-
145
-
146
-
147
-
148
-
149
-
150
-
151
-
152
-
153
-
154
-
155
-
156
-
157
-
158
-
159
-
160
-
161
-
162
-
163
-
164
-
165
-
166
-
167
-
168
-
169
-
170
-
171
-
172
-
173
-
174
-
175
-
176
-
177
-
178
-
179
-
180
-
181
-
182
-
183
-
184
-
185
-
186
-
187
-
188
-
189
-
190
-
191
-
192
-
193
-
194
-
195
-
196
-
197
-
198
-
199
-
200
-
201
-
202
-
203
-
204
-
205
-
206
-
207
-
208
-
209
-
210
-
211
-
212
-
213
-
214
-
215
-
216
-
217
-
218
-
219
-
220
-
221
-
222
-
223
-
224
-
225
-
226
-
227
-
228
-
229
-
230
-
231
-
232
-
233
-
234
-
235
-
236
-
237
-
238
-
239
-
240
-
241
-
242
-
243
-
244
-
245
-
246
-
247
-
248
-
249
-
250
-
251
-
252
-
253
-
254
-
255
-
256
-
257
-
258
-
259
-
260
-
261
-
262
-
263
-
264
-
265
-
266
-
267
-
268
-
269
-
270
-
271
-
272
-
273
-
274
-
275
-
276
-
277
-
278
-
279
-
280
-
281
-
282
-
283
-
284
-
285
-
286
-
287
-
288
-
289
-
290
-
291
-
292
-
293
-
294
-
295
-
296
-
297
-
298
-
299
-
300
-
301
-
302
-
303
-
304
-
305
-
306
-
307
-
308
-
309
-
310
-
311
-
312
-
313
-
314
-
315
-
316
-
317
-
318
-
319
-
320
-
321
-
322
-
323
-
324
-
325
-
326
-
327
-
328
-
329
-
330
-
331
-
332
-
333
-
334
-
335
-
336
-
337
-
338
-
339
-
340
-
341
 |
 |
