Adobe 65045315 Photoshop Elements Manual - Page 208
Apply a filter, can use Add Noise, Chalk & Charcoal, Clouds, Conté Crayon, Difference Clouds
 |
UPC - 883919176512
View all Adobe 65045315 manuals
Add to My Manuals
Save this manual to your list of manuals |
Page 208 highlights
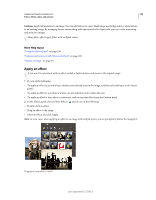
USING PHOTOSHOP ELEMENTS 10 202 Filters, effects, styles, and artwork • Apply filters in succession to build up effects. You can apply filters to individual layers or to several layers in succession to build up an effect. Choosing different blending modes in the Layers panel blends the effect. For a filter to affect a layer, the layer must be visible and must contain pixels. • Create textures and backgrounds. By applying filters to solid-color or grayscale images, you can generate a variety of backgrounds and textures. You can then blur these textures. Although some filters (for example, the Glass filter) have little or no visible effect when applied to solid colors, others produce interesting effects. For such colors, you can use Add Noise, Chalk & Charcoal, Clouds, Conté Crayon, Difference Clouds, Glass, Graphic Pen, Halftone Pattern, Mezzotint, Note Paper, Pointillize, Reticulation, Rough Pastels, Sponge, or Underpainting. You can also use any of the filters in the Texture submenu. • Improve image quality and consistency. You can disguise faults, alter or enhance images, or make a series of images look similar by applying the same filter to each. More Help topics "Using the Effects panel" on page 196 "Improve performance with filters and effects" on page 205 Apply a filter 1 Choose the area you want to apply the filter to: • To apply a filter to an entire layer, deselect any selected areas, and then select the layer in the Layers panel. • To apply a filter to a portion of a layer, use any selection tool to select an area. 2 Choose how to apply the filter: • To use the Filter gallery, choose Filter > Filter Gallery, select a category, and click the filter you want to apply. • To use the Effects panel, choose Window > Effects, select a category, and double-click the filter you want to apply. You can also drag a filter to the image. • To use the Filter menu, choose Filter, then choose a submenu followed by the filter you want to apply. If a filter name is followed by ellipses (...), a Filter Options dialog box appears. 3 If a dialog box appears, enter values or select options. 4 If available, select the Preview option to preview the filter in the document window. Depending on the filter and how you are applying it, use one of the following methods to preview the filter: • Use the + button or - button under the preview window to zoom in or zoom out. • Click the zoom bar (where the zoom percentage appears) to choose a zoom percentage. • Click-drag within the preview window to center a specific area of the image in the window. • Click the Show/Hide button at the top of the dialog box to hide the filter thumbnails. Hiding the thumbnails expands the preview area. • Click the eye icon next to a filter to hide the effect in the preview image. 5 If the dialog box contains sliders, hold down Alt (Option in Mac OS) while dragging a slider to see a real-time preview (real-time rendering). 6 Click in the image window to center a specific area of the image in the preview window. (This may not work with all preview windows.) Note: A blinking line beneath the preview size indicates that the preview is being rendered. Last updated 1/2/2012
-
 1
1 -
2
-
3
-
4
-
5
-
6
-
7
-
8
-
9
-
10
-
11
-
12
-
13
-
14
-
15
-
16
-
17
-
18
-
19
-
20
-
21
-
22
-
23
-
24
-
25
-
26
-
27
-
28
-
29
-
30
-
31
-
32
-
33
-
34
-
35
-
36
-
37
-
38
-
39
-
40
-
41
-
42
-
43
-
44
-
45
-
46
-
47
-
48
-
49
-
50
-
51
-
52
-
53
-
54
-
55
-
56
-
57
-
58
-
59
-
60
-
61
-
62
-
63
-
64
-
65
-
66
-
67
-
68
-
69
-
70
-
71
-
72
-
73
-
74
-
75
-
76
-
77
-
78
-
79
-
80
-
81
-
82
-
83
-
84
-
85
-
86
-
87
-
88
-
89
-
90
-
91
-
92
-
93
-
94
-
95
-
96
-
97
-
98
-
99
-
100
-
101
-
102
-
103
-
104
-
105
-
106
-
107
-
108
-
109
-
110
-
111
-
112
-
113
-
114
-
115
-
116
-
117
-
118
-
119
-
120
-
121
-
122
-
123
-
124
-
125
-
126
-
127
-
128
-
129
-
130
-
131
-
132
-
133
-
134
-
135
-
136
-
137
-
138
-
139
-
140
-
141
-
142
-
143
-
144
-
145
-
146
-
147
-
148
-
149
-
150
-
151
-
152
-
153
-
154
-
155
-
156
-
157
-
158
-
159
-
160
-
161
-
162
-
163
-
164
-
165
-
166
-
167
-
168
-
169
-
170
-
171
-
172
-
173
-
174
-
175
-
176
-
177
-
178
-
179
-
180
-
181
-
182
-
183
-
184
-
185
-
186
-
187
-
188
-
189
-
190
-
191
-
192
-
193
-
194
-
195
-
196
-
197
-
198
-
199
-
200
-
201
-
202
-
 203
203 -
 204
204 -
 205
205 -
 206
206 -
 207
207 -
 208
208 -
 209
209 -
 210
210 -
 211
211 -
 212
212 -
 213
213 -
214
-
215
-
216
-
217
-
218
-
219
-
220
-
221
-
222
-
223
-
224
-
225
-
226
-
227
-
228
-
229
-
230
-
231
-
232
-
233
-
234
-
235
-
236
-
237
-
238
-
239
-
240
-
241
-
242
-
243
-
244
-
245
-
246
-
247
-
248
-
249
-
250
-
251
-
252
-
253
-
254
-
255
-
256
-
257
-
258
-
259
-
260
-
261
-
262
-
263
-
264
-
265
-
266
-
267
-
268
-
269
-
270
-
271
-
272
-
273
-
274
-
275
-
276
-
277
-
278
-
279
-
280
-
281
-
282
-
283
-
284
-
285
-
286
-
287
-
288
-
289
-
290
-
291
-
292
-
293
-
294
-
295
-
296
-
297
-
298
-
299
-
300
-
301
-
302
-
303
-
304
-
305
-
306
-
307
-
308
-
309
-
310
-
311
-
312
-
313
-
314
-
315
-
316
-
317
-
318
-
319
-
320
-
321
-
322
-
323
-
324
-
325
-
326
-
327
-
328
-
329
-
330
-
331
-
332
-
333
-
334
-
335
-
336
-
337
-
338
-
339
-
340
-
341
 |
 |
