Adobe 65045315 Photoshop Elements Manual - Page 124
Automatically correct lighting and color, About histograms, Auto Smart Fix, Auto Levels, Auto Contrast
 |
UPC - 883919176512
View all Adobe 65045315 manuals
Add to My Manuals
Save this manual to your list of manuals |
Page 124 highlights
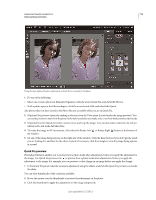
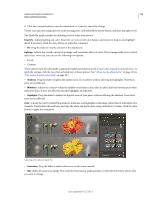
USING PHOTOSHOP ELEMENTS 10 118 Color and tonal correction Automatically correct lighting and color Photoshop Elements provides several automatic lighting and color-correction commands in both Full Edit and Quick Fix. The command you choose depends on the needs of your image. You can experiment with each of the auto commands. If you don't like the result of one, undo the command by choosing Edit > Undo, and try another command. You will rarely need to use more than one auto command to fix an image. 1 To adjust a specific image area, select it with one of the selection tools. If no selection is made, the adjustment applies to the entire image. 2 Choose one of the following commands from the Enhance menu: Auto Smart Fix Corrects overall color balance and improves shadow and highlight detail, if necessary. Auto Levels Adjusts the overall contrast of an image and may affect its color. If your image needs more contrast, and it has a color cast, try this command. Auto Levels works by individually mapping the lightest and darkest pixels in each color channel to black and white. Auto Contrast Adjusts the overall contrast of an image without affecting its color. Use when your image needs more contrast, but the colors look right. Auto Contrast maps the lightest and darkest pixels in the image to white and black, which makes highlights appear lighter and shadows appear darker. Auto Color Correction Adjusts the contrast and color by identifying shadows, midtones, and highlights in the image, rather than in individual color channels. It neutralizes the midtones and sets the white and black points using a default set of values. Auto Sharpen Adjusts the sharpness of the image by clarifying the edges and adding detail that tonal adjustments may reduce. Auto Red Eye Fix Automatically detects and repairs red eye in an image. More Help topics "Precisely remove red eye" on page 155 "Replace colors in an image" on page 160 "Sharpen an image" on page 172 About histograms You can use the histogram to analyze the image's tonal distribution to see if you need to correct it. A histogram shows the distribution of an image's pixel values in a bar chart. The left side of the chart shows the values of the image shadow (starting at level 0), and the right side shows the highlight (level 255). The vertical axis of the chart represents the total number of pixels within a given level. You can view an image's histogram in the Histogram panel. Histograms are also available in the Levels dialog box and the Camera Raw dialog box. You can update the histogram as you work so that you can see how your adjustments are affecting the tonal range. When the Cached Data Warning icon appears, click it to refresh the histogram's data. Last updated 1/2/2012
-
 1
1 -
2
-
3
-
4
-
5
-
6
-
7
-
8
-
9
-
10
-
11
-
12
-
13
-
14
-
15
-
16
-
17
-
18
-
19
-
20
-
21
-
22
-
23
-
24
-
25
-
26
-
27
-
28
-
29
-
30
-
31
-
32
-
33
-
34
-
35
-
36
-
37
-
38
-
39
-
40
-
41
-
42
-
43
-
44
-
45
-
46
-
47
-
48
-
49
-
50
-
51
-
52
-
53
-
54
-
55
-
56
-
57
-
58
-
59
-
60
-
61
-
62
-
63
-
64
-
65
-
66
-
67
-
68
-
69
-
70
-
71
-
72
-
73
-
74
-
75
-
76
-
77
-
78
-
79
-
80
-
81
-
82
-
83
-
84
-
85
-
86
-
87
-
88
-
89
-
90
-
91
-
92
-
93
-
94
-
95
-
96
-
97
-
98
-
99
-
100
-
101
-
102
-
103
-
104
-
105
-
106
-
107
-
108
-
109
-
110
-
111
-
112
-
113
-
114
-
115
-
116
-
117
-
118
-
 119
119 -
 120
120 -
 121
121 -
 122
122 -
 123
123 -
 124
124 -
 125
125 -
 126
126 -
 127
127 -
 128
128 -
 129
129 -
130
-
131
-
132
-
133
-
134
-
135
-
136
-
137
-
138
-
139
-
140
-
141
-
142
-
143
-
144
-
145
-
146
-
147
-
148
-
149
-
150
-
151
-
152
-
153
-
154
-
155
-
156
-
157
-
158
-
159
-
160
-
161
-
162
-
163
-
164
-
165
-
166
-
167
-
168
-
169
-
170
-
171
-
172
-
173
-
174
-
175
-
176
-
177
-
178
-
179
-
180
-
181
-
182
-
183
-
184
-
185
-
186
-
187
-
188
-
189
-
190
-
191
-
192
-
193
-
194
-
195
-
196
-
197
-
198
-
199
-
200
-
201
-
202
-
203
-
204
-
205
-
206
-
207
-
208
-
209
-
210
-
211
-
212
-
213
-
214
-
215
-
216
-
217
-
218
-
219
-
220
-
221
-
222
-
223
-
224
-
225
-
226
-
227
-
228
-
229
-
230
-
231
-
232
-
233
-
234
-
235
-
236
-
237
-
238
-
239
-
240
-
241
-
242
-
243
-
244
-
245
-
246
-
247
-
248
-
249
-
250
-
251
-
252
-
253
-
254
-
255
-
256
-
257
-
258
-
259
-
260
-
261
-
262
-
263
-
264
-
265
-
266
-
267
-
268
-
269
-
270
-
271
-
272
-
273
-
274
-
275
-
276
-
277
-
278
-
279
-
280
-
281
-
282
-
283
-
284
-
285
-
286
-
287
-
288
-
289
-
290
-
291
-
292
-
293
-
294
-
295
-
296
-
297
-
298
-
299
-
300
-
301
-
302
-
303
-
304
-
305
-
306
-
307
-
308
-
309
-
310
-
311
-
312
-
313
-
314
-
315
-
316
-
317
-
318
-
319
-
320
-
321
-
322
-
323
-
324
-
325
-
326
-
327
-
328
-
329
-
330
-
331
-
332
-
333
-
334
-
335
-
336
-
337
-
338
-
339
-
340
-
341
 |
 |
