Adobe 65045315 Photoshop Elements Manual - Page 93
Reducing noise in camera raw images, Save changes to camera raw images, Click the Save Image button.
 |
UPC - 883919176512
View all Adobe 65045315 manuals
Add to My Manuals
Save this manual to your list of manuals |
Page 93 highlights
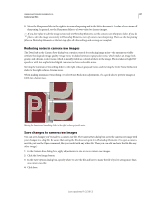
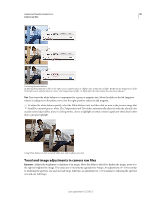
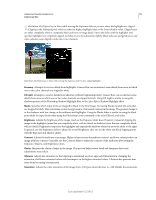
USING PHOTOSHOP ELEMENTS 10 87 Camera raw files 3 Move the Sharpness slider to the right to increase sharpening and to the left to decrease it. A value of zero turns off sharpening. In general, set the Sharpness slider to a lower value for cleaner images. If you don't plan to edit the image extensively in Photoshop Elements, use the camera raw Sharpness slider. If you do plan to edit the image extensively in Photoshop Elements, turn off camera raw sharpening. Then use the sharpening filters in Photoshop Elements as the last step after all other editing and resizing are complete. Reducing noise in camera raw images The Detail tab in the Camera Raw dialog box contains controls for reducing image noise-the extraneous visible artifacts that degrade image quality. Image noise includes luminance (grayscale) noise, which makes an image look grainy, and chroma (color) noise, which is usually visible as colored artifacts in the image. Photos taken at high ISO speeds or with less sophisticated digital cameras can have noticeable noise. Moving the Luminance Smoothing slider to the right reduces grayscale noise, and moving the Color Noise Reduction slider to the right reduces chroma noise. When making Luminance Smoothing or Color Noise Reduction adjustments, it's a good idea to preview images at 100% for a better view. Moving the Luminance Smoothing slider to the right reduces grayscale noise. Save changes to camera raw images You can save changes you've made to a camera raw file. The Camera Raw dialog box saves the camera raw image with your changes in a .dng file. Be aware that saving the file does not open it in Photoshop Elements. (To open a camera raw file, just use the Open command, like you would with any other file. Then you can edit and save the file like any other image.) 1 In the Camera Raw dialog box, apply adjustments to one or more camera raw images. 2 Click the Save Image button. 3 In the Save Options dialog box, specify where to save the file and how to name the file if you're saving more than one camera raw file. 4 Click Save. Last updated 1/2/2012
-
 1
1 -
2
-
3
-
4
-
5
-
6
-
7
-
8
-
9
-
10
-
11
-
12
-
13
-
14
-
15
-
16
-
17
-
18
-
19
-
20
-
21
-
22
-
23
-
24
-
25
-
26
-
27
-
28
-
29
-
30
-
31
-
32
-
33
-
34
-
35
-
36
-
37
-
38
-
39
-
40
-
41
-
42
-
43
-
44
-
45
-
46
-
47
-
48
-
49
-
50
-
51
-
52
-
53
-
54
-
55
-
56
-
57
-
58
-
59
-
60
-
61
-
62
-
63
-
64
-
65
-
66
-
67
-
68
-
69
-
70
-
71
-
72
-
73
-
74
-
75
-
76
-
77
-
78
-
79
-
80
-
81
-
82
-
83
-
84
-
85
-
86
-
87
-
 88
88 -
 89
89 -
 90
90 -
 91
91 -
 92
92 -
 93
93 -
 94
94 -
 95
95 -
 96
96 -
 97
97 -
 98
98 -
99
-
100
-
101
-
102
-
103
-
104
-
105
-
106
-
107
-
108
-
109
-
110
-
111
-
112
-
113
-
114
-
115
-
116
-
117
-
118
-
119
-
120
-
121
-
122
-
123
-
124
-
125
-
126
-
127
-
128
-
129
-
130
-
131
-
132
-
133
-
134
-
135
-
136
-
137
-
138
-
139
-
140
-
141
-
142
-
143
-
144
-
145
-
146
-
147
-
148
-
149
-
150
-
151
-
152
-
153
-
154
-
155
-
156
-
157
-
158
-
159
-
160
-
161
-
162
-
163
-
164
-
165
-
166
-
167
-
168
-
169
-
170
-
171
-
172
-
173
-
174
-
175
-
176
-
177
-
178
-
179
-
180
-
181
-
182
-
183
-
184
-
185
-
186
-
187
-
188
-
189
-
190
-
191
-
192
-
193
-
194
-
195
-
196
-
197
-
198
-
199
-
200
-
201
-
202
-
203
-
204
-
205
-
206
-
207
-
208
-
209
-
210
-
211
-
212
-
213
-
214
-
215
-
216
-
217
-
218
-
219
-
220
-
221
-
222
-
223
-
224
-
225
-
226
-
227
-
228
-
229
-
230
-
231
-
232
-
233
-
234
-
235
-
236
-
237
-
238
-
239
-
240
-
241
-
242
-
243
-
244
-
245
-
246
-
247
-
248
-
249
-
250
-
251
-
252
-
253
-
254
-
255
-
256
-
257
-
258
-
259
-
260
-
261
-
262
-
263
-
264
-
265
-
266
-
267
-
268
-
269
-
270
-
271
-
272
-
273
-
274
-
275
-
276
-
277
-
278
-
279
-
280
-
281
-
282
-
283
-
284
-
285
-
286
-
287
-
288
-
289
-
290
-
291
-
292
-
293
-
294
-
295
-
296
-
297
-
298
-
299
-
300
-
301
-
302
-
303
-
304
-
305
-
306
-
307
-
308
-
309
-
310
-
311
-
312
-
313
-
314
-
315
-
316
-
317
-
318
-
319
-
320
-
321
-
322
-
323
-
324
-
325
-
326
-
327
-
328
-
329
-
330
-
331
-
332
-
333
-
334
-
335
-
336
-
337
-
338
-
339
-
340
-
341
 |
 |
