Adobe 65045315 Photoshop Elements Manual - Page 156
Automatically straighten an image, Divide a scanned image containing multiple photos
 |
UPC - 883919176512
View all Adobe 65045315 manuals
Add to My Manuals
Save this manual to your list of manuals |
Page 156 highlights
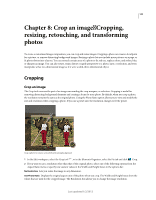
USING PHOTOSHOP ELEMENTS 10 150 Crop an image Cropping, resizing, retouching, and transforming photos Crop To Remove Background Crops the image to remove any blank background area that becomes visible after straightening. Some pixels will be clipped. Crop To Original Size Keeps the canvas the same size as the original image. The straightened image will include areas of blank background and some pixels will be clipped. Straightening and cropping to remove the background 3 To straighten the image, do one of the following: • To align horizontally, draw a line in the image to represent the new straight horizontal edge. • To align vertically, click the starting point, hold down Ctrl (Command in Mac OS), and drag to represent the new straight vertical line. Automatically straighten an image • To automatically straighten the image and leave the canvas around the image, choose Image > Rotate > Straighten Image. The straightened image will contain areas of blank background, but no pixels are clipped. • To automatically straighten and crop the image, choose Image > Rotate > Straighten And Crop Image. The straightened image will not contain areas of blank background, but some pixels will be clipped. Divide a scanned image containing multiple photos If you scanned several pictures at once on a flatbed scanner, you can automatically divide and straighten the scanned image into its component photos. The photos must have a clear separation between them. Separating images scanned from one page into three separate images ❖ In the Edit workspace, choose Image > Divide Scanned Photos. Photoshop Elements automatically divides the image and places each photo in a separate file. For images with white around the border (images of light skies, snow, and so on), this command works best if you cover the image on the scanner with a piece of dark paper. Last updated 1/2/2012
-
 1
1 -
2
-
3
-
4
-
5
-
6
-
7
-
8
-
9
-
10
-
11
-
12
-
13
-
14
-
15
-
16
-
17
-
18
-
19
-
20
-
21
-
22
-
23
-
24
-
25
-
26
-
27
-
28
-
29
-
30
-
31
-
32
-
33
-
34
-
35
-
36
-
37
-
38
-
39
-
40
-
41
-
42
-
43
-
44
-
45
-
46
-
47
-
48
-
49
-
50
-
51
-
52
-
53
-
54
-
55
-
56
-
57
-
58
-
59
-
60
-
61
-
62
-
63
-
64
-
65
-
66
-
67
-
68
-
69
-
70
-
71
-
72
-
73
-
74
-
75
-
76
-
77
-
78
-
79
-
80
-
81
-
82
-
83
-
84
-
85
-
86
-
87
-
88
-
89
-
90
-
91
-
92
-
93
-
94
-
95
-
96
-
97
-
98
-
99
-
100
-
101
-
102
-
103
-
104
-
105
-
106
-
107
-
108
-
109
-
110
-
111
-
112
-
113
-
114
-
115
-
116
-
117
-
118
-
119
-
120
-
121
-
122
-
123
-
124
-
125
-
126
-
127
-
128
-
129
-
130
-
131
-
132
-
133
-
134
-
135
-
136
-
137
-
138
-
139
-
140
-
141
-
142
-
143
-
144
-
145
-
146
-
147
-
148
-
149
-
150
-
 151
151 -
 152
152 -
 153
153 -
 154
154 -
 155
155 -
 156
156 -
 157
157 -
 158
158 -
 159
159 -
 160
160 -
 161
161 -
162
-
163
-
164
-
165
-
166
-
167
-
168
-
169
-
170
-
171
-
172
-
173
-
174
-
175
-
176
-
177
-
178
-
179
-
180
-
181
-
182
-
183
-
184
-
185
-
186
-
187
-
188
-
189
-
190
-
191
-
192
-
193
-
194
-
195
-
196
-
197
-
198
-
199
-
200
-
201
-
202
-
203
-
204
-
205
-
206
-
207
-
208
-
209
-
210
-
211
-
212
-
213
-
214
-
215
-
216
-
217
-
218
-
219
-
220
-
221
-
222
-
223
-
224
-
225
-
226
-
227
-
228
-
229
-
230
-
231
-
232
-
233
-
234
-
235
-
236
-
237
-
238
-
239
-
240
-
241
-
242
-
243
-
244
-
245
-
246
-
247
-
248
-
249
-
250
-
251
-
252
-
253
-
254
-
255
-
256
-
257
-
258
-
259
-
260
-
261
-
262
-
263
-
264
-
265
-
266
-
267
-
268
-
269
-
270
-
271
-
272
-
273
-
274
-
275
-
276
-
277
-
278
-
279
-
280
-
281
-
282
-
283
-
284
-
285
-
286
-
287
-
288
-
289
-
290
-
291
-
292
-
293
-
294
-
295
-
296
-
297
-
298
-
299
-
300
-
301
-
302
-
303
-
304
-
305
-
306
-
307
-
308
-
309
-
310
-
311
-
312
-
313
-
314
-
315
-
316
-
317
-
318
-
319
-
320
-
321
-
322
-
323
-
324
-
325
-
326
-
327
-
328
-
329
-
330
-
331
-
332
-
333
-
334
-
335
-
336
-
337
-
338
-
339
-
340
-
341
 |
 |
