Adobe 65045315 Photoshop Elements Manual - Page 190
Create a Photomerge panorama interactively, The Photomerge dialog box for interactive layouts
 |
UPC - 883919176512
View all Adobe 65045315 manuals
Add to My Manuals
Save this manual to your list of manuals |
Page 190 highlights
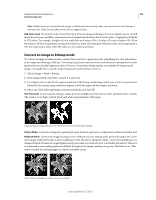
USING PHOTOSHOP ELEMENTS 10 184 Crop an image Cropping, resizing, retouching, and transforming photos Create a Photomerge panorama interactively Generally, the automatic options in the Photomerge dialog box create satisfactory panoramas. If these options don't produce the results you want, select the Interactive Layout option. The Photomerge dialog box for interactive layouts lets you manually rearrange your source images. 1 Choose the Interactive Layout option in the main Photomerge dialog box to open the Photomerge interactive dialog box. 2 Do any of the following: • Select Reposition Only and Snap To Image to preserve the alignment at overlapping image areas. Photoshop Elements applies blending to even out differences of exposure between the source images. • Select Perspective and Photoshop Elements selects one of the source images to supply a vanishing point. It also stretches or skews the other images to create a wraparound effect. Use the Vanishing Point tool to change the vanishing point and reorient the perspective. 3 Drag the images to the work area and manually arrange them. 4 After arrange the composition, click OK to generate the panorama as a new file. The composition then opens in Photoshop Elements. The Photomerge dialog box for interactive layouts The Photomerge dialog box contains tools for manipulating the composition, a lightbox for storing source images that are not in use, a work area for assembling the composition, and options for viewing and editing the composition. You can also zoom in and out to better see the alignment of each file. A B C D E Photomerge interactive layout dialog box. A. Lightbox B. Tools C. Work area D. Selected image E. Status bar • To navigate, select the Move View tool and drag within the work area. Or, drag the view area (the red box) or the scroll bar of the navigator. Last updated 1/2/2012
-
 1
1 -
2
-
3
-
4
-
5
-
6
-
7
-
8
-
9
-
10
-
11
-
12
-
13
-
14
-
15
-
16
-
17
-
18
-
19
-
20
-
21
-
22
-
23
-
24
-
25
-
26
-
27
-
28
-
29
-
30
-
31
-
32
-
33
-
34
-
35
-
36
-
37
-
38
-
39
-
40
-
41
-
42
-
43
-
44
-
45
-
46
-
47
-
48
-
49
-
50
-
51
-
52
-
53
-
54
-
55
-
56
-
57
-
58
-
59
-
60
-
61
-
62
-
63
-
64
-
65
-
66
-
67
-
68
-
69
-
70
-
71
-
72
-
73
-
74
-
75
-
76
-
77
-
78
-
79
-
80
-
81
-
82
-
83
-
84
-
85
-
86
-
87
-
88
-
89
-
90
-
91
-
92
-
93
-
94
-
95
-
96
-
97
-
98
-
99
-
100
-
101
-
102
-
103
-
104
-
105
-
106
-
107
-
108
-
109
-
110
-
111
-
112
-
113
-
114
-
115
-
116
-
117
-
118
-
119
-
120
-
121
-
122
-
123
-
124
-
125
-
126
-
127
-
128
-
129
-
130
-
131
-
132
-
133
-
134
-
135
-
136
-
137
-
138
-
139
-
140
-
141
-
142
-
143
-
144
-
145
-
146
-
147
-
148
-
149
-
150
-
151
-
152
-
153
-
154
-
155
-
156
-
157
-
158
-
159
-
160
-
161
-
162
-
163
-
164
-
165
-
166
-
167
-
168
-
169
-
170
-
171
-
172
-
173
-
174
-
175
-
176
-
177
-
178
-
179
-
180
-
181
-
182
-
183
-
184
-
 185
185 -
 186
186 -
 187
187 -
 188
188 -
 189
189 -
 190
190 -
 191
191 -
 192
192 -
 193
193 -
 194
194 -
 195
195 -
196
-
197
-
198
-
199
-
200
-
201
-
202
-
203
-
204
-
205
-
206
-
207
-
208
-
209
-
210
-
211
-
212
-
213
-
214
-
215
-
216
-
217
-
218
-
219
-
220
-
221
-
222
-
223
-
224
-
225
-
226
-
227
-
228
-
229
-
230
-
231
-
232
-
233
-
234
-
235
-
236
-
237
-
238
-
239
-
240
-
241
-
242
-
243
-
244
-
245
-
246
-
247
-
248
-
249
-
250
-
251
-
252
-
253
-
254
-
255
-
256
-
257
-
258
-
259
-
260
-
261
-
262
-
263
-
264
-
265
-
266
-
267
-
268
-
269
-
270
-
271
-
272
-
273
-
274
-
275
-
276
-
277
-
278
-
279
-
280
-
281
-
282
-
283
-
284
-
285
-
286
-
287
-
288
-
289
-
290
-
291
-
292
-
293
-
294
-
295
-
296
-
297
-
298
-
299
-
300
-
301
-
302
-
303
-
304
-
305
-
306
-
307
-
308
-
309
-
310
-
311
-
312
-
313
-
314
-
315
-
316
-
317
-
318
-
319
-
320
-
321
-
322
-
323
-
324
-
325
-
326
-
327
-
328
-
329
-
330
-
331
-
332
-
333
-
334
-
335
-
336
-
337
-
338
-
339
-
340
-
341
 |
 |
