Adobe 65045315 Photoshop Elements Manual - Page 169
Use Photomerge Group Shot, Show Strokes, Show Regions, Advanced Options, Alignment Tool
 |
UPC - 883919176512
View all Adobe 65045315 manuals
Add to My Manuals
Save this manual to your list of manuals |
Page 169 highlights
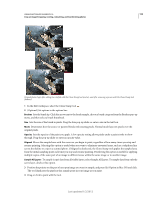
USING PHOTOSHOP ELEMENTS 10 163 Crop an image Cropping, resizing, retouching, and transforming photos More Help topics "The Fix Keystone Distortion Guided Edit" on page 56 "Adjust color curves" on page 133 "Improve shadow and highlight detail" on page 126 Use Photomerge Group Shot For a video about photomerge features, see www.adobe.com/go/lrvid2342_pse9_en. Use Photomerge Group Shot to create the perfect group photo from multiple photos. Note: For best results, pick the multiple images used to create a Photomerge Group Shot from the same photo session. 1 Do one of the following to select the group photos you want to use as source images for the Photomerge Group Shot: • In Elements Organizer, select the photos. • In the Edit workspace, open the photos. 2 Choose File > New > Photomerge Group Shot. 3 Select the best group photo, and drag it from the Project Bin to the Final window. 4 Click other photos in the Project Bin (color coded to help you keep track). Use the Pencil tool to mark over the areas that you want to merge into the final photo. To fine-tune the final image, use the Pencil tool to add additional content, or the Eraser tool to remove content. 5 Set any of the following: Show Strokes Click this option to show the Pencil strokes you marked in the source image. Show Regions Click this option to reveal the selected regions in the final image. Advanced Options Expand or collapse this arrow for Advanced Options. Alignment Tool To correct the alignment of multiple photos, click the Alignment Tool, place three markers in the source image and three markers in the final image, then click Align Photos. Note: Photomerge Group Shot uses auto alignment. Use the Alignment Tool only if the automatic alignment didn't produce the expected result. Pixel Blending Click this option to blend pixels. 6 Click Reset to start the process over, Done to complete the Photomerge Group Shot, or Cancel to close Photomerge Group Shot. Last updated 1/2/2012
-
 1
1 -
2
-
3
-
4
-
5
-
6
-
7
-
8
-
9
-
10
-
11
-
12
-
13
-
14
-
15
-
16
-
17
-
18
-
19
-
20
-
21
-
22
-
23
-
24
-
25
-
26
-
27
-
28
-
29
-
30
-
31
-
32
-
33
-
34
-
35
-
36
-
37
-
38
-
39
-
40
-
41
-
42
-
43
-
44
-
45
-
46
-
47
-
48
-
49
-
50
-
51
-
52
-
53
-
54
-
55
-
56
-
57
-
58
-
59
-
60
-
61
-
62
-
63
-
64
-
65
-
66
-
67
-
68
-
69
-
70
-
71
-
72
-
73
-
74
-
75
-
76
-
77
-
78
-
79
-
80
-
81
-
82
-
83
-
84
-
85
-
86
-
87
-
88
-
89
-
90
-
91
-
92
-
93
-
94
-
95
-
96
-
97
-
98
-
99
-
100
-
101
-
102
-
103
-
104
-
105
-
106
-
107
-
108
-
109
-
110
-
111
-
112
-
113
-
114
-
115
-
116
-
117
-
118
-
119
-
120
-
121
-
122
-
123
-
124
-
125
-
126
-
127
-
128
-
129
-
130
-
131
-
132
-
133
-
134
-
135
-
136
-
137
-
138
-
139
-
140
-
141
-
142
-
143
-
144
-
145
-
146
-
147
-
148
-
149
-
150
-
151
-
152
-
153
-
154
-
155
-
156
-
157
-
158
-
159
-
160
-
161
-
162
-
163
-
 164
164 -
 165
165 -
 166
166 -
 167
167 -
 168
168 -
 169
169 -
 170
170 -
 171
171 -
 172
172 -
 173
173 -
 174
174 -
175
-
176
-
177
-
178
-
179
-
180
-
181
-
182
-
183
-
184
-
185
-
186
-
187
-
188
-
189
-
190
-
191
-
192
-
193
-
194
-
195
-
196
-
197
-
198
-
199
-
200
-
201
-
202
-
203
-
204
-
205
-
206
-
207
-
208
-
209
-
210
-
211
-
212
-
213
-
214
-
215
-
216
-
217
-
218
-
219
-
220
-
221
-
222
-
223
-
224
-
225
-
226
-
227
-
228
-
229
-
230
-
231
-
232
-
233
-
234
-
235
-
236
-
237
-
238
-
239
-
240
-
241
-
242
-
243
-
244
-
245
-
246
-
247
-
248
-
249
-
250
-
251
-
252
-
253
-
254
-
255
-
256
-
257
-
258
-
259
-
260
-
261
-
262
-
263
-
264
-
265
-
266
-
267
-
268
-
269
-
270
-
271
-
272
-
273
-
274
-
275
-
276
-
277
-
278
-
279
-
280
-
281
-
282
-
283
-
284
-
285
-
286
-
287
-
288
-
289
-
290
-
291
-
292
-
293
-
294
-
295
-
296
-
297
-
298
-
299
-
300
-
301
-
302
-
303
-
304
-
305
-
306
-
307
-
308
-
309
-
310
-
311
-
312
-
313
-
314
-
315
-
316
-
317
-
318
-
319
-
320
-
321
-
322
-
323
-
324
-
325
-
326
-
327
-
328
-
329
-
330
-
331
-
332
-
333
-
334
-
335
-
336
-
337
-
338
-
339
-
340
-
341
 |
 |
