Adobe 65045315 Photoshop Elements Manual - Page 51
Using the Navigator panel, Open multiple windows of the same image, View and arrange multiple windows
 |
UPC - 883919176512
View all Adobe 65045315 manuals
Add to My Manuals
Save this manual to your list of manuals |
Page 51 highlights
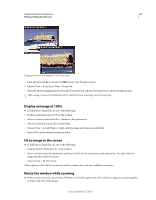
USING PHOTOSHOP ELEMENTS 10 45 Working in Photoshop Elements When Resize Windows To Fit is deselected, the window maintains a constant size regardless of the image's magnification. This can be helpful when you are using smaller monitors or working with tiled images. Note: To automatically resize the window when using keyboard shortcuts to reduce or magnify an image view, in the Edit workspace, choose Edit > Preferences > General, and then select the Zoom Resizes Windows preference and click OK. Using the Navigator panel The Navigator panel lets you adjust the image's magnification and area of view. Typing a value in the text box, clicking the Zoom Out or Zoom In button, or dragging the zoom slider changes the magnification. Drag the view box in the image thumbnail to move the view of an image. The view box represents the boundaries of the image window. You can also click in the thumbnail of the image to designate the area of view. Note: To change the color of the view box, choose Panel Options from the Navigator panel menu. Choose a color from the Color menu or click the color swatch to open the Color Picker and select a custom color. Click OK. A BC D E The Navigator panel A. Zoom text box B. Zoom Out C. Drag the view box to move the view D. Zoom slider E. Zoom In More Help topics "Fit an image to the screen" on page 44 Open multiple windows of the same image In Full Edit, you can open multiple windows to display different views of the same file. A list of open windows appears in the Window menu, and thumbnails of each open image appear in the Photo Bin. Available memory may limit the number of windows per image. ❖ Choose View > New Window For [image filename]. Depending on the position of the first window, you may have to move the second window to view both simultaneously. You can use the New Window command when you're working with a zoomed image to see what the image will look like at 100% size in a separate window. View and arrange multiple windows ❖ In Full Edit, do one of the following: • To display windows stacked and cascading from the upper left to the lower right of the screen, choose Window > Images > Cascade. • To display windows edge-to-edge, choose Window > Images > Tile. As you close images, the open windows are resized to fill the available space. • To view all open images at the same magnification as the active image, choose Window > Images > Match Zoom. • To view the same section (upper-left corner, center, lower-right corner, and so on) of all open photos, choose Window > Images > Match Location. The view in all windows shifts to match the active (frontmost) image. The zoom level does not change. Last updated 1/2/2012
-
 1
1 -
2
-
3
-
4
-
5
-
6
-
7
-
8
-
9
-
10
-
11
-
12
-
13
-
14
-
15
-
16
-
17
-
18
-
19
-
20
-
21
-
22
-
23
-
24
-
25
-
26
-
27
-
28
-
29
-
30
-
31
-
32
-
33
-
34
-
35
-
36
-
37
-
38
-
39
-
40
-
41
-
42
-
43
-
44
-
45
-
 46
46 -
 47
47 -
 48
48 -
 49
49 -
 50
50 -
 51
51 -
 52
52 -
 53
53 -
 54
54 -
 55
55 -
 56
56 -
57
-
58
-
59
-
60
-
61
-
62
-
63
-
64
-
65
-
66
-
67
-
68
-
69
-
70
-
71
-
72
-
73
-
74
-
75
-
76
-
77
-
78
-
79
-
80
-
81
-
82
-
83
-
84
-
85
-
86
-
87
-
88
-
89
-
90
-
91
-
92
-
93
-
94
-
95
-
96
-
97
-
98
-
99
-
100
-
101
-
102
-
103
-
104
-
105
-
106
-
107
-
108
-
109
-
110
-
111
-
112
-
113
-
114
-
115
-
116
-
117
-
118
-
119
-
120
-
121
-
122
-
123
-
124
-
125
-
126
-
127
-
128
-
129
-
130
-
131
-
132
-
133
-
134
-
135
-
136
-
137
-
138
-
139
-
140
-
141
-
142
-
143
-
144
-
145
-
146
-
147
-
148
-
149
-
150
-
151
-
152
-
153
-
154
-
155
-
156
-
157
-
158
-
159
-
160
-
161
-
162
-
163
-
164
-
165
-
166
-
167
-
168
-
169
-
170
-
171
-
172
-
173
-
174
-
175
-
176
-
177
-
178
-
179
-
180
-
181
-
182
-
183
-
184
-
185
-
186
-
187
-
188
-
189
-
190
-
191
-
192
-
193
-
194
-
195
-
196
-
197
-
198
-
199
-
200
-
201
-
202
-
203
-
204
-
205
-
206
-
207
-
208
-
209
-
210
-
211
-
212
-
213
-
214
-
215
-
216
-
217
-
218
-
219
-
220
-
221
-
222
-
223
-
224
-
225
-
226
-
227
-
228
-
229
-
230
-
231
-
232
-
233
-
234
-
235
-
236
-
237
-
238
-
239
-
240
-
241
-
242
-
243
-
244
-
245
-
246
-
247
-
248
-
249
-
250
-
251
-
252
-
253
-
254
-
255
-
256
-
257
-
258
-
259
-
260
-
261
-
262
-
263
-
264
-
265
-
266
-
267
-
268
-
269
-
270
-
271
-
272
-
273
-
274
-
275
-
276
-
277
-
278
-
279
-
280
-
281
-
282
-
283
-
284
-
285
-
286
-
287
-
288
-
289
-
290
-
291
-
292
-
293
-
294
-
295
-
296
-
297
-
298
-
299
-
300
-
301
-
302
-
303
-
304
-
305
-
306
-
307
-
308
-
309
-
310
-
311
-
312
-
313
-
314
-
315
-
316
-
317
-
318
-
319
-
320
-
321
-
322
-
323
-
324
-
325
-
326
-
327
-
328
-
329
-
330
-
331
-
332
-
333
-
334
-
335
-
336
-
337
-
338
-
339
-
340
-
341
 |
 |
