Adobe 65045315 Photoshop Elements Manual - Page 86
Layer masks, About layer masks, Add a layer mask to an image, Clipping masks
 |
UPC - 883919176512
View all Adobe 65045315 manuals
Add to My Manuals
Save this manual to your list of manuals |
Page 86 highlights
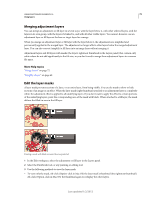
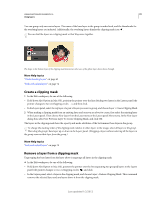
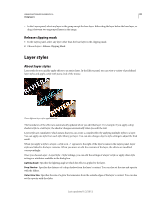
USING PHOTOSHOP ELEMENTS 10 80 Using layers • To view the mask in a red masking color, hold down Alt+Shift (Option+Shift in Mac OS) and click the layer mask's thumbnail (the rightmost thumbnail). Hold down Alt+Shift (Option+Shift in Mac OS) and click the thumbnail again to turn off the red display. • To constrain editing to part of the mask, select the corresponding pixels. 4 Edit the layer mask: • To remove areas of the adjustment effect or fill, paint the layer mask with black. • To add areas to the adjustment effect or fill, paint the layer mask with white. • To partially remove the adjustment effect or fill so that it shows in various levels of transparency, paint the layer mask with gray. (Single-click the foreground color swatch in the toolbox to choose a gray shade from the Swatches panel.) The extent to which the effect or fill is removed depends on the tones of gray you use to paint. Darker shades result in more transparency; lighter shades in more opacity. Shift-click the mask thumbnail (the layer's rightmost thumbnail) in the Layers panel to turn off the mask; click the thumbnail again to turn on the mask. More Help topics "About selections" on page 93 Layer masks About layer masks Layer masks are resolution-dependent bitmap images that are edited with the painting or selection tools. A layer mask controls the visibility of the layer to which it is added. You can edit a layer mask to add or subtract from the masked region without losing the layer pixels. A layer mask is a grayscale image, so areas you paint in black are hidden, areas you paint in white are visible, and areas you paint in shades of gray appear in various levels of transparency. You can use the paint brush or the eraser to paint over the mask. Add a layer mask to an image ❖ To add a layer mask, select the part of the image that you want to show and click the Add Layer Mask button in the Layers panel. Note: A mask thumbnail linked with the layer thumbnail is added. This thumbnail represents the grayscale channel that is created when you add the layer mask. Clipping masks About layer clipping masks A clipping mask is a group of layers to which a mask is applied. The bottommost layer, or base layer, defines the visible boundaries of the entire group. For example, suppose you have a shape in the base layer, a photograph in the layer above it, and text in the topmost layer. If the photograph and text appear only through the shape outline in the base layer, they also take on the opacity of the base layer. Last updated 1/2/2012
-
 1
1 -
2
-
3
-
4
-
5
-
6
-
7
-
8
-
9
-
10
-
11
-
12
-
13
-
14
-
15
-
16
-
17
-
18
-
19
-
20
-
21
-
22
-
23
-
24
-
25
-
26
-
27
-
28
-
29
-
30
-
31
-
32
-
33
-
34
-
35
-
36
-
37
-
38
-
39
-
40
-
41
-
42
-
43
-
44
-
45
-
46
-
47
-
48
-
49
-
50
-
51
-
52
-
53
-
54
-
55
-
56
-
57
-
58
-
59
-
60
-
61
-
62
-
63
-
64
-
65
-
66
-
67
-
68
-
69
-
70
-
71
-
72
-
73
-
74
-
75
-
76
-
77
-
78
-
79
-
80
-
 81
81 -
 82
82 -
 83
83 -
 84
84 -
 85
85 -
 86
86 -
 87
87 -
 88
88 -
 89
89 -
 90
90 -
 91
91 -
92
-
93
-
94
-
95
-
96
-
97
-
98
-
99
-
100
-
101
-
102
-
103
-
104
-
105
-
106
-
107
-
108
-
109
-
110
-
111
-
112
-
113
-
114
-
115
-
116
-
117
-
118
-
119
-
120
-
121
-
122
-
123
-
124
-
125
-
126
-
127
-
128
-
129
-
130
-
131
-
132
-
133
-
134
-
135
-
136
-
137
-
138
-
139
-
140
-
141
-
142
-
143
-
144
-
145
-
146
-
147
-
148
-
149
-
150
-
151
-
152
-
153
-
154
-
155
-
156
-
157
-
158
-
159
-
160
-
161
-
162
-
163
-
164
-
165
-
166
-
167
-
168
-
169
-
170
-
171
-
172
-
173
-
174
-
175
-
176
-
177
-
178
-
179
-
180
-
181
-
182
-
183
-
184
-
185
-
186
-
187
-
188
-
189
-
190
-
191
-
192
-
193
-
194
-
195
-
196
-
197
-
198
-
199
-
200
-
201
-
202
-
203
-
204
-
205
-
206
-
207
-
208
-
209
-
210
-
211
-
212
-
213
-
214
-
215
-
216
-
217
-
218
-
219
-
220
-
221
-
222
-
223
-
224
-
225
-
226
-
227
-
228
-
229
-
230
-
231
-
232
-
233
-
234
-
235
-
236
-
237
-
238
-
239
-
240
-
241
-
242
-
243
-
244
-
245
-
246
-
247
-
248
-
249
-
250
-
251
-
252
-
253
-
254
-
255
-
256
-
257
-
258
-
259
-
260
-
261
-
262
-
263
-
264
-
265
-
266
-
267
-
268
-
269
-
270
-
271
-
272
-
273
-
274
-
275
-
276
-
277
-
278
-
279
-
280
-
281
-
282
-
283
-
284
-
285
-
286
-
287
-
288
-
289
-
290
-
291
-
292
-
293
-
294
-
295
-
296
-
297
-
298
-
299
-
300
-
301
-
302
-
303
-
304
-
305
-
306
-
307
-
308
-
309
-
310
-
311
-
312
-
313
-
314
-
315
-
316
-
317
-
318
-
319
-
320
-
321
-
322
-
323
-
324
-
325
-
326
-
327
-
328
-
329
-
330
-
331
-
332
-
333
-
334
-
335
-
336
-
337
-
338
-
339
-
340
-
341
 |
 |
