Adobe 65045315 Photoshop Elements Manual - Page 252
Fill a layer with a color or pattern, Stroke (outline) objects on a layer, Contiguous, All Layers
 |
UPC - 883919176512
View all Adobe 65045315 manuals
Add to My Manuals
Save this manual to your list of manuals |
Page 252 highlights
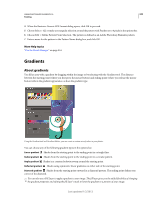
USING PHOTOSHOP ELEMENTS 10 246 Painting Contiguous Fills similarly colored pixels that are next to each other. Deselect this option to fill all similar pixels in the image, including those that aren't touching. The Tolerance option defines how similar the colors must be. All Layers Fills similar pixels on any visible layer that are within the levels set by the Tolerance and Contiguous options. More Help topics "About foreground and background colors" on page 227 "About blending modes" on page 227 "Smooth the edges of a selection by anti-aliasing" on page 106 "Create fill layers" on page 78 Fill a layer with a color or pattern You can use a Fill Layer to apply a fill or a pattern to your image, instead of using one of the brush tools. The fill layer gives you the added flexibility of changing the fill and pattern properties and editing the fill layer's mask to limit the gradient to a portion of your image. 1 In the Edit workspace, specify a foreground or background color. 2 Select the area you want to fill. To fill an entire layer, select the layer in the Layers panel. 3 Choose Edit > Fill Layer. 4 Set options in the Fill dialog box, and then click OK. Contents Choose a color from the Use menu. To select a different color, choose Color, and then select a color from the Color Picker. Choose Pattern to fill with a pattern. Custom Pattern Specifies the pattern to use if you choose Pattern from the Use menu. You can use patterns from the pattern libraries or create your own patterns. Mode Specifies how the color pattern that you apply blends with the existing pixels in the image. Opacity Sets the opacity of the color pattern to apply. Preserve Transparency Fills only opaque pixels. More Help topics "About patterns" on page 247 "About blending modes" on page 227 "About foreground and background colors" on page 227 "Create fill layers" on page 78 Stroke (outline) objects on a layer You can use the Stroke command to automatically trace a colored outline around a selection or the content of a layer. Note: To add an outline to the background, you must first convert it to a regular layer. The background contains no transparent pixels, so the entire layer is outlined. 1 In the Edit workspace, select the area in the image or a layer in the Layers panel. 2 Choose Edit > Stroke (Outline) Selection. Last updated 1/2/2012
-
 1
1 -
2
-
3
-
4
-
5
-
6
-
7
-
8
-
9
-
10
-
11
-
12
-
13
-
14
-
15
-
16
-
17
-
18
-
19
-
20
-
21
-
22
-
23
-
24
-
25
-
26
-
27
-
28
-
29
-
30
-
31
-
32
-
33
-
34
-
35
-
36
-
37
-
38
-
39
-
40
-
41
-
42
-
43
-
44
-
45
-
46
-
47
-
48
-
49
-
50
-
51
-
52
-
53
-
54
-
55
-
56
-
57
-
58
-
59
-
60
-
61
-
62
-
63
-
64
-
65
-
66
-
67
-
68
-
69
-
70
-
71
-
72
-
73
-
74
-
75
-
76
-
77
-
78
-
79
-
80
-
81
-
82
-
83
-
84
-
85
-
86
-
87
-
88
-
89
-
90
-
91
-
92
-
93
-
94
-
95
-
96
-
97
-
98
-
99
-
100
-
101
-
102
-
103
-
104
-
105
-
106
-
107
-
108
-
109
-
110
-
111
-
112
-
113
-
114
-
115
-
116
-
117
-
118
-
119
-
120
-
121
-
122
-
123
-
124
-
125
-
126
-
127
-
128
-
129
-
130
-
131
-
132
-
133
-
134
-
135
-
136
-
137
-
138
-
139
-
140
-
141
-
142
-
143
-
144
-
145
-
146
-
147
-
148
-
149
-
150
-
151
-
152
-
153
-
154
-
155
-
156
-
157
-
158
-
159
-
160
-
161
-
162
-
163
-
164
-
165
-
166
-
167
-
168
-
169
-
170
-
171
-
172
-
173
-
174
-
175
-
176
-
177
-
178
-
179
-
180
-
181
-
182
-
183
-
184
-
185
-
186
-
187
-
188
-
189
-
190
-
191
-
192
-
193
-
194
-
195
-
196
-
197
-
198
-
199
-
200
-
201
-
202
-
203
-
204
-
205
-
206
-
207
-
208
-
209
-
210
-
211
-
212
-
213
-
214
-
215
-
216
-
217
-
218
-
219
-
220
-
221
-
222
-
223
-
224
-
225
-
226
-
227
-
228
-
229
-
230
-
231
-
232
-
233
-
234
-
235
-
236
-
237
-
238
-
239
-
240
-
241
-
242
-
243
-
244
-
245
-
246
-
 247
247 -
 248
248 -
 249
249 -
 250
250 -
 251
251 -
 252
252 -
 253
253 -
 254
254 -
 255
255 -
 256
256 -
 257
257 -
258
-
259
-
260
-
261
-
262
-
263
-
264
-
265
-
266
-
267
-
268
-
269
-
270
-
271
-
272
-
273
-
274
-
275
-
276
-
277
-
278
-
279
-
280
-
281
-
282
-
283
-
284
-
285
-
286
-
287
-
288
-
289
-
290
-
291
-
292
-
293
-
294
-
295
-
296
-
297
-
298
-
299
-
300
-
301
-
302
-
303
-
304
-
305
-
306
-
307
-
308
-
309
-
310
-
311
-
312
-
313
-
314
-
315
-
316
-
317
-
318
-
319
-
320
-
321
-
322
-
323
-
324
-
325
-
326
-
327
-
328
-
329
-
330
-
331
-
332
-
333
-
334
-
335
-
336
-
337
-
338
-
339
-
340
-
341
 |
 |
