Adobe 65045315 Photoshop Elements Manual - Page 132
Improve shadow and highlight detail, Lighten Shadows, Darken Highlights, Midtone Contrast
 |
UPC - 883919176512
View all Adobe 65045315 manuals
Add to My Manuals
Save this manual to your list of manuals |
Page 132 highlights
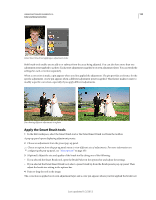
USING PHOTOSHOP ELEMENTS 10 126 Color and tonal correction A B C D Levels dialog box A. Channels to adjust color B. Shadow values C. Middle tones D. Highlight values You can do any of the following with the Levels dialog box: • Set the shadow and highlight values to make sure that your image uses the full tonal range. • Adjust the brightness of the image's middle tones without affecting the shadow and highlight values. • Fix a color cast by making grays neutral. You can also enhance an image by adding a slight color cast, for example, by adding a warming effect on a sunset. • Target shadow and highlight RGB values if you are preparing images for commercial printing. When you work with Levels, you can work directly on the image pixels or through an adjustment layer. Adjustment layers give you flexibility in the following ways: • You can modify an adjustment at any time by double-clicking the adjustment layer to reopen the Levels dialog box. • You can reduce the effect of an adjustment by lowering the adjustment layer's opacity in the Layers panel. • You can stack adjustment layers to make multiple adjustments without degrading the image because of too many successive adjustments. • You can use the adjustment layer's layer mask to confine an adjustment to a portion of your image. More Help topics "About adjustment and fill layers" on page 76 "The Adjust Levels Guided Edit" on page 55 Improve shadow and highlight detail 1 In the Edit workspace, choose Enhance > Adjust Lighting > Shadow/Highlights. 2 Drag any of the adjustment sliders or enter values in the text boxes, then click OK. Lighten Shadows Brightens the dark areas of your photo and reveals more of the shadow detail that was captured in your image. Darken Highlights Darkens the light areas of your photo and reveals more of the highlight detail that was captured in your image. Pure white areas of your photo don't have any detail and aren't affected by this adjustment. Midtone Contrast Adds or reduces the contrast of the middle tones. Use this slider if the image contrast doesn't look right after you've adjusted shadows and highlights. To reset the image to how it looked when you opened the dialog box, hold down Alt (Option in Mac OS) and click the Reset button. Last updated 1/2/2012
-
 1
1 -
2
-
3
-
4
-
5
-
6
-
7
-
8
-
9
-
10
-
11
-
12
-
13
-
14
-
15
-
16
-
17
-
18
-
19
-
20
-
21
-
22
-
23
-
24
-
25
-
26
-
27
-
28
-
29
-
30
-
31
-
32
-
33
-
34
-
35
-
36
-
37
-
38
-
39
-
40
-
41
-
42
-
43
-
44
-
45
-
46
-
47
-
48
-
49
-
50
-
51
-
52
-
53
-
54
-
55
-
56
-
57
-
58
-
59
-
60
-
61
-
62
-
63
-
64
-
65
-
66
-
67
-
68
-
69
-
70
-
71
-
72
-
73
-
74
-
75
-
76
-
77
-
78
-
79
-
80
-
81
-
82
-
83
-
84
-
85
-
86
-
87
-
88
-
89
-
90
-
91
-
92
-
93
-
94
-
95
-
96
-
97
-
98
-
99
-
100
-
101
-
102
-
103
-
104
-
105
-
106
-
107
-
108
-
109
-
110
-
111
-
112
-
113
-
114
-
115
-
116
-
117
-
118
-
119
-
120
-
121
-
122
-
123
-
124
-
125
-
126
-
 127
127 -
 128
128 -
 129
129 -
 130
130 -
 131
131 -
 132
132 -
 133
133 -
 134
134 -
 135
135 -
 136
136 -
 137
137 -
138
-
139
-
140
-
141
-
142
-
143
-
144
-
145
-
146
-
147
-
148
-
149
-
150
-
151
-
152
-
153
-
154
-
155
-
156
-
157
-
158
-
159
-
160
-
161
-
162
-
163
-
164
-
165
-
166
-
167
-
168
-
169
-
170
-
171
-
172
-
173
-
174
-
175
-
176
-
177
-
178
-
179
-
180
-
181
-
182
-
183
-
184
-
185
-
186
-
187
-
188
-
189
-
190
-
191
-
192
-
193
-
194
-
195
-
196
-
197
-
198
-
199
-
200
-
201
-
202
-
203
-
204
-
205
-
206
-
207
-
208
-
209
-
210
-
211
-
212
-
213
-
214
-
215
-
216
-
217
-
218
-
219
-
220
-
221
-
222
-
223
-
224
-
225
-
226
-
227
-
228
-
229
-
230
-
231
-
232
-
233
-
234
-
235
-
236
-
237
-
238
-
239
-
240
-
241
-
242
-
243
-
244
-
245
-
246
-
247
-
248
-
249
-
250
-
251
-
252
-
253
-
254
-
255
-
256
-
257
-
258
-
259
-
260
-
261
-
262
-
263
-
264
-
265
-
266
-
267
-
268
-
269
-
270
-
271
-
272
-
273
-
274
-
275
-
276
-
277
-
278
-
279
-
280
-
281
-
282
-
283
-
284
-
285
-
286
-
287
-
288
-
289
-
290
-
291
-
292
-
293
-
294
-
295
-
296
-
297
-
298
-
299
-
300
-
301
-
302
-
303
-
304
-
305
-
306
-
307
-
308
-
309
-
310
-
311
-
312
-
313
-
314
-
315
-
316
-
317
-
318
-
319
-
320
-
321
-
322
-
323
-
324
-
325
-
326
-
327
-
328
-
329
-
330
-
331
-
332
-
333
-
334
-
335
-
336
-
337
-
338
-
339
-
340
-
341
 |
 |
