Adobe 65045315 Photoshop Elements Manual - Page 85
Merging adjustment layers, Edit the layer masks, of the underlying layers
 |
UPC - 883919176512
View all Adobe 65045315 manuals
Add to My Manuals
Save this manual to your list of manuals |
Page 85 highlights
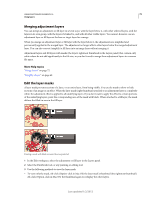
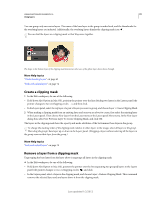
USING PHOTOSHOP ELEMENTS 10 79 Using layers Merging adjustment layers You can merge an adjustment or fill layer in several ways: with the layer below it, with other selected layers, with the layers in its own group, with the layers it's linked to, and with all other visible layers. You cannot, however, use an adjustment layer or fill layer as the base or target layer for a merge. When you merge an adjustment layer or fill layer with the layer below it, the adjustments are simplified and permanently applied to the merged layer. The adjustment no longer affects other layers below the merged adjustment layer. You can also convert (simplify) a fill layer into an image layer without merging it. Adjustment layers and fill layers with masks (the layer's rightmost thumbnail in the Layers panel) that contain only white values do not add significantly to the file size, so you don't need to merge these adjustment layers to conserve file space. More Help topics "Merge layers" on page 72 "Simplify a layer" on page 68 Edit the layer masks A layer mask prevents sections of a layer, or an entire layer, from being visible. You use the mask to show or hide sections of an image or an effect. When the layer mask (right thumbnail) attached to an adjustment layer is completely white, the adjustment effect is applied to all underlying layers. If you don't want to apply the effect to certain portions of the underlying layers, paint the corresponding area of the mask with black. When attached to a fill layer, the mask defines the filled-in area in the fill layer. Painting a mask with black increases the area protected. 1 In the Edit workspace, select the adjustment or fill layer in the Layers panel. 2 Select the Paintbrush tool, or any painting or editing tool. 3 Use the following methods to view the layer mask: • To view only the mask, Alt-click (Option-click in Mac OS) the layer mask's thumbnail (the rightmost thumbnail). Alt-click (Option-click in Mac OS) the thumbnail again to redisplay the other layers. Last updated 1/2/2012
-
 1
1 -
2
-
3
-
4
-
5
-
6
-
7
-
8
-
9
-
10
-
11
-
12
-
13
-
14
-
15
-
16
-
17
-
18
-
19
-
20
-
21
-
22
-
23
-
24
-
25
-
26
-
27
-
28
-
29
-
30
-
31
-
32
-
33
-
34
-
35
-
36
-
37
-
38
-
39
-
40
-
41
-
42
-
43
-
44
-
45
-
46
-
47
-
48
-
49
-
50
-
51
-
52
-
53
-
54
-
55
-
56
-
57
-
58
-
59
-
60
-
61
-
62
-
63
-
64
-
65
-
66
-
67
-
68
-
69
-
70
-
71
-
72
-
73
-
74
-
75
-
76
-
77
-
78
-
79
-
 80
80 -
 81
81 -
 82
82 -
 83
83 -
 84
84 -
 85
85 -
 86
86 -
 87
87 -
 88
88 -
 89
89 -
 90
90 -
91
-
92
-
93
-
94
-
95
-
96
-
97
-
98
-
99
-
100
-
101
-
102
-
103
-
104
-
105
-
106
-
107
-
108
-
109
-
110
-
111
-
112
-
113
-
114
-
115
-
116
-
117
-
118
-
119
-
120
-
121
-
122
-
123
-
124
-
125
-
126
-
127
-
128
-
129
-
130
-
131
-
132
-
133
-
134
-
135
-
136
-
137
-
138
-
139
-
140
-
141
-
142
-
143
-
144
-
145
-
146
-
147
-
148
-
149
-
150
-
151
-
152
-
153
-
154
-
155
-
156
-
157
-
158
-
159
-
160
-
161
-
162
-
163
-
164
-
165
-
166
-
167
-
168
-
169
-
170
-
171
-
172
-
173
-
174
-
175
-
176
-
177
-
178
-
179
-
180
-
181
-
182
-
183
-
184
-
185
-
186
-
187
-
188
-
189
-
190
-
191
-
192
-
193
-
194
-
195
-
196
-
197
-
198
-
199
-
200
-
201
-
202
-
203
-
204
-
205
-
206
-
207
-
208
-
209
-
210
-
211
-
212
-
213
-
214
-
215
-
216
-
217
-
218
-
219
-
220
-
221
-
222
-
223
-
224
-
225
-
226
-
227
-
228
-
229
-
230
-
231
-
232
-
233
-
234
-
235
-
236
-
237
-
238
-
239
-
240
-
241
-
242
-
243
-
244
-
245
-
246
-
247
-
248
-
249
-
250
-
251
-
252
-
253
-
254
-
255
-
256
-
257
-
258
-
259
-
260
-
261
-
262
-
263
-
264
-
265
-
266
-
267
-
268
-
269
-
270
-
271
-
272
-
273
-
274
-
275
-
276
-
277
-
278
-
279
-
280
-
281
-
282
-
283
-
284
-
285
-
286
-
287
-
288
-
289
-
290
-
291
-
292
-
293
-
294
-
295
-
296
-
297
-
298
-
299
-
300
-
301
-
302
-
303
-
304
-
305
-
306
-
307
-
308
-
309
-
310
-
311
-
312
-
313
-
314
-
315
-
316
-
317
-
318
-
319
-
320
-
321
-
322
-
323
-
324
-
325
-
326
-
327
-
328
-
329
-
330
-
331
-
332
-
333
-
334
-
335
-
336
-
337
-
338
-
339
-
340
-
341
 |
 |
