Adobe 65045315 Photoshop Elements Manual - Page 91
Camera raw files, Processing camera raw image files
 |
UPC - 883919176512
View all Adobe 65045315 manuals
Add to My Manuals
Save this manual to your list of manuals |
Page 91 highlights
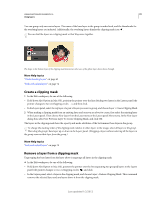
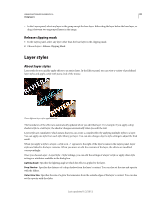
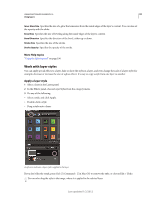
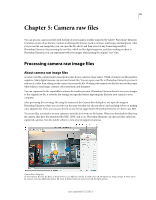
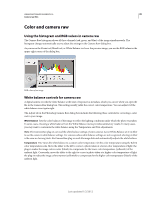
85 Chapter 5: Camera raw files You can process camera raw files with the help of preset camera profiles supported by Adobe® Photoshop® Elements 10 and set certain values that are common to all image file formats (such as contrast, tonal range, and sharpness). After you process the raw image files, you can open the file, edit it, and then save it in any format supported by Photoshop Elements. By processing the raw files, which are like digital negatives, and then working on them in Photoshop Elements, you can experiment with your images while keeping the original "raw" files. Processing camera raw image files About camera raw image files A camera raw file contains unprocessed picture data from a camera's image sensor. Think of camera raw files as photo negatives. Many digital cameras can save raw format files. You can open a raw file in Photoshop Elements, process it, and save it, rather than relying on the camera to process the file. Working with camera raw files lets you set the proper white balance, tonal range, contrast, color saturation, and sharpness. You can reprocess the file repeatedly to achieve the results you want. Photoshop Elements doesn't save your changes to the original raw file; it saves the last settings you specified before importing the file from your camera to your computer. After processing the raw image file using the features of the Camera Raw dialog box, you open the image in Photoshop Elements, where you can edit it in the same way that you edit any photo, such as fixing red eye or making color adjustments. Then, you can save the file in any format supported by Photoshop Elements. It's best to use PSD. To use raw files, you need to set your camera to save files in its own raw file format. When you download the files from the camera, they have file extensions like NEF, CRW, and so on. Photoshop Elements can open raw files only from supported cameras. Visit the Adobe website to view a list of supported cameras. Camera Raw dialog box A. View options B. Click the Basic or Detail tab to access different controls C. RGB values D. Histogram E. Image settings F. More menu G. Camera and some EXIF information H. Tools I. Rotate buttons J. Zoom levels K. Bit depth options Last updated 1/2/2012
-
 1
1 -
2
-
3
-
4
-
5
-
6
-
7
-
8
-
9
-
10
-
11
-
12
-
13
-
14
-
15
-
16
-
17
-
18
-
19
-
20
-
21
-
22
-
23
-
24
-
25
-
26
-
27
-
28
-
29
-
30
-
31
-
32
-
33
-
34
-
35
-
36
-
37
-
38
-
39
-
40
-
41
-
42
-
43
-
44
-
45
-
46
-
47
-
48
-
49
-
50
-
51
-
52
-
53
-
54
-
55
-
56
-
57
-
58
-
59
-
60
-
61
-
62
-
63
-
64
-
65
-
66
-
67
-
68
-
69
-
70
-
71
-
72
-
73
-
74
-
75
-
76
-
77
-
78
-
79
-
80
-
81
-
82
-
83
-
84
-
85
-
 86
86 -
 87
87 -
 88
88 -
 89
89 -
 90
90 -
 91
91 -
 92
92 -
 93
93 -
 94
94 -
 95
95 -
 96
96 -
97
-
98
-
99
-
100
-
101
-
102
-
103
-
104
-
105
-
106
-
107
-
108
-
109
-
110
-
111
-
112
-
113
-
114
-
115
-
116
-
117
-
118
-
119
-
120
-
121
-
122
-
123
-
124
-
125
-
126
-
127
-
128
-
129
-
130
-
131
-
132
-
133
-
134
-
135
-
136
-
137
-
138
-
139
-
140
-
141
-
142
-
143
-
144
-
145
-
146
-
147
-
148
-
149
-
150
-
151
-
152
-
153
-
154
-
155
-
156
-
157
-
158
-
159
-
160
-
161
-
162
-
163
-
164
-
165
-
166
-
167
-
168
-
169
-
170
-
171
-
172
-
173
-
174
-
175
-
176
-
177
-
178
-
179
-
180
-
181
-
182
-
183
-
184
-
185
-
186
-
187
-
188
-
189
-
190
-
191
-
192
-
193
-
194
-
195
-
196
-
197
-
198
-
199
-
200
-
201
-
202
-
203
-
204
-
205
-
206
-
207
-
208
-
209
-
210
-
211
-
212
-
213
-
214
-
215
-
216
-
217
-
218
-
219
-
220
-
221
-
222
-
223
-
224
-
225
-
226
-
227
-
228
-
229
-
230
-
231
-
232
-
233
-
234
-
235
-
236
-
237
-
238
-
239
-
240
-
241
-
242
-
243
-
244
-
245
-
246
-
247
-
248
-
249
-
250
-
251
-
252
-
253
-
254
-
255
-
256
-
257
-
258
-
259
-
260
-
261
-
262
-
263
-
264
-
265
-
266
-
267
-
268
-
269
-
270
-
271
-
272
-
273
-
274
-
275
-
276
-
277
-
278
-
279
-
280
-
281
-
282
-
283
-
284
-
285
-
286
-
287
-
288
-
289
-
290
-
291
-
292
-
293
-
294
-
295
-
296
-
297
-
298
-
299
-
300
-
301
-
302
-
303
-
304
-
305
-
306
-
307
-
308
-
309
-
310
-
311
-
312
-
313
-
314
-
315
-
316
-
317
-
318
-
319
-
320
-
321
-
322
-
323
-
324
-
325
-
326
-
327
-
328
-
329
-
330
-
331
-
332
-
333
-
334
-
335
-
336
-
337
-
338
-
339
-
340
-
341
 |
 |
