Adobe 65045315 Photoshop Elements Manual - Page 242
Use the Impressionist Brush tool, Auto Erase, Brushes, Opacity, More Options
 |
UPC - 883919176512
View all Adobe 65045315 manuals
Add to My Manuals
Save this manual to your list of manuals |
Page 242 highlights
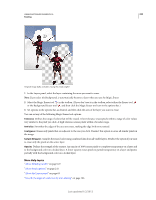
USING PHOTOSHOP ELEMENTS 10 236 Painting Auto Erase If you begin drawing and drag over an area that doesn't contain the foreground color, the tool paints with the foreground color. That is, if we start with color other than foreground color, it paints the foreground color only. Click and paint on the areas containing the foreground color, pencil paints with the Background color. More Help topics "About blending modes" on page 227 "About foreground and background colors" on page 227 "About painting tools" on page 226 "About brush options" on page 241 Use the Impressionist Brush tool The Impressionist Brush tool changes the existing colors and details in your image so your photo looks like it was painted using stylized brush strokes. By experimenting with different style, area size, and tolerance options, you can simulate the textures associated with painting in different artistic styles. 1 In the Edit workspace, select the Impressionist Brush tool from the toolbox. (If you don't see it in the toolbox, right-click either the Brush tool or the Color Replacement tool , and then select Impressionist Brush tool in the toolbox.) 2 Set options in the options bar as desired, and then drag within the image to paint. Original photo (left), and after using the Impressionist Brush tool (right) You can specify any of the following options: Brushes Sets the brush tip. Click the arrow next to the brush sample, choose a brush category from the Brushes pop-up menu, and then select a brush thumbnail. Size Sets the size of the brush in pixels. Drag the Size pop-up slider or enter a size in the text box. Mode Specifies how the paint that you apply blends with the existing pixels in the image. See "About blending modes" on page 227 for more information. Opacity Sets the opacity of the paint you apply. A low opacity setting allows pixels under a paint stroke to show through. Drag the pop-up slider or enter an opacity value. More Options Style affects the shape of the brush stroke. Area controls the size of the brush stroke. A larger area value also increases the number of strokes. Tolerance controls how similar in color value adjacent pixels must be before they are affected by the brush stroke. Last updated 1/2/2012
-
 1
1 -
2
-
3
-
4
-
5
-
6
-
7
-
8
-
9
-
10
-
11
-
12
-
13
-
14
-
15
-
16
-
17
-
18
-
19
-
20
-
21
-
22
-
23
-
24
-
25
-
26
-
27
-
28
-
29
-
30
-
31
-
32
-
33
-
34
-
35
-
36
-
37
-
38
-
39
-
40
-
41
-
42
-
43
-
44
-
45
-
46
-
47
-
48
-
49
-
50
-
51
-
52
-
53
-
54
-
55
-
56
-
57
-
58
-
59
-
60
-
61
-
62
-
63
-
64
-
65
-
66
-
67
-
68
-
69
-
70
-
71
-
72
-
73
-
74
-
75
-
76
-
77
-
78
-
79
-
80
-
81
-
82
-
83
-
84
-
85
-
86
-
87
-
88
-
89
-
90
-
91
-
92
-
93
-
94
-
95
-
96
-
97
-
98
-
99
-
100
-
101
-
102
-
103
-
104
-
105
-
106
-
107
-
108
-
109
-
110
-
111
-
112
-
113
-
114
-
115
-
116
-
117
-
118
-
119
-
120
-
121
-
122
-
123
-
124
-
125
-
126
-
127
-
128
-
129
-
130
-
131
-
132
-
133
-
134
-
135
-
136
-
137
-
138
-
139
-
140
-
141
-
142
-
143
-
144
-
145
-
146
-
147
-
148
-
149
-
150
-
151
-
152
-
153
-
154
-
155
-
156
-
157
-
158
-
159
-
160
-
161
-
162
-
163
-
164
-
165
-
166
-
167
-
168
-
169
-
170
-
171
-
172
-
173
-
174
-
175
-
176
-
177
-
178
-
179
-
180
-
181
-
182
-
183
-
184
-
185
-
186
-
187
-
188
-
189
-
190
-
191
-
192
-
193
-
194
-
195
-
196
-
197
-
198
-
199
-
200
-
201
-
202
-
203
-
204
-
205
-
206
-
207
-
208
-
209
-
210
-
211
-
212
-
213
-
214
-
215
-
216
-
217
-
218
-
219
-
220
-
221
-
222
-
223
-
224
-
225
-
226
-
227
-
228
-
229
-
230
-
231
-
232
-
233
-
234
-
235
-
236
-
 237
237 -
 238
238 -
 239
239 -
 240
240 -
 241
241 -
 242
242 -
 243
243 -
 244
244 -
 245
245 -
 246
246 -
 247
247 -
248
-
249
-
250
-
251
-
252
-
253
-
254
-
255
-
256
-
257
-
258
-
259
-
260
-
261
-
262
-
263
-
264
-
265
-
266
-
267
-
268
-
269
-
270
-
271
-
272
-
273
-
274
-
275
-
276
-
277
-
278
-
279
-
280
-
281
-
282
-
283
-
284
-
285
-
286
-
287
-
288
-
289
-
290
-
291
-
292
-
293
-
294
-
295
-
296
-
297
-
298
-
299
-
300
-
301
-
302
-
303
-
304
-
305
-
306
-
307
-
308
-
309
-
310
-
311
-
312
-
313
-
314
-
315
-
316
-
317
-
318
-
319
-
320
-
321
-
322
-
323
-
324
-
325
-
326
-
327
-
328
-
329
-
330
-
331
-
332
-
333
-
334
-
335
-
336
-
337
-
338
-
339
-
340
-
341
 |
 |
