Adobe 65045315 Photoshop Elements Manual - Page 195
Convert an image to bitmap mode, RGB Color mode, Threshold, Pattern Dither, Diffusion Dither
 |
UPC - 883919176512
View all Adobe 65045315 manuals
Add to My Manuals
Save this manual to your list of manuals |
Page 195 highlights
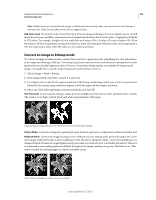
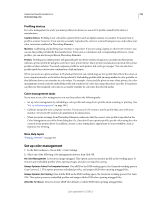
USING PHOTOSHOP ELEMENTS 10 189 Understanding color Note: Hidden layers are discarded and images are flattened automatically when you convert them into bitmap or indexed-color mode, because these modes do not support layers. RGB Color mode The default mode of new Photoshop Elements images and images from your digital camera. In RGB mode, the red, green, and blue components are each assigned an intensity value for every pixel-ranging from 0 (black) to 255 (white). For example, a bright red color might have an R value of 246, a G value of 20, and a B value of 50. When the values of all three components are equal, the result is a shade of neutral gray. When the value of all components is 255, the result is pure white; when the value is 0, the result is pure black. Convert an image to bitmap mode To convert an image to bitmap mode, you must first convert it to grayscale mode, simplifying the color information in the image and reducing its file size. Converting to grayscale removes the hue and saturation information from the pixels and leaves just the brightness values. However, because few editing options are available for bitmap-mode images, it's usually best to edit the image in grayscale mode and then convert it. 1 Choose Image > Mode > Bitmap. 2 If the image is RGB, click OK to convert it to grayscale. 3 For Output, enter a value for the output resolution of the bitmap-mode image, and choose a unit of measurement. By default, the current image resolution appears as both the input and the output resolutions. 4 Select one of the following bitmap conversion methods, and click OK: 50% Threshold Converts pixels with gray values above the middle gray level (128) to white, and those below to black. The result is a very high-contrast, black-and-white representation of the image. Original grayscale image (left) and 50% Threshold conversion method applied (right). Pattern Dither Converts an image by organizing the gray levels into geometric configurations of black and white dots. Diffusion Dither Converts an image by using an error-diffusion process, starting at the pixel in the upper-left corner of the image. If the pixel's value is above middle gray (128), the pixel is changed to white-if it's below middle gray, it's changed to black. Because the original pixel is rarely pure white or pure black, error is inevitably introduced. This error is transferred to surrounding pixels and diffused throughout the image, resulting in a grainy, film-like texture. This option is useful for viewing images on a black-and-white screen. Pattern Dither and Diffusion Dither conversion methods Last updated 1/2/2012
-
 1
1 -
2
-
3
-
4
-
5
-
6
-
7
-
8
-
9
-
10
-
11
-
12
-
13
-
14
-
15
-
16
-
17
-
18
-
19
-
20
-
21
-
22
-
23
-
24
-
25
-
26
-
27
-
28
-
29
-
30
-
31
-
32
-
33
-
34
-
35
-
36
-
37
-
38
-
39
-
40
-
41
-
42
-
43
-
44
-
45
-
46
-
47
-
48
-
49
-
50
-
51
-
52
-
53
-
54
-
55
-
56
-
57
-
58
-
59
-
60
-
61
-
62
-
63
-
64
-
65
-
66
-
67
-
68
-
69
-
70
-
71
-
72
-
73
-
74
-
75
-
76
-
77
-
78
-
79
-
80
-
81
-
82
-
83
-
84
-
85
-
86
-
87
-
88
-
89
-
90
-
91
-
92
-
93
-
94
-
95
-
96
-
97
-
98
-
99
-
100
-
101
-
102
-
103
-
104
-
105
-
106
-
107
-
108
-
109
-
110
-
111
-
112
-
113
-
114
-
115
-
116
-
117
-
118
-
119
-
120
-
121
-
122
-
123
-
124
-
125
-
126
-
127
-
128
-
129
-
130
-
131
-
132
-
133
-
134
-
135
-
136
-
137
-
138
-
139
-
140
-
141
-
142
-
143
-
144
-
145
-
146
-
147
-
148
-
149
-
150
-
151
-
152
-
153
-
154
-
155
-
156
-
157
-
158
-
159
-
160
-
161
-
162
-
163
-
164
-
165
-
166
-
167
-
168
-
169
-
170
-
171
-
172
-
173
-
174
-
175
-
176
-
177
-
178
-
179
-
180
-
181
-
182
-
183
-
184
-
185
-
186
-
187
-
188
-
189
-
 190
190 -
 191
191 -
 192
192 -
 193
193 -
 194
194 -
 195
195 -
 196
196 -
 197
197 -
 198
198 -
 199
199 -
 200
200 -
201
-
202
-
203
-
204
-
205
-
206
-
207
-
208
-
209
-
210
-
211
-
212
-
213
-
214
-
215
-
216
-
217
-
218
-
219
-
220
-
221
-
222
-
223
-
224
-
225
-
226
-
227
-
228
-
229
-
230
-
231
-
232
-
233
-
234
-
235
-
236
-
237
-
238
-
239
-
240
-
241
-
242
-
243
-
244
-
245
-
246
-
247
-
248
-
249
-
250
-
251
-
252
-
253
-
254
-
255
-
256
-
257
-
258
-
259
-
260
-
261
-
262
-
263
-
264
-
265
-
266
-
267
-
268
-
269
-
270
-
271
-
272
-
273
-
274
-
275
-
276
-
277
-
278
-
279
-
280
-
281
-
282
-
283
-
284
-
285
-
286
-
287
-
288
-
289
-
290
-
291
-
292
-
293
-
294
-
295
-
296
-
297
-
298
-
299
-
300
-
301
-
302
-
303
-
304
-
305
-
306
-
307
-
308
-
309
-
310
-
311
-
312
-
313
-
314
-
315
-
316
-
317
-
318
-
319
-
320
-
321
-
322
-
323
-
324
-
325
-
326
-
327
-
328
-
329
-
330
-
331
-
332
-
333
-
334
-
335
-
336
-
337
-
338
-
339
-
340
-
341
 |
 |
