Adobe 65045315 Photoshop Elements Manual - Page 121
Fix photos with Touch Up buttons in the Quick Fix Tools panel, Quick Fix and Edit workspace options
 |
UPC - 883919176512
View all Adobe 65045315 manuals
Add to My Manuals
Save this manual to your list of manuals |
Page 121 highlights
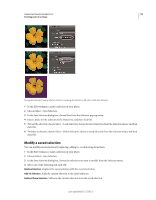
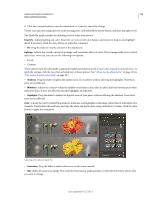
USING PHOTOSHOP ELEMENTS 10 115 Color and tonal correction Balance Adjusts the color balance of an image without affecting its contrast. • Temperature Drag the slider to make the colors warmer (red) or cooler (blue). Use this control to enhance sunsets or skin tones, or when the color balance set by your camera is off. • Tint Drag the slider to make the color more green or more magenta. Use this control to fine-tune the colors after using the Temperature control. Sharpness Adjusts the sharpness of your image. Click Auto to use the default amount of sharpening. • Sharpen Drag the slider to vary the amount of sharpening. Zoom your preview at 100% to get a more accurate view of the amount of sharpening you are trying to apply. Fix photos with Touch Up buttons in the Quick Fix Tools panel The Touch Up buttons in Quick Fix tools panel enable you to apply corrections and adjustments to selected parts of an image. Except for Red Eye Removal, all Touch Up button adjustments are applied to an adjustment layer. As a result, they do not discard, or permanently edit any information on the image layer. You can always change adjustment settings without degrading the original image. The Whiten Teeth, Make Dull Skies Blue, and Black and White-High Contrast Touch Up buttons apply adjustments found in the Smart Brush tool. See "Adjust color and tonality using the Smart Brush tools" on page 121 and "About adjustment and fill layers" on page 76. 1 In the Quick Fix Tools panel, do any of the following: • Click the Red Eye Removal button to remove red eye from a photo. This tool removes red eye in flash photos of people, and green or white eye in pets. Drag the tool in the image around an eye you want to fix, or click the Auto button in the options bar. See "Precisely remove red eye" on page 155. • Click the Whiten Teeth button you want to brighten. to apply a Pearly Whites adjustment. Drag in the image area with the teeth that • Click the Make Dull Skies Blue button to apply a Blue Skies adjustment. Drag in the image where you want to add blueness to the sky. For a video about making dull skies blue, see www.adobe.com/go/lrvid909_pse_en. • Click the Black And White-High Contrast button to apply a High Contrast Red Filter adjustment. Drag in the image area that you want to convert to a high-contrast monochrome image. This adjustment simulates the image effects that photographers produce by placing a red filter over the camera lens and using monochrome film. 2 (Optional) If you carried out Pearly Whites, Blue Skies, or a High Contrast Red Filter adjustment, you can do any of the following: • Add the adjustment to more parts of the photo, by clicking the Add To Selection button , and dragging in the image. • Remove the adjustment from parts of the photo, by clicking the Subtract From Selection button , and dragging in the image. Quick Fix and Edit workspace options These tools work the same way in Quick Fix and the Edit workspace. Zoom tool Sets the magnification of the preview image. Controls and options work like the Zoom tool in the toolbox. (See "Zoom in or out" on page 43.) Hand tool Moves the image around in the preview window if the entire image is not visible. Press the spacebar to access the Hand tool when another tool is selected. (See "Viewing images in Full Edit or Quick Fix" on page 43.) Last updated 1/2/2012
-
 1
1 -
2
-
3
-
4
-
5
-
6
-
7
-
8
-
9
-
10
-
11
-
12
-
13
-
14
-
15
-
16
-
17
-
18
-
19
-
20
-
21
-
22
-
23
-
24
-
25
-
26
-
27
-
28
-
29
-
30
-
31
-
32
-
33
-
34
-
35
-
36
-
37
-
38
-
39
-
40
-
41
-
42
-
43
-
44
-
45
-
46
-
47
-
48
-
49
-
50
-
51
-
52
-
53
-
54
-
55
-
56
-
57
-
58
-
59
-
60
-
61
-
62
-
63
-
64
-
65
-
66
-
67
-
68
-
69
-
70
-
71
-
72
-
73
-
74
-
75
-
76
-
77
-
78
-
79
-
80
-
81
-
82
-
83
-
84
-
85
-
86
-
87
-
88
-
89
-
90
-
91
-
92
-
93
-
94
-
95
-
96
-
97
-
98
-
99
-
100
-
101
-
102
-
103
-
104
-
105
-
106
-
107
-
108
-
109
-
110
-
111
-
112
-
113
-
114
-
115
-
 116
116 -
 117
117 -
 118
118 -
 119
119 -
 120
120 -
 121
121 -
 122
122 -
 123
123 -
 124
124 -
 125
125 -
 126
126 -
127
-
128
-
129
-
130
-
131
-
132
-
133
-
134
-
135
-
136
-
137
-
138
-
139
-
140
-
141
-
142
-
143
-
144
-
145
-
146
-
147
-
148
-
149
-
150
-
151
-
152
-
153
-
154
-
155
-
156
-
157
-
158
-
159
-
160
-
161
-
162
-
163
-
164
-
165
-
166
-
167
-
168
-
169
-
170
-
171
-
172
-
173
-
174
-
175
-
176
-
177
-
178
-
179
-
180
-
181
-
182
-
183
-
184
-
185
-
186
-
187
-
188
-
189
-
190
-
191
-
192
-
193
-
194
-
195
-
196
-
197
-
198
-
199
-
200
-
201
-
202
-
203
-
204
-
205
-
206
-
207
-
208
-
209
-
210
-
211
-
212
-
213
-
214
-
215
-
216
-
217
-
218
-
219
-
220
-
221
-
222
-
223
-
224
-
225
-
226
-
227
-
228
-
229
-
230
-
231
-
232
-
233
-
234
-
235
-
236
-
237
-
238
-
239
-
240
-
241
-
242
-
243
-
244
-
245
-
246
-
247
-
248
-
249
-
250
-
251
-
252
-
253
-
254
-
255
-
256
-
257
-
258
-
259
-
260
-
261
-
262
-
263
-
264
-
265
-
266
-
267
-
268
-
269
-
270
-
271
-
272
-
273
-
274
-
275
-
276
-
277
-
278
-
279
-
280
-
281
-
282
-
283
-
284
-
285
-
286
-
287
-
288
-
289
-
290
-
291
-
292
-
293
-
294
-
295
-
296
-
297
-
298
-
299
-
300
-
301
-
302
-
303
-
304
-
305
-
306
-
307
-
308
-
309
-
310
-
311
-
312
-
313
-
314
-
315
-
316
-
317
-
318
-
319
-
320
-
321
-
322
-
323
-
324
-
325
-
326
-
327
-
328
-
329
-
330
-
331
-
332
-
333
-
334
-
335
-
336
-
337
-
338
-
339
-
340
-
341
 |
 |
