Adobe 65045315 Photoshop Elements Manual - Page 113
Moving and copying selections, Move a selection, Move tool options
 |
UPC - 883919176512
View all Adobe 65045315 manuals
Add to My Manuals
Save this manual to your list of manuals |
Page 113 highlights
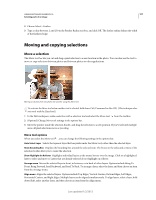
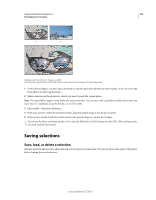
USING PHOTOSHOP ELEMENTS 10 107 Selecting parts of an image 2 Choose Select > Feather. 3 Type a value between .2 and 250 in the Feather Radius text box, and click OK. The feather radius defines the width of the feathered edge. Moving and copying selections Move a selection The Move tool lets you cut and drag a pixel selection to a new location in the photo. You can also use the tool to move or copy selections between photos and between photos in other applications. Moving a selection from one photo into another using the Move tool To activate the Move tool when another tool is selected, hold down Ctrl (Command in Mac OS). (This technique does not work with the Hand tool.) 1 In the Edit workspace, make a selection with a selection tool and select the Move tool from the toolbox. 2 (Optional) Change Move tool settings in the options bar. 3 Move the pointer inside the selection border, and drag the selection to a new position. If you've selected multiple areas, all pixel selections move as you drag. Move tool options When you select the Move tool , you can change the following settings in the options bar: Auto Select Layer Selects the topmost layer that has pixels under the Move tool, rather than the selected layer. Show Bounding Box Displays the bounding box around the selected item. The boxes on the sides and corners of the selection border allow you to resize the selection. Show Highlight On Rollover Highlights individual layers as the mouse hovers over the image. Click on a highlighted layer to select and move it. Layers that are already selected do not highlight on rollover. Arrange menu Moves the selected layer in front, in between, or in back of other layers. Options include Bring To Front, Bring Forward, Send Backward, and Send To Back. To arrange a layer, select the layer, and then choose an item from the Arrange menu. Align menu Aligns the selected layers. Options include Top Edges, Vertical Centers, Bottom Edges, Left Edges, Horizontal Centers, and Right Edges. Multiple layers can be aligned simultaneously. To align layers, select a layer, hold down Shift, select another layer, and then choose an item from the Align menu. Last updated 1/2/2012
-
 1
1 -
2
-
3
-
4
-
5
-
6
-
7
-
8
-
9
-
10
-
11
-
12
-
13
-
14
-
15
-
16
-
17
-
18
-
19
-
20
-
21
-
22
-
23
-
24
-
25
-
26
-
27
-
28
-
29
-
30
-
31
-
32
-
33
-
34
-
35
-
36
-
37
-
38
-
39
-
40
-
41
-
42
-
43
-
44
-
45
-
46
-
47
-
48
-
49
-
50
-
51
-
52
-
53
-
54
-
55
-
56
-
57
-
58
-
59
-
60
-
61
-
62
-
63
-
64
-
65
-
66
-
67
-
68
-
69
-
70
-
71
-
72
-
73
-
74
-
75
-
76
-
77
-
78
-
79
-
80
-
81
-
82
-
83
-
84
-
85
-
86
-
87
-
88
-
89
-
90
-
91
-
92
-
93
-
94
-
95
-
96
-
97
-
98
-
99
-
100
-
101
-
102
-
103
-
104
-
105
-
106
-
107
-
 108
108 -
 109
109 -
 110
110 -
 111
111 -
 112
112 -
 113
113 -
 114
114 -
 115
115 -
 116
116 -
 117
117 -
 118
118 -
119
-
120
-
121
-
122
-
123
-
124
-
125
-
126
-
127
-
128
-
129
-
130
-
131
-
132
-
133
-
134
-
135
-
136
-
137
-
138
-
139
-
140
-
141
-
142
-
143
-
144
-
145
-
146
-
147
-
148
-
149
-
150
-
151
-
152
-
153
-
154
-
155
-
156
-
157
-
158
-
159
-
160
-
161
-
162
-
163
-
164
-
165
-
166
-
167
-
168
-
169
-
170
-
171
-
172
-
173
-
174
-
175
-
176
-
177
-
178
-
179
-
180
-
181
-
182
-
183
-
184
-
185
-
186
-
187
-
188
-
189
-
190
-
191
-
192
-
193
-
194
-
195
-
196
-
197
-
198
-
199
-
200
-
201
-
202
-
203
-
204
-
205
-
206
-
207
-
208
-
209
-
210
-
211
-
212
-
213
-
214
-
215
-
216
-
217
-
218
-
219
-
220
-
221
-
222
-
223
-
224
-
225
-
226
-
227
-
228
-
229
-
230
-
231
-
232
-
233
-
234
-
235
-
236
-
237
-
238
-
239
-
240
-
241
-
242
-
243
-
244
-
245
-
246
-
247
-
248
-
249
-
250
-
251
-
252
-
253
-
254
-
255
-
256
-
257
-
258
-
259
-
260
-
261
-
262
-
263
-
264
-
265
-
266
-
267
-
268
-
269
-
270
-
271
-
272
-
273
-
274
-
275
-
276
-
277
-
278
-
279
-
280
-
281
-
282
-
283
-
284
-
285
-
286
-
287
-
288
-
289
-
290
-
291
-
292
-
293
-
294
-
295
-
296
-
297
-
298
-
299
-
300
-
301
-
302
-
303
-
304
-
305
-
306
-
307
-
308
-
309
-
310
-
311
-
312
-
313
-
314
-
315
-
316
-
317
-
318
-
319
-
320
-
321
-
322
-
323
-
324
-
325
-
326
-
327
-
328
-
329
-
330
-
331
-
332
-
333
-
334
-
335
-
336
-
337
-
338
-
339
-
340
-
341
 |
 |
