Adobe 65045315 Photoshop Elements Manual - Page 142
Adjust the color of skin tone, > Adjust Color For Skin Tone.
 |
UPC - 883919176512
View all Adobe 65045315 manuals
Add to My Manuals
Save this manual to your list of manuals |
Page 142 highlights
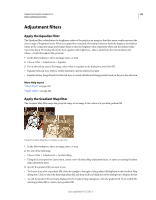
USING PHOTOSHOP ELEMENTS 10 136 Color and tonal correction If you modify the adjustment slider so that it falls into a different color range, the name changes to reflect this. For example, if you choose Yellow and alter its range so that it falls in the red part of the color bar, the name changes to Red 2. You can convert up to six of the individual color ranges to varieties of the same color range (for example, Red 1 through Red 6). Note: By default, the color range selected when you choose a color component is 30° wide, with 30° color fall-off on either side. Setting the fall-off too low can produce banding in the image. 4 To edit the range by choosing colors from the image, select the eyedropper, and click the image. Use the eyedropper + tool to add to the range; use the eyedropper - tool to subtract from the range. While the eyedropper tool is selected, you can also press Shift to add to the range or press Alt (Option in Mac OS) to subtract from it. Adjust the color of skin tone The Adjust Color For Skin Tone command adjusts the overall color in a photo to bring out more natural skin tones. When you click an area of skin in the photo, Photoshop Elements adjusts the skin tone-as well as all other colors in the photo. You can manually adjust the brown and red colors separately to achieve the final color you want. Original (top), and after adjusting skin tone (bottom) 1 Open the photo in the Edit workspace, and select the layer that needs correction. 2 Choose Enhance > Adjust Color > Adjust Color For Skin Tone. 3 Click an area of skin. Photoshop Elements automatically adjusts the colors in the image. Changes might be subtle. Note: Make sure Preview is selected so that you can see the color changes as they occur. 4 (Optional) Drag any of the following sliders to fine-tune the correction: Tan Increases or decreases the level of brown in skin tones. Last updated 1/2/2012
-
 1
1 -
2
-
3
-
4
-
5
-
6
-
7
-
8
-
9
-
10
-
11
-
12
-
13
-
14
-
15
-
16
-
17
-
18
-
19
-
20
-
21
-
22
-
23
-
24
-
25
-
26
-
27
-
28
-
29
-
30
-
31
-
32
-
33
-
34
-
35
-
36
-
37
-
38
-
39
-
40
-
41
-
42
-
43
-
44
-
45
-
46
-
47
-
48
-
49
-
50
-
51
-
52
-
53
-
54
-
55
-
56
-
57
-
58
-
59
-
60
-
61
-
62
-
63
-
64
-
65
-
66
-
67
-
68
-
69
-
70
-
71
-
72
-
73
-
74
-
75
-
76
-
77
-
78
-
79
-
80
-
81
-
82
-
83
-
84
-
85
-
86
-
87
-
88
-
89
-
90
-
91
-
92
-
93
-
94
-
95
-
96
-
97
-
98
-
99
-
100
-
101
-
102
-
103
-
104
-
105
-
106
-
107
-
108
-
109
-
110
-
111
-
112
-
113
-
114
-
115
-
116
-
117
-
118
-
119
-
120
-
121
-
122
-
123
-
124
-
125
-
126
-
127
-
128
-
129
-
130
-
131
-
132
-
133
-
134
-
135
-
136
-
 137
137 -
 138
138 -
 139
139 -
 140
140 -
 141
141 -
 142
142 -
 143
143 -
 144
144 -
 145
145 -
 146
146 -
 147
147 -
148
-
149
-
150
-
151
-
152
-
153
-
154
-
155
-
156
-
157
-
158
-
159
-
160
-
161
-
162
-
163
-
164
-
165
-
166
-
167
-
168
-
169
-
170
-
171
-
172
-
173
-
174
-
175
-
176
-
177
-
178
-
179
-
180
-
181
-
182
-
183
-
184
-
185
-
186
-
187
-
188
-
189
-
190
-
191
-
192
-
193
-
194
-
195
-
196
-
197
-
198
-
199
-
200
-
201
-
202
-
203
-
204
-
205
-
206
-
207
-
208
-
209
-
210
-
211
-
212
-
213
-
214
-
215
-
216
-
217
-
218
-
219
-
220
-
221
-
222
-
223
-
224
-
225
-
226
-
227
-
228
-
229
-
230
-
231
-
232
-
233
-
234
-
235
-
236
-
237
-
238
-
239
-
240
-
241
-
242
-
243
-
244
-
245
-
246
-
247
-
248
-
249
-
250
-
251
-
252
-
253
-
254
-
255
-
256
-
257
-
258
-
259
-
260
-
261
-
262
-
263
-
264
-
265
-
266
-
267
-
268
-
269
-
270
-
271
-
272
-
273
-
274
-
275
-
276
-
277
-
278
-
279
-
280
-
281
-
282
-
283
-
284
-
285
-
286
-
287
-
288
-
289
-
290
-
291
-
292
-
293
-
294
-
295
-
296
-
297
-
298
-
299
-
300
-
301
-
302
-
303
-
304
-
305
-
306
-
307
-
308
-
309
-
310
-
311
-
312
-
313
-
314
-
315
-
316
-
317
-
318
-
319
-
320
-
321
-
322
-
323
-
324
-
325
-
326
-
327
-
328
-
329
-
330
-
331
-
332
-
333
-
334
-
335
-
336
-
337
-
338
-
339
-
340
-
341
 |
 |
