Adobe 65045315 Photoshop Elements Manual - Page 92
Open and process camera raw files, Adjust sharpness in camera raw files, the Zoom tool, Hand tool
 |
UPC - 883919176512
View all Adobe 65045315 manuals
Add to My Manuals
Save this manual to your list of manuals |
Page 92 highlights
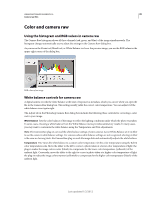
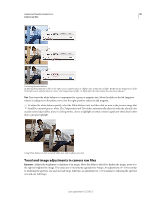
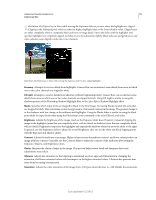
USING PHOTOSHOP ELEMENTS 10 86 Camera raw files Open and process camera raw files 1 In the Edit workspace, choose File > Open. 2 Browse to select one or more camera raw files, and click Open. The histogram in the Camera Raw dialog box shows the tonal range of the image at the current settings. As you make settings adjustments, the histogram automatically updates. 3 (Optional) Adjust the image view using the controls, such as the Zoom tool, and options, such as Shadows and Highlights, which reveal clipping in the preview area. (See "Camera raw controls" on page 88.) Note: Selecting Preview displays a preview of the image with the settings changes you make. Deselecting Preview displays the camera raw image at the original settings of the current tab combined with the settings in the hidden tabs. 4 To rotate the image 90° counterclockwise or 90° clockwise, click the Rotate Image buttons . 5 To apply the settings used in the previous camera raw image or the default settings for your camera, choose an option from the Settings menu. Using the same options is useful, for example, if you want to quickly process images with similar lighting conditions. (See "Set custom camera settings" on page 88.) 6 (Optional) Set options to adjust the white balance. (See "White balance controls for camera raw" on page 89.) You can monitor the RGB values of pixels in your image as you adjust them in the Camera Raw dialog box. Position the Zoom tool, Hand tool, White Balance tool, or Crop tool over the preview image to display the RGB values directly beneath the pointer. 7 Make tonal adjustments using the Exposure, Brightness, Contrast, and Saturation sliders. (See "Tonal and image adjustments in camera raw files" on page 90.) To undo your manual adjustments and make the adjustments automatically, select Auto. To restore all options to their initial settings, press Alt (Option in Mac OS) and click Reset. 8 Do one of the following: • To open a copy of the camera raw image file (with the camera raw settings applied) in Photoshop Elements, click Open. You can edit the image and save it in a Photoshop Elements-supported format. The original camera raw file remains unaltered. • To save the adjustments to a DNG file, click Save Image. (See "Save changes to camera raw images" on page 87.) • To cancel the adjustments and close the dialog box, click Cancel. Note: The Digital Negative (DNG) format is Adobe's proposed standard format for camera raw files. DNG files are useful for archiving camera raw images because they contain the raw camera sensor data and data specifying how the image should look. Camera raw image settings can be stored in DNG files instead of in sidecar XMP files or the camera raw database. Adjust sharpness in camera raw files The Sharpness slider adjusts the image sharpness to provide the edge definition you want. The Sharpness adjustment is a variation of the Adobe Photoshop Unsharp Mask filter, which locates pixels that differ from surrounding pixels based on the threshold you specify and increases the pixels' contrast by the amount you specify. When opening a camera raw file, the Camera Raw plug-in calculates the threshold to use based on the camera model, ISO, and exposure compensation. You can choose whether sharpening is applied to all images or just to previews. 1 Zoom the preview image to at least 100%. 2 Click the Detail tab. Last updated 1/2/2012
-
 1
1 -
2
-
3
-
4
-
5
-
6
-
7
-
8
-
9
-
10
-
11
-
12
-
13
-
14
-
15
-
16
-
17
-
18
-
19
-
20
-
21
-
22
-
23
-
24
-
25
-
26
-
27
-
28
-
29
-
30
-
31
-
32
-
33
-
34
-
35
-
36
-
37
-
38
-
39
-
40
-
41
-
42
-
43
-
44
-
45
-
46
-
47
-
48
-
49
-
50
-
51
-
52
-
53
-
54
-
55
-
56
-
57
-
58
-
59
-
60
-
61
-
62
-
63
-
64
-
65
-
66
-
67
-
68
-
69
-
70
-
71
-
72
-
73
-
74
-
75
-
76
-
77
-
78
-
79
-
80
-
81
-
82
-
83
-
84
-
85
-
86
-
 87
87 -
 88
88 -
 89
89 -
 90
90 -
 91
91 -
 92
92 -
 93
93 -
 94
94 -
 95
95 -
 96
96 -
 97
97 -
98
-
99
-
100
-
101
-
102
-
103
-
104
-
105
-
106
-
107
-
108
-
109
-
110
-
111
-
112
-
113
-
114
-
115
-
116
-
117
-
118
-
119
-
120
-
121
-
122
-
123
-
124
-
125
-
126
-
127
-
128
-
129
-
130
-
131
-
132
-
133
-
134
-
135
-
136
-
137
-
138
-
139
-
140
-
141
-
142
-
143
-
144
-
145
-
146
-
147
-
148
-
149
-
150
-
151
-
152
-
153
-
154
-
155
-
156
-
157
-
158
-
159
-
160
-
161
-
162
-
163
-
164
-
165
-
166
-
167
-
168
-
169
-
170
-
171
-
172
-
173
-
174
-
175
-
176
-
177
-
178
-
179
-
180
-
181
-
182
-
183
-
184
-
185
-
186
-
187
-
188
-
189
-
190
-
191
-
192
-
193
-
194
-
195
-
196
-
197
-
198
-
199
-
200
-
201
-
202
-
203
-
204
-
205
-
206
-
207
-
208
-
209
-
210
-
211
-
212
-
213
-
214
-
215
-
216
-
217
-
218
-
219
-
220
-
221
-
222
-
223
-
224
-
225
-
226
-
227
-
228
-
229
-
230
-
231
-
232
-
233
-
234
-
235
-
236
-
237
-
238
-
239
-
240
-
241
-
242
-
243
-
244
-
245
-
246
-
247
-
248
-
249
-
250
-
251
-
252
-
253
-
254
-
255
-
256
-
257
-
258
-
259
-
260
-
261
-
262
-
263
-
264
-
265
-
266
-
267
-
268
-
269
-
270
-
271
-
272
-
273
-
274
-
275
-
276
-
277
-
278
-
279
-
280
-
281
-
282
-
283
-
284
-
285
-
286
-
287
-
288
-
289
-
290
-
291
-
292
-
293
-
294
-
295
-
296
-
297
-
298
-
299
-
300
-
301
-
302
-
303
-
304
-
305
-
306
-
307
-
308
-
309
-
310
-
311
-
312
-
313
-
314
-
315
-
316
-
317
-
318
-
319
-
320
-
321
-
322
-
323
-
324
-
325
-
326
-
327
-
328
-
329
-
330
-
331
-
332
-
333
-
334
-
335
-
336
-
337
-
338
-
339
-
340
-
341
 |
 |