Adobe 65045315 Photoshop Elements Manual - Page 143
Adjust saturation in isolated areas, Change the color of an object, Blush, Temperature
 |
UPC - 883919176512
View all Adobe 65045315 manuals
Add to My Manuals
Save this manual to your list of manuals |
Page 143 highlights
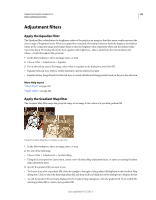
USING PHOTOSHOP ELEMENTS 10 137 Color and tonal correction Blush Increases or decreases the level of red in skin tones. Temperature Changes the overall color of skin tones. 5 When you're finished, click OK. Or, to cancel your changes and start over, click Reset. Adjust saturation in isolated areas The Sponge tool changes the color saturation or vividness of an area. Increasing saturation by scrubbing with the Sponge tool 1 In the Edit workspace, select the Sponge tool . 2 Set tool options in the options bar: Brushes pop-up menu Sets the brush tip. Click the arrow next to the brush sample, choose a brush category from the Brushes pop-up menu, and then select a brush thumbnail. Size Sets the size of the brush, in pixels. Drag the Size slider or enter a size in the text box. Mode Increases or decreases color saturation. Choose Saturate to intensify the color's saturation. In grayscale, Saturate increases contrast. Choose Desaturate to dilute the color's saturation. In grayscale, Desaturate decreases contrast. Flow Sets the rate of saturation change. Drag the Flow pop-up slider or enter a value in the text box. 3 Drag over the part of the image you want to modify. Change the color of an object The Replace Color command replaces a specific color in an image. You can set the hue, saturation, and lightness of the color. 1 In the Edit workspace, choose Enhance > Adjust Color > Replace Color. 2 Select a display option under the image thumbnail: Selection Displays the mask, which looks like a black and white version of the image, in the preview box. Image Displays the image in the preview box. This option is useful when you are working with a magnified image or have limited screen space. 3 Click the Eyedropper button, and then click the color you want to change in the image or in the preview box. Use the eyedropper + tool to add colors, or use the eyedropper - tool to remove colors to keep them from changing. 4 Drag the Fuzziness slider to control the degree to which related colors are included in the selection. 5 Do one of the following to specify a new color: • Drag the Hue, Saturation, and Lightness sliders (or enter values in the text boxes). Last updated 1/2/2012
-
 1
1 -
2
-
3
-
4
-
5
-
6
-
7
-
8
-
9
-
10
-
11
-
12
-
13
-
14
-
15
-
16
-
17
-
18
-
19
-
20
-
21
-
22
-
23
-
24
-
25
-
26
-
27
-
28
-
29
-
30
-
31
-
32
-
33
-
34
-
35
-
36
-
37
-
38
-
39
-
40
-
41
-
42
-
43
-
44
-
45
-
46
-
47
-
48
-
49
-
50
-
51
-
52
-
53
-
54
-
55
-
56
-
57
-
58
-
59
-
60
-
61
-
62
-
63
-
64
-
65
-
66
-
67
-
68
-
69
-
70
-
71
-
72
-
73
-
74
-
75
-
76
-
77
-
78
-
79
-
80
-
81
-
82
-
83
-
84
-
85
-
86
-
87
-
88
-
89
-
90
-
91
-
92
-
93
-
94
-
95
-
96
-
97
-
98
-
99
-
100
-
101
-
102
-
103
-
104
-
105
-
106
-
107
-
108
-
109
-
110
-
111
-
112
-
113
-
114
-
115
-
116
-
117
-
118
-
119
-
120
-
121
-
122
-
123
-
124
-
125
-
126
-
127
-
128
-
129
-
130
-
131
-
132
-
133
-
134
-
135
-
136
-
137
-
 138
138 -
 139
139 -
 140
140 -
 141
141 -
 142
142 -
 143
143 -
 144
144 -
 145
145 -
 146
146 -
 147
147 -
 148
148 -
149
-
150
-
151
-
152
-
153
-
154
-
155
-
156
-
157
-
158
-
159
-
160
-
161
-
162
-
163
-
164
-
165
-
166
-
167
-
168
-
169
-
170
-
171
-
172
-
173
-
174
-
175
-
176
-
177
-
178
-
179
-
180
-
181
-
182
-
183
-
184
-
185
-
186
-
187
-
188
-
189
-
190
-
191
-
192
-
193
-
194
-
195
-
196
-
197
-
198
-
199
-
200
-
201
-
202
-
203
-
204
-
205
-
206
-
207
-
208
-
209
-
210
-
211
-
212
-
213
-
214
-
215
-
216
-
217
-
218
-
219
-
220
-
221
-
222
-
223
-
224
-
225
-
226
-
227
-
228
-
229
-
230
-
231
-
232
-
233
-
234
-
235
-
236
-
237
-
238
-
239
-
240
-
241
-
242
-
243
-
244
-
245
-
246
-
247
-
248
-
249
-
250
-
251
-
252
-
253
-
254
-
255
-
256
-
257
-
258
-
259
-
260
-
261
-
262
-
263
-
264
-
265
-
266
-
267
-
268
-
269
-
270
-
271
-
272
-
273
-
274
-
275
-
276
-
277
-
278
-
279
-
280
-
281
-
282
-
283
-
284
-
285
-
286
-
287
-
288
-
289
-
290
-
291
-
292
-
293
-
294
-
295
-
296
-
297
-
298
-
299
-
300
-
301
-
302
-
303
-
304
-
305
-
306
-
307
-
308
-
309
-
310
-
311
-
312
-
313
-
314
-
315
-
316
-
317
-
318
-
319
-
320
-
321
-
322
-
323
-
324
-
325
-
326
-
327
-
328
-
329
-
330
-
331
-
332
-
333
-
334
-
335
-
336
-
337
-
338
-
339
-
340
-
341
 |
 |
