Adobe 65045315 Photoshop Elements Manual - Page 57
Save a file in Photoshop EPS format, Save a file in PNG format
 |
UPC - 883919176512
View all Adobe 65045315 manuals
Add to My Manuals
Save this manual to your list of manuals |
Page 57 highlights
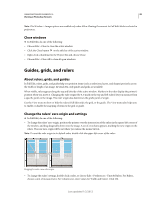
USING PHOTOSHOP ELEMENTS 10 51 Working in Photoshop Elements Save a file in Photoshop EPS format 1 In the Edit workspace, choose File > Save As, and choose Photoshop EPS from the format list. 2 Specify a filename and location, select file-saving options, and click Save. 3 In the EPS Options dialog box, set the following options: • For Preview, choose TIFF (8 bits/pixel) for better display quality, or choose TIFF 1-bit/pixel for a smaller file size. • For Encoding, choose an encoding method from the following options: • ASCII • ASCII85 • Binary • JPEG (Low Quality) • JPEG (Medium Quality) • JPEG (High Quality) • JPEG (Maximum Quality) 4 To display white areas in the image as transparent, select Transparent Whites. This option is available only for images in bitmap mode. 5 If you want to apply anti-aliasing to a printed low-resolution image, select Image Interpolation. 6 Click OK. Save a file in Photoshop PDF format 1 In the Edit workspace, choose File > Save As, and choose Photoshop PDF from the format list. 2 Specify a filename and location, select file-saving options, and click Save. 3 In the Save Adobe PDF dialog box, select a compression method. (See "Understanding file compression" on page 52.) 4 Choose an option from the Image Quality menu. 5 To view the PDF file, select View PDF After Saving to launch Adobe Acrobat or Adobe® Reader (depending on which application is installed on your computer). 6 Click Save PDF. If you've made changes to an Acrobat Touchup file, but the changes are not reflected when you open the file, check the Saving File preferences dialog box. Choose Edit > Preferences > Saving Files, and then choose Save Over Current File from the On First Save menu. Save a file in PNG format 1 In the Edit workspace, choose File > Save As, and choose PNG from the format list. 2 Specify a filename and location, select file-saving options, and click Save. 3 In the PNG Options dialog box, select an Interlace option and click OK. None Displays the image in a web browser only after it is completely downloaded. Interlaced Displays low-resolution versions of the image while the full image file is downloading to the browser. Interlacing can make downloading time seem shorter and assures viewers that downloading is in progress. However, interlacing also increases file size. Last updated 1/2/2012
-
 1
1 -
2
-
3
-
4
-
5
-
6
-
7
-
8
-
9
-
10
-
11
-
12
-
13
-
14
-
15
-
16
-
17
-
18
-
19
-
20
-
21
-
22
-
23
-
24
-
25
-
26
-
27
-
28
-
29
-
30
-
31
-
32
-
33
-
34
-
35
-
36
-
37
-
38
-
39
-
40
-
41
-
42
-
43
-
44
-
45
-
46
-
47
-
48
-
49
-
50
-
51
-
 52
52 -
 53
53 -
 54
54 -
 55
55 -
 56
56 -
 57
57 -
 58
58 -
 59
59 -
 60
60 -
 61
61 -
 62
62 -
63
-
64
-
65
-
66
-
67
-
68
-
69
-
70
-
71
-
72
-
73
-
74
-
75
-
76
-
77
-
78
-
79
-
80
-
81
-
82
-
83
-
84
-
85
-
86
-
87
-
88
-
89
-
90
-
91
-
92
-
93
-
94
-
95
-
96
-
97
-
98
-
99
-
100
-
101
-
102
-
103
-
104
-
105
-
106
-
107
-
108
-
109
-
110
-
111
-
112
-
113
-
114
-
115
-
116
-
117
-
118
-
119
-
120
-
121
-
122
-
123
-
124
-
125
-
126
-
127
-
128
-
129
-
130
-
131
-
132
-
133
-
134
-
135
-
136
-
137
-
138
-
139
-
140
-
141
-
142
-
143
-
144
-
145
-
146
-
147
-
148
-
149
-
150
-
151
-
152
-
153
-
154
-
155
-
156
-
157
-
158
-
159
-
160
-
161
-
162
-
163
-
164
-
165
-
166
-
167
-
168
-
169
-
170
-
171
-
172
-
173
-
174
-
175
-
176
-
177
-
178
-
179
-
180
-
181
-
182
-
183
-
184
-
185
-
186
-
187
-
188
-
189
-
190
-
191
-
192
-
193
-
194
-
195
-
196
-
197
-
198
-
199
-
200
-
201
-
202
-
203
-
204
-
205
-
206
-
207
-
208
-
209
-
210
-
211
-
212
-
213
-
214
-
215
-
216
-
217
-
218
-
219
-
220
-
221
-
222
-
223
-
224
-
225
-
226
-
227
-
228
-
229
-
230
-
231
-
232
-
233
-
234
-
235
-
236
-
237
-
238
-
239
-
240
-
241
-
242
-
243
-
244
-
245
-
246
-
247
-
248
-
249
-
250
-
251
-
252
-
253
-
254
-
255
-
256
-
257
-
258
-
259
-
260
-
261
-
262
-
263
-
264
-
265
-
266
-
267
-
268
-
269
-
270
-
271
-
272
-
273
-
274
-
275
-
276
-
277
-
278
-
279
-
280
-
281
-
282
-
283
-
284
-
285
-
286
-
287
-
288
-
289
-
290
-
291
-
292
-
293
-
294
-
295
-
296
-
297
-
298
-
299
-
300
-
301
-
302
-
303
-
304
-
305
-
306
-
307
-
308
-
309
-
310
-
311
-
312
-
313
-
314
-
315
-
316
-
317
-
318
-
319
-
320
-
321
-
322
-
323
-
324
-
325
-
326
-
327
-
328
-
329
-
330
-
331
-
332
-
333
-
334
-
335
-
336
-
337
-
338
-
339
-
340
-
341
 |
 |