Adobe 65045315 Photoshop Elements Manual - Page 60
Use the Guided Edit options, The Crop Photo Guided Edit, The Rotate And/Or Straighten Guided Edit
 |
UPC - 883919176512
View all Adobe 65045315 manuals
Add to My Manuals
Save this manual to your list of manuals |
Page 60 highlights
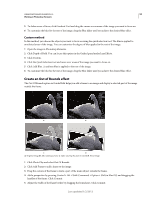
USING PHOTOSHOP ELEMENTS 10 54 Working in Photoshop Elements Automated Actions Lets you complete complex workflows in a small number of easy steps by allowing you to select an action set, then play the actions within that file. Use the Guided Edit options 1 Click the Edit tab in the Edit workspace. 2 Click the Guided tab. 3 Choose from the list of Guided Edits. 4 Do one of the following: • Follow the steps that appear and click Done. • Click Cancel to choose a different Guided Edit, or go back to the Edit workspace. Note: If you enter a Guided Edit, then select "Before & After - Horizontal" option from View drop-down list at the bottom of the image to see the Before and After view of your photo. the view resets back to After only (the default), when you move out of Guided edit to other effects. The Crop Photo Guided Edit Use the Crop Photo Guided Edit to crop an image. You can view the after image only, or view both the before and after images either vertically or horizontally. For more information on cropping, see "Cropping" on page 145. The Recompose Photo Guided Edit For more information on the features used in the Recompose Photo Guided Edit, see "Recomposing" on page 178. The Rotate And/Or Straighten Guided Edit Use the Rotate and/or Straighten Photo Guided Edit to rotate a picture in 90-degree increments or draw a line through an image to realign it. You can view the after image only, or view both the before and after images either vertically or horizontally. For more on rotating an image, see "Rotate or flip an item" on page 174. For more on straightening an image, see "Straighten an image" on page 149. The Sharpen Photo Guided Edit Use the Sharpen Photo Guided Edit to sharpen an image. You can view the after image only, or view both the before and after images either vertically or horizontally. For more on sharpening images, see "Sharpening overview" on page 171 or "Sharpen an image" on page 172. The Lighten Or Darken Guided Edit Use the Lighten or Darken Guided Edit to lighten or darken an image. You can view the after image only, or view both the before and after images either vertically or horizontally. For more on lightening or darkening an image, see "Adjusting shadows and light" on page 121. Last updated 1/2/2012
-
 1
1 -
2
-
3
-
4
-
5
-
6
-
7
-
8
-
9
-
10
-
11
-
12
-
13
-
14
-
15
-
16
-
17
-
18
-
19
-
20
-
21
-
22
-
23
-
24
-
25
-
26
-
27
-
28
-
29
-
30
-
31
-
32
-
33
-
34
-
35
-
36
-
37
-
38
-
39
-
40
-
41
-
42
-
43
-
44
-
45
-
46
-
47
-
48
-
49
-
50
-
51
-
52
-
53
-
54
-
 55
55 -
 56
56 -
 57
57 -
 58
58 -
 59
59 -
 60
60 -
 61
61 -
 62
62 -
 63
63 -
 64
64 -
 65
65 -
66
-
67
-
68
-
69
-
70
-
71
-
72
-
73
-
74
-
75
-
76
-
77
-
78
-
79
-
80
-
81
-
82
-
83
-
84
-
85
-
86
-
87
-
88
-
89
-
90
-
91
-
92
-
93
-
94
-
95
-
96
-
97
-
98
-
99
-
100
-
101
-
102
-
103
-
104
-
105
-
106
-
107
-
108
-
109
-
110
-
111
-
112
-
113
-
114
-
115
-
116
-
117
-
118
-
119
-
120
-
121
-
122
-
123
-
124
-
125
-
126
-
127
-
128
-
129
-
130
-
131
-
132
-
133
-
134
-
135
-
136
-
137
-
138
-
139
-
140
-
141
-
142
-
143
-
144
-
145
-
146
-
147
-
148
-
149
-
150
-
151
-
152
-
153
-
154
-
155
-
156
-
157
-
158
-
159
-
160
-
161
-
162
-
163
-
164
-
165
-
166
-
167
-
168
-
169
-
170
-
171
-
172
-
173
-
174
-
175
-
176
-
177
-
178
-
179
-
180
-
181
-
182
-
183
-
184
-
185
-
186
-
187
-
188
-
189
-
190
-
191
-
192
-
193
-
194
-
195
-
196
-
197
-
198
-
199
-
200
-
201
-
202
-
203
-
204
-
205
-
206
-
207
-
208
-
209
-
210
-
211
-
212
-
213
-
214
-
215
-
216
-
217
-
218
-
219
-
220
-
221
-
222
-
223
-
224
-
225
-
226
-
227
-
228
-
229
-
230
-
231
-
232
-
233
-
234
-
235
-
236
-
237
-
238
-
239
-
240
-
241
-
242
-
243
-
244
-
245
-
246
-
247
-
248
-
249
-
250
-
251
-
252
-
253
-
254
-
255
-
256
-
257
-
258
-
259
-
260
-
261
-
262
-
263
-
264
-
265
-
266
-
267
-
268
-
269
-
270
-
271
-
272
-
273
-
274
-
275
-
276
-
277
-
278
-
279
-
280
-
281
-
282
-
283
-
284
-
285
-
286
-
287
-
288
-
289
-
290
-
291
-
292
-
293
-
294
-
295
-
296
-
297
-
298
-
299
-
300
-
301
-
302
-
303
-
304
-
305
-
306
-
307
-
308
-
309
-
310
-
311
-
312
-
313
-
314
-
315
-
316
-
317
-
318
-
319
-
320
-
321
-
322
-
323
-
324
-
325
-
326
-
327
-
328
-
329
-
330
-
331
-
332
-
333
-
334
-
335
-
336
-
337
-
338
-
339
-
340
-
341
 |
 |
