Adobe 65045315 Photoshop Elements Manual - Page 40
Working in Photoshop Elements, Opening files in the Edit workspace, Create a new blank file
 |
UPC - 883919176512
View all Adobe 65045315 manuals
Add to My Manuals
Save this manual to your list of manuals |
Page 40 highlights
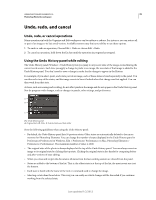
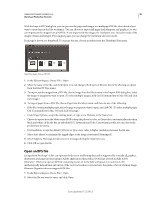
34 Chapter 3: Working in Photoshop Elements Working in the Edit workspace of Photoshop Elements gives you choices about working with your files. You can set options for opening, saving, and exporting files by type, by file size, and resolution. You can also process and save camera raw files. These tools make it easy to combine files of different types and optimize them in Adobe® Photoshop® Elements 10. In the Edit workspace, you can create a blank file, open a recently used file, specify which files types to open in Photoshop Elements, and more. An additional option for working in the Edit workspace is to use the Guided Edit feature. Guided Edits helps you when you're unsure of a workflow or how to accomplish a task. They empower users to complete complex editing workflows in a small number of easy steps. Opening files in the Edit workspace Create a new blank file You may want to create a web graphic, banner, or company logo and letterhead, in which case you need to start from a new blank file. 1 In the Edit workspace, choose File > New > Blank File. 2 Enter options for the new image and click OK. Name Names the new image file. Preset Provides options for setting the width, height, and resolution of images that you intend to print or to view on-screen. Select Clipboard to use the size and resolution of data that you copied to the clipboard. You can also base a new image on the size and resolution of any open image by choosing its name from the bottom of the Preset menu. Width, Height, and Resolution Sets these options individually. The default values are based on the last image you created, unless you've copied data to the clipboard. Color Mode Sets an image to RGB color, grayscale, or bitmap (1-bit mode). Background Contents Sets the color of the image Background layer. White is the default. Select Background Color to use the current background color (shown in the toolbox). Select Transparent to make the default layer transparent, with no color values-the new image will have a Layer 1 instead of a Background layer. You can also right-click the background of an image to choose a background color (gray, black, or a custom color). Open a file In the Edit workspace, you can open and import images in various file formats. The available formats appear in the Open dialog box, the Open As dialog box, and the Import submenu. Last updated 1/2/2012
-
 1
1 -
2
-
3
-
4
-
5
-
6
-
7
-
8
-
9
-
10
-
11
-
12
-
13
-
14
-
15
-
16
-
17
-
18
-
19
-
20
-
21
-
22
-
23
-
24
-
25
-
26
-
27
-
28
-
29
-
30
-
31
-
32
-
33
-
34
-
 35
35 -
 36
36 -
 37
37 -
 38
38 -
 39
39 -
 40
40 -
 41
41 -
 42
42 -
 43
43 -
 44
44 -
 45
45 -
46
-
47
-
48
-
49
-
50
-
51
-
52
-
53
-
54
-
55
-
56
-
57
-
58
-
59
-
60
-
61
-
62
-
63
-
64
-
65
-
66
-
67
-
68
-
69
-
70
-
71
-
72
-
73
-
74
-
75
-
76
-
77
-
78
-
79
-
80
-
81
-
82
-
83
-
84
-
85
-
86
-
87
-
88
-
89
-
90
-
91
-
92
-
93
-
94
-
95
-
96
-
97
-
98
-
99
-
100
-
101
-
102
-
103
-
104
-
105
-
106
-
107
-
108
-
109
-
110
-
111
-
112
-
113
-
114
-
115
-
116
-
117
-
118
-
119
-
120
-
121
-
122
-
123
-
124
-
125
-
126
-
127
-
128
-
129
-
130
-
131
-
132
-
133
-
134
-
135
-
136
-
137
-
138
-
139
-
140
-
141
-
142
-
143
-
144
-
145
-
146
-
147
-
148
-
149
-
150
-
151
-
152
-
153
-
154
-
155
-
156
-
157
-
158
-
159
-
160
-
161
-
162
-
163
-
164
-
165
-
166
-
167
-
168
-
169
-
170
-
171
-
172
-
173
-
174
-
175
-
176
-
177
-
178
-
179
-
180
-
181
-
182
-
183
-
184
-
185
-
186
-
187
-
188
-
189
-
190
-
191
-
192
-
193
-
194
-
195
-
196
-
197
-
198
-
199
-
200
-
201
-
202
-
203
-
204
-
205
-
206
-
207
-
208
-
209
-
210
-
211
-
212
-
213
-
214
-
215
-
216
-
217
-
218
-
219
-
220
-
221
-
222
-
223
-
224
-
225
-
226
-
227
-
228
-
229
-
230
-
231
-
232
-
233
-
234
-
235
-
236
-
237
-
238
-
239
-
240
-
241
-
242
-
243
-
244
-
245
-
246
-
247
-
248
-
249
-
250
-
251
-
252
-
253
-
254
-
255
-
256
-
257
-
258
-
259
-
260
-
261
-
262
-
263
-
264
-
265
-
266
-
267
-
268
-
269
-
270
-
271
-
272
-
273
-
274
-
275
-
276
-
277
-
278
-
279
-
280
-
281
-
282
-
283
-
284
-
285
-
286
-
287
-
288
-
289
-
290
-
291
-
292
-
293
-
294
-
295
-
296
-
297
-
298
-
299
-
300
-
301
-
302
-
303
-
304
-
305
-
306
-
307
-
308
-
309
-
310
-
311
-
312
-
313
-
314
-
315
-
316
-
317
-
318
-
319
-
320
-
321
-
322
-
323
-
324
-
325
-
326
-
327
-
328
-
329
-
330
-
331
-
332
-
333
-
334
-
335
-
336
-
337
-
338
-
339
-
340
-
341
 |
 |
