Adobe 65045315 Photoshop Elements Manual - Page 15
Creating photo projects, Create and share a slideshow (Windows only)
 |
UPC - 883919176512
View all Adobe 65045315 manuals
Add to My Manuals
Save this manual to your list of manuals |
Page 15 highlights
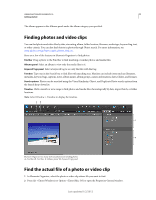
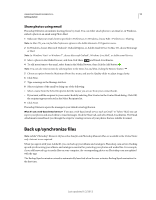
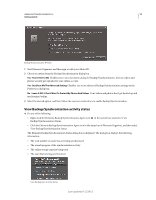
USING PHOTOSHOP ELEMENTS 10 9 Getting started 3 Do one of the following: • (Windows) Click the Reveal In Explorer icon . • (Mac OS) Click the Reveal In Finder icon . Creating photo projects You can use your photos in various fun projects that you can share with family and friends. For example, you can create photo projects, such as albums, greeting cards, CD/DVD labels and jackets, and photo collages. You can print these photo projects at home, or you can upload them to an online printing service. You can also use your photos in online photo galleries, photo slideshows, and flipbooks. For more information, see www.adobe.com/go/learn_org10_projects_en. Give your projects a personal look by customizing the project templates. Adjust layout colors to better complement your photos, and add new graphical elements, text, and effects, such as drop shadows and glows. Use the Contents panel to quickly browse hundreds of frames, themes, backgrounds, clip art, and effects to apply to your photos and photo projects. Note: Flipbook, slideshow, and HTML-based photo mail creation are not supported in Mac OS. Create and share a slideshow (Windows only) 1 In Elements Organizer, select the photos you want in the slideshow. 2 In the Create tab , click slideshow to show the slideshow Preferences. 3 Change any of the preferences, or click OK to use the default options. All the tools for creating your slideshow are in the slideshow dialog box. The photos you chose to use in the slideshow appear at the bottom of the screen. 4 In the slideshow Editor, have fun adding effects, text, small graphics, music, or your own narration. The slideshow Editor provides lots of possibilities for creativity. 5 If you want to reorder your slides, drag the slide's thumbnail image to a new location. The image thumbnails are at the bottom of the slideshow Editor. Drag one forward or back until you see the blue bar, and then release the mouse button. 6 To preview your slideshow with all its effects, use the VCR-style buttons under the slide preview. You can return to editing slides at any time by pressing the VCR-style button. Note: You can also preview your slideshow with all its effects using the Full Screen Preview icon. You can return to editing slides from the Full screen preview by pressing the Esc key. 7 Click Save Project (in the upper left of the slideshow Editor). It's a good idea to save the slideshow regularly as you work. 8 To output your slideshow for viewing or sharing, click Output (in the upper left of the slideshow Editor). Choose how you want to share your slideshow. You can save it as a movie file or a PDF file. You can also burn it to a disc (VCD/DVD) so you can play it on a TV or computer (Windows only). You must have Adobe Premiere Elements installed to burn your movie files to DVD. Last updated 1/2/2012
-
 1
1 -
2
-
3
-
4
-
5
-
6
-
7
-
8
-
9
-
 10
10 -
 11
11 -
 12
12 -
 13
13 -
 14
14 -
 15
15 -
 16
16 -
 17
17 -
 18
18 -
 19
19 -
 20
20 -
21
-
22
-
23
-
24
-
25
-
26
-
27
-
28
-
29
-
30
-
31
-
32
-
33
-
34
-
35
-
36
-
37
-
38
-
39
-
40
-
41
-
42
-
43
-
44
-
45
-
46
-
47
-
48
-
49
-
50
-
51
-
52
-
53
-
54
-
55
-
56
-
57
-
58
-
59
-
60
-
61
-
62
-
63
-
64
-
65
-
66
-
67
-
68
-
69
-
70
-
71
-
72
-
73
-
74
-
75
-
76
-
77
-
78
-
79
-
80
-
81
-
82
-
83
-
84
-
85
-
86
-
87
-
88
-
89
-
90
-
91
-
92
-
93
-
94
-
95
-
96
-
97
-
98
-
99
-
100
-
101
-
102
-
103
-
104
-
105
-
106
-
107
-
108
-
109
-
110
-
111
-
112
-
113
-
114
-
115
-
116
-
117
-
118
-
119
-
120
-
121
-
122
-
123
-
124
-
125
-
126
-
127
-
128
-
129
-
130
-
131
-
132
-
133
-
134
-
135
-
136
-
137
-
138
-
139
-
140
-
141
-
142
-
143
-
144
-
145
-
146
-
147
-
148
-
149
-
150
-
151
-
152
-
153
-
154
-
155
-
156
-
157
-
158
-
159
-
160
-
161
-
162
-
163
-
164
-
165
-
166
-
167
-
168
-
169
-
170
-
171
-
172
-
173
-
174
-
175
-
176
-
177
-
178
-
179
-
180
-
181
-
182
-
183
-
184
-
185
-
186
-
187
-
188
-
189
-
190
-
191
-
192
-
193
-
194
-
195
-
196
-
197
-
198
-
199
-
200
-
201
-
202
-
203
-
204
-
205
-
206
-
207
-
208
-
209
-
210
-
211
-
212
-
213
-
214
-
215
-
216
-
217
-
218
-
219
-
220
-
221
-
222
-
223
-
224
-
225
-
226
-
227
-
228
-
229
-
230
-
231
-
232
-
233
-
234
-
235
-
236
-
237
-
238
-
239
-
240
-
241
-
242
-
243
-
244
-
245
-
246
-
247
-
248
-
249
-
250
-
251
-
252
-
253
-
254
-
255
-
256
-
257
-
258
-
259
-
260
-
261
-
262
-
263
-
264
-
265
-
266
-
267
-
268
-
269
-
270
-
271
-
272
-
273
-
274
-
275
-
276
-
277
-
278
-
279
-
280
-
281
-
282
-
283
-
284
-
285
-
286
-
287
-
288
-
289
-
290
-
291
-
292
-
293
-
294
-
295
-
296
-
297
-
298
-
299
-
300
-
301
-
302
-
303
-
304
-
305
-
306
-
307
-
308
-
309
-
310
-
311
-
312
-
313
-
314
-
315
-
316
-
317
-
318
-
319
-
320
-
321
-
322
-
323
-
324
-
325
-
326
-
327
-
328
-
329
-
330
-
331
-
332
-
333
-
334
-
335
-
336
-
337
-
338
-
339
-
340
-
341
 |
 |
