Adobe 65045315 Photoshop Elements Manual - Page 87
Create a clipping mask, Remove a layer from a clipping mask, dialog box
 |
UPC - 883919176512
View all Adobe 65045315 manuals
Add to My Manuals
Save this manual to your list of manuals |
Page 87 highlights
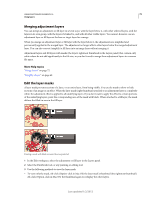
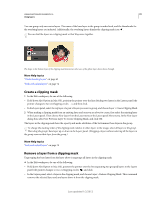
USING PHOTOSHOP ELEMENTS 10 81 Using layers You can group only successive layers. The name of the base layer in the group is underlined, and the thumbnails for the overlying layers are indented. Additionally, the overlying layers display the clipping mask icon . You can link the layers in a clipping mask so that they move together. The shape in the bottom layer of the clipping mask determines what area of the photo layer above shows through. More Help topics "Understanding layers" on page 62 "Link and unlink layers" on page 72 Create a clipping mask 1 In the Edit workspace, do one of the following: • Hold down Alt (Option in Mac OS), position the pointer over the line dividing two layers in the Layers panel (the pointer changes to two overlapping circles ), and then click. • In the Layers panel, select the top layer of a pair of layers you want to group, and choose Layer > Create Clipping Mask. 2 When making a clipping mask from an existing layer and one you are about to create, first select the existing layer in the Layers panel. Then choose New Layer from the Layer menu or the Layers panel More menu. In the New Layer dialog box, select Use Previous Layer To Create Clipping Mask, and click OK. The layers in the clipping mask have the opacity and mode attributes of the bottommost base layer in the group. To change the stacking order of the clipping mask relative to other layers in the image, select all layers in the group. Then drag the group's base layer up or down in the Layers panel. (Dragging a layer without selecting all the layers in the group removes that layer from the group.) More Help topics "Link and unlink layers" on page 72 Remove a layer from a clipping mask Ungrouping the base layer from the layer above it ungroups all layers in the clipping mask. ❖ In the Edit workspace, do one of the following: • Hold down Alt (Option in Mac OS), position the pointer over the line separating two grouped layers in the Layers panel (the pointer changes to two overlapping circles ), and click. • In the Layers panel, select a layer in the clipping mask, and choose Layer > Release Clipping Mask. This command removes the selected layer and any layers above it from the clipping mask. Last updated 1/2/2012
-
 1
1 -
2
-
3
-
4
-
5
-
6
-
7
-
8
-
9
-
10
-
11
-
12
-
13
-
14
-
15
-
16
-
17
-
18
-
19
-
20
-
21
-
22
-
23
-
24
-
25
-
26
-
27
-
28
-
29
-
30
-
31
-
32
-
33
-
34
-
35
-
36
-
37
-
38
-
39
-
40
-
41
-
42
-
43
-
44
-
45
-
46
-
47
-
48
-
49
-
50
-
51
-
52
-
53
-
54
-
55
-
56
-
57
-
58
-
59
-
60
-
61
-
62
-
63
-
64
-
65
-
66
-
67
-
68
-
69
-
70
-
71
-
72
-
73
-
74
-
75
-
76
-
77
-
78
-
79
-
80
-
81
-
 82
82 -
 83
83 -
 84
84 -
 85
85 -
 86
86 -
 87
87 -
 88
88 -
 89
89 -
 90
90 -
 91
91 -
 92
92 -
93
-
94
-
95
-
96
-
97
-
98
-
99
-
100
-
101
-
102
-
103
-
104
-
105
-
106
-
107
-
108
-
109
-
110
-
111
-
112
-
113
-
114
-
115
-
116
-
117
-
118
-
119
-
120
-
121
-
122
-
123
-
124
-
125
-
126
-
127
-
128
-
129
-
130
-
131
-
132
-
133
-
134
-
135
-
136
-
137
-
138
-
139
-
140
-
141
-
142
-
143
-
144
-
145
-
146
-
147
-
148
-
149
-
150
-
151
-
152
-
153
-
154
-
155
-
156
-
157
-
158
-
159
-
160
-
161
-
162
-
163
-
164
-
165
-
166
-
167
-
168
-
169
-
170
-
171
-
172
-
173
-
174
-
175
-
176
-
177
-
178
-
179
-
180
-
181
-
182
-
183
-
184
-
185
-
186
-
187
-
188
-
189
-
190
-
191
-
192
-
193
-
194
-
195
-
196
-
197
-
198
-
199
-
200
-
201
-
202
-
203
-
204
-
205
-
206
-
207
-
208
-
209
-
210
-
211
-
212
-
213
-
214
-
215
-
216
-
217
-
218
-
219
-
220
-
221
-
222
-
223
-
224
-
225
-
226
-
227
-
228
-
229
-
230
-
231
-
232
-
233
-
234
-
235
-
236
-
237
-
238
-
239
-
240
-
241
-
242
-
243
-
244
-
245
-
246
-
247
-
248
-
249
-
250
-
251
-
252
-
253
-
254
-
255
-
256
-
257
-
258
-
259
-
260
-
261
-
262
-
263
-
264
-
265
-
266
-
267
-
268
-
269
-
270
-
271
-
272
-
273
-
274
-
275
-
276
-
277
-
278
-
279
-
280
-
281
-
282
-
283
-
284
-
285
-
286
-
287
-
288
-
289
-
290
-
291
-
292
-
293
-
294
-
295
-
296
-
297
-
298
-
299
-
300
-
301
-
302
-
303
-
304
-
305
-
306
-
307
-
308
-
309
-
310
-
311
-
312
-
313
-
314
-
315
-
316
-
317
-
318
-
319
-
320
-
321
-
322
-
323
-
324
-
325
-
326
-
327
-
328
-
329
-
330
-
331
-
332
-
333
-
334
-
335
-
336
-
337
-
338
-
339
-
340
-
341
 |
 |
