Adobe 65045315 Photoshop Elements Manual - Page 97
Recovery, Fill Light, Blacks, Brightness, Contrast, Clarity, Vibrance, Saturation, Exposure, Shadow
 |
UPC - 883919176512
View all Adobe 65045315 manuals
Add to My Manuals
Save this manual to your list of manuals |
Page 97 highlights
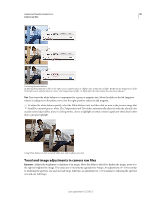
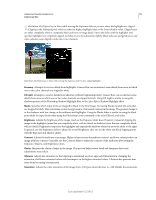
USING PHOTOSHOP ELEMENTS 10 91 Camera raw files Hold down Alt (Option key in Mac) while moving the Exposure slider to preview where the highlights are clipped. (Clipping is the shifting of pixel values to either the highest highlight value or the lowest shadow value. Clipped areas are either completely white or completely black and have no image detail.) Move the slider until the highlights (not specular highlights) are completely clipped, and then reverse the adjustment slightly. Black indicates unclipped areas, and color indicates areas clipped in only one or two channels. Hold down Alt (Option key in Mac) while moving the Exposure slider to show clipped highlights. Recovery Attempts to recover details from highlights. Camera Raw can reconstruct some details from areas in which one or two color channels are clipped to white. Fill Light Attempts to recover details from shadows, without brightening blacks. Camera Raw can reconstruct some details from areas in which one or two color channels are clipped to black. Using Fill Light is similar to using the shadows portion of the Photoshop Shadow/Highlight filter or the After Effects Shadow/Highlight effect. Blacks Specifies which input levels are mapped to black in the final image. Increasing Blacks expands the areas that are mapped to black. This sometimes creates the appearance of increased contrast in the image. The greatest change is in the shadows, with less change in the midtones and highlights. Using the Blacks slider is similar to using the black point slider for input levels when using the Photoshop Levels command or the After Effects Levels effect. Brightness Adjusts the brightness of the image, much as the Exposure slider does. However, instead of clipping the image in the highlights (areas that are completely white, with no detail) or shadows (areas that are completely black, with no detail), Brightness compresses the highlights and expands the shadows when you move the slider to the right. In general, use the Brightness slider to adjust the overall brightness after you set the white and black clipping points with the Exposure and Shadow sliders. Contrast Adjusts the midtones in an image. Higher values increase the midtone contrast, and lower values produce an image with less contrast. Generally, use the Contrast slider to adjust the contrast of the midtones after setting the Exposure, Shadow, and Brightness values. Clarity Sharpens the clarity of edges in the image. This process helps restore detail and sharpness that tonal adjustments may reduce. Vibrance Adjusts the saturation so that clipping is minimized as colors approach full saturation, changing the saturation of all lower-saturated colors with less impact on the higher-saturated colors. Vibrance also prevents skin tones from becoming oversaturated. Saturation Adjusts the color saturation of the image from -100 (pure monochrome) to +100 (double the saturation). Last updated 1/2/2012
-
 1
1 -
2
-
3
-
4
-
5
-
6
-
7
-
8
-
9
-
10
-
11
-
12
-
13
-
14
-
15
-
16
-
17
-
18
-
19
-
20
-
21
-
22
-
23
-
24
-
25
-
26
-
27
-
28
-
29
-
30
-
31
-
32
-
33
-
34
-
35
-
36
-
37
-
38
-
39
-
40
-
41
-
42
-
43
-
44
-
45
-
46
-
47
-
48
-
49
-
50
-
51
-
52
-
53
-
54
-
55
-
56
-
57
-
58
-
59
-
60
-
61
-
62
-
63
-
64
-
65
-
66
-
67
-
68
-
69
-
70
-
71
-
72
-
73
-
74
-
75
-
76
-
77
-
78
-
79
-
80
-
81
-
82
-
83
-
84
-
85
-
86
-
87
-
88
-
89
-
90
-
91
-
 92
92 -
 93
93 -
 94
94 -
 95
95 -
 96
96 -
 97
97 -
 98
98 -
 99
99 -
 100
100 -
 101
101 -
 102
102 -
103
-
104
-
105
-
106
-
107
-
108
-
109
-
110
-
111
-
112
-
113
-
114
-
115
-
116
-
117
-
118
-
119
-
120
-
121
-
122
-
123
-
124
-
125
-
126
-
127
-
128
-
129
-
130
-
131
-
132
-
133
-
134
-
135
-
136
-
137
-
138
-
139
-
140
-
141
-
142
-
143
-
144
-
145
-
146
-
147
-
148
-
149
-
150
-
151
-
152
-
153
-
154
-
155
-
156
-
157
-
158
-
159
-
160
-
161
-
162
-
163
-
164
-
165
-
166
-
167
-
168
-
169
-
170
-
171
-
172
-
173
-
174
-
175
-
176
-
177
-
178
-
179
-
180
-
181
-
182
-
183
-
184
-
185
-
186
-
187
-
188
-
189
-
190
-
191
-
192
-
193
-
194
-
195
-
196
-
197
-
198
-
199
-
200
-
201
-
202
-
203
-
204
-
205
-
206
-
207
-
208
-
209
-
210
-
211
-
212
-
213
-
214
-
215
-
216
-
217
-
218
-
219
-
220
-
221
-
222
-
223
-
224
-
225
-
226
-
227
-
228
-
229
-
230
-
231
-
232
-
233
-
234
-
235
-
236
-
237
-
238
-
239
-
240
-
241
-
242
-
243
-
244
-
245
-
246
-
247
-
248
-
249
-
250
-
251
-
252
-
253
-
254
-
255
-
256
-
257
-
258
-
259
-
260
-
261
-
262
-
263
-
264
-
265
-
266
-
267
-
268
-
269
-
270
-
271
-
272
-
273
-
274
-
275
-
276
-
277
-
278
-
279
-
280
-
281
-
282
-
283
-
284
-
285
-
286
-
287
-
288
-
289
-
290
-
291
-
292
-
293
-
294
-
295
-
296
-
297
-
298
-
299
-
300
-
301
-
302
-
303
-
304
-
305
-
306
-
307
-
308
-
309
-
310
-
311
-
312
-
313
-
314
-
315
-
316
-
317
-
318
-
319
-
320
-
321
-
322
-
323
-
324
-
325
-
326
-
327
-
328
-
329
-
330
-
331
-
332
-
333
-
334
-
335
-
336
-
337
-
338
-
339
-
340
-
341
 |
 |
