HP StorageWorks 2/16V Brocade Fabric Manager Administrator's Guide (53-1000019 - Page 229
Creating Single-Switch Reboot Groups
 |
View all HP StorageWorks 2/16V manuals
Add to My Manuals
Save this manual to your list of manuals |
Page 229 highlights
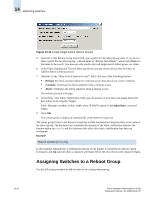
Rebooting Switches 14 6. Optional: In the "What to do if timeout occurs?" field, click one of the following buttons: • Prompt: Provides a prompt whenever a timeout occurs that asks if you want to continue. • Continue: Continues the reboot sequence when a timeout occurs. • Abort: Terminates the reboot sequence when a timeout occurs. The default selection is Prompt. 7. In the Delay After Fabric Stabilization field, type the amount of time that must elapse before the next reboot in the sequence begins. Fabric Manager considers a fabric stable when all WWNs appear in the fabricShow command output. 8. Click OK. Your reboot group is displayed automatically in the Reboot Groups tree. The reboot groups listed in the Reboot Groups tree include bracketed text displayed next to the name of the reboot group. The bracketed text represents the duration of the fabric stabilization timeout, the timeout option (see step 6), and the duration of the delay after fabric stabilization time that you configured. Example CoreSwitchRebootGroup [1m,P,2m] In this example, 1m indicates a stabilization timeout of one minute, P identifies the timeout option (Prompt), and 2m indicates that two minutes will elapse before the next reboot in the sequence begins. Creating Single-Switch Reboot Groups Create a single-switch reboot group for any switch in your fabric that is not assigned to a multiswitch reboot group if you want to include it in a reboot sequence. To create a single-switch reboot group 1. Click Tasks > Reboot > Create Reboot Sequence. The "Create or Change Reboot Groups and Sequence" window displays (see Figure 14-11 on page 14-20). 2. Select a fabric from the Select Fabric drop-down list. 3. Select a switch from the list of Unassigned Switches. To create more than one single-switch reboot group, select multiple switches. Each switch is made into its own single-switch reboot group. 4. Click the Create Single Switch Groups button. The Create Single Switch Reboot Groups dialog displays, as shown in Figure 14-13. Fabric Manager Administrator's Guide Publication Number: 53-1000196-01-HP 14-21
-
 1
1 -
2
-
3
-
4
-
5
-
6
-
7
-
8
-
9
-
10
-
11
-
12
-
13
-
14
-
15
-
16
-
17
-
18
-
19
-
20
-
21
-
22
-
23
-
24
-
25
-
26
-
27
-
28
-
29
-
30
-
31
-
32
-
33
-
34
-
35
-
36
-
37
-
38
-
39
-
40
-
41
-
42
-
43
-
44
-
45
-
46
-
47
-
48
-
49
-
50
-
51
-
52
-
53
-
54
-
55
-
56
-
57
-
58
-
59
-
60
-
61
-
62
-
63
-
64
-
65
-
66
-
67
-
68
-
69
-
70
-
71
-
72
-
73
-
74
-
75
-
76
-
77
-
78
-
79
-
80
-
81
-
82
-
83
-
84
-
85
-
86
-
87
-
88
-
89
-
90
-
91
-
92
-
93
-
94
-
95
-
96
-
97
-
98
-
99
-
100
-
101
-
102
-
103
-
104
-
105
-
106
-
107
-
108
-
109
-
110
-
111
-
112
-
113
-
114
-
115
-
116
-
117
-
118
-
119
-
120
-
121
-
122
-
123
-
124
-
125
-
126
-
127
-
128
-
129
-
130
-
131
-
132
-
133
-
134
-
135
-
136
-
137
-
138
-
139
-
140
-
141
-
142
-
143
-
144
-
145
-
146
-
147
-
148
-
149
-
150
-
151
-
152
-
153
-
154
-
155
-
156
-
157
-
158
-
159
-
160
-
161
-
162
-
163
-
164
-
165
-
166
-
167
-
168
-
169
-
170
-
171
-
172
-
173
-
174
-
175
-
176
-
177
-
178
-
179
-
180
-
181
-
182
-
183
-
184
-
185
-
186
-
187
-
188
-
189
-
190
-
191
-
192
-
193
-
194
-
195
-
196
-
197
-
198
-
199
-
200
-
201
-
202
-
203
-
204
-
205
-
206
-
207
-
208
-
209
-
210
-
211
-
212
-
213
-
214
-
215
-
216
-
217
-
218
-
219
-
220
-
221
-
222
-
223
-
 224
224 -
 225
225 -
 226
226 -
 227
227 -
 228
228 -
 229
229 -
 230
230 -
 231
231 -
 232
232 -
 233
233 -
 234
234 -
235
-
236
-
237
-
238
-
239
-
240
-
241
-
242
-
243
-
244
-
245
-
246
-
247
-
248
-
249
-
250
-
251
-
252
-
253
-
254
-
255
-
256
-
257
-
258
-
259
-
260
-
261
-
262
-
263
-
264
-
265
-
266
-
267
-
268
-
269
-
270
-
271
-
272
-
273
-
274
-
275
-
276
-
277
-
278
-
279
-
280
-
281
-
282
-
283
-
284
-
285
-
286
-
287
-
288
-
289
-
290
-
291
-
292
-
293
-
294
-
295
-
296
-
297
-
298
-
299
-
300
-
301
-
302
-
303
-
304
-
305
-
306
-
307
-
308
-
309
-
310
-
311
-
312
-
313
-
314
-
315
-
316
-
317
-
318
-
319
-
320
-
321
-
322
-
323
-
324
-
325
-
326
-
327
-
328
-
329
-
330
-
331
-
332
-
333
-
334
-
335
-
336
-
337
-
338
-
339
-
340
-
341
-
342
-
343
-
344
-
345
-
346
-
347
-
348
-
349
-
350
-
351
-
352
-
353
-
354
-
355
-
356
-
357
-
358
-
359
-
360
-
361
-
362
-
363
-
364
-
365
-
366
-
367
-
368
-
369
-
370
-
371
-
372
-
373
-
374
-
375
-
376
-
377
-
378
-
379
-
380
-
381
-
382
-
383
-
384
-
385
-
386
-
387
-
388
-
389
-
390
-
391
-
392
-
393
-
394
-
395
-
396
-
397
-
398
-
399
-
400
-
401
-
402
-
403
-
404
-
405
-
406
 |
 |