HP StorageWorks 2/16V Brocade Fabric Manager Administrator's Guide (53-1000019 - Page 263
Configuring SES and MS Policy Options, Security, Security Policy Editor, Policy >, Delete, Policy
 |
View all HP StorageWorks 2/16V manuals
Add to My Manuals
Save this manual to your list of manuals |
Page 263 highlights
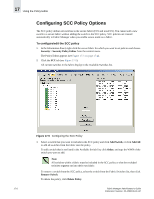
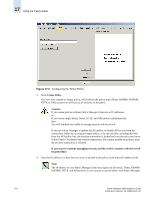
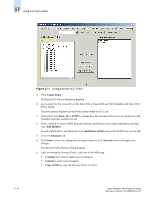
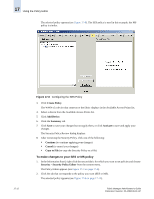
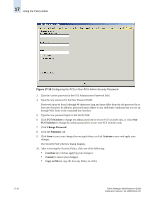
Using the Policy Editor 17 To make changes to existing DCC policies 1. In the Information Panel, right-click the secure fabric for which you want to set policies and choose Security > Security Policy Editor from the context menu. The Policy Editor appears (see Figure 17-3 on page 17-4). 2. Click the DCC tab (see Figure 17-7 on page 17-10). 3. Perform any of the following actions for each DCC policy: • To remove a DCC policy, click Policy > Policy Name You want to delete and click Delete Policy. • To rename a DCC policy, click Policy > Policy Name You want to rename and click Rename Policy. • To change the contents of a DCC policy, click Policy > Policy Name you want to edit, then... - Select a switch or device WWN from the Switches and Devices tab to add to the policy, and click Add Member. - To add a WWN that is not displayed, click Add Device WWN and type the WWN you want to add. 4. Click the Summary tab. 5. Click Save to save your changes but not apply them, or click Activate to save and apply your changes. The Security Policy Review dialog displays. 6. After reviewing the Security Policy, click one of the following: • Continue (to continue applying your changes) • Cancel (to cancel your changes) • Copy to File (to copy the Security Policy to a file) Configuring SES and MS Policy Options Create an SES policy to allow device ports to access switches using the SES protocol. With Fabric Manager, you can create and configure multiple SES policies with unique names and populate SES policies with switch and device WWNs. Create an MS policy to allow trusted fabric-connected devices to access the Management Server. With Fabric Manager, you can create and configure multiple MS policies with unique names and populate MS policies with switch and device WWNs. SES and MS policies are both device-based. To create an SES or MS policy 1. In the Information Panel, right-click the secure fabric for which you want to set policies and choose Security > Security Policy Editor from the context menu. The Policy Editor appears (see Figure 17-3 on page 17-4). 2. Click the tab that corresponds to the policy you want (SES or MS). Fabric Manager Administrator's Guide Publication Number: 53-1000196-01-HP 17-11
-
 1
1 -
2
-
3
-
4
-
5
-
6
-
7
-
8
-
9
-
10
-
11
-
12
-
13
-
14
-
15
-
16
-
17
-
18
-
19
-
20
-
21
-
22
-
23
-
24
-
25
-
26
-
27
-
28
-
29
-
30
-
31
-
32
-
33
-
34
-
35
-
36
-
37
-
38
-
39
-
40
-
41
-
42
-
43
-
44
-
45
-
46
-
47
-
48
-
49
-
50
-
51
-
52
-
53
-
54
-
55
-
56
-
57
-
58
-
59
-
60
-
61
-
62
-
63
-
64
-
65
-
66
-
67
-
68
-
69
-
70
-
71
-
72
-
73
-
74
-
75
-
76
-
77
-
78
-
79
-
80
-
81
-
82
-
83
-
84
-
85
-
86
-
87
-
88
-
89
-
90
-
91
-
92
-
93
-
94
-
95
-
96
-
97
-
98
-
99
-
100
-
101
-
102
-
103
-
104
-
105
-
106
-
107
-
108
-
109
-
110
-
111
-
112
-
113
-
114
-
115
-
116
-
117
-
118
-
119
-
120
-
121
-
122
-
123
-
124
-
125
-
126
-
127
-
128
-
129
-
130
-
131
-
132
-
133
-
134
-
135
-
136
-
137
-
138
-
139
-
140
-
141
-
142
-
143
-
144
-
145
-
146
-
147
-
148
-
149
-
150
-
151
-
152
-
153
-
154
-
155
-
156
-
157
-
158
-
159
-
160
-
161
-
162
-
163
-
164
-
165
-
166
-
167
-
168
-
169
-
170
-
171
-
172
-
173
-
174
-
175
-
176
-
177
-
178
-
179
-
180
-
181
-
182
-
183
-
184
-
185
-
186
-
187
-
188
-
189
-
190
-
191
-
192
-
193
-
194
-
195
-
196
-
197
-
198
-
199
-
200
-
201
-
202
-
203
-
204
-
205
-
206
-
207
-
208
-
209
-
210
-
211
-
212
-
213
-
214
-
215
-
216
-
217
-
218
-
219
-
220
-
221
-
222
-
223
-
224
-
225
-
226
-
227
-
228
-
229
-
230
-
231
-
232
-
233
-
234
-
235
-
236
-
237
-
238
-
239
-
240
-
241
-
242
-
243
-
244
-
245
-
246
-
247
-
248
-
249
-
250
-
251
-
252
-
253
-
254
-
255
-
256
-
257
-
 258
258 -
 259
259 -
 260
260 -
 261
261 -
 262
262 -
 263
263 -
 264
264 -
 265
265 -
 266
266 -
 267
267 -
 268
268 -
269
-
270
-
271
-
272
-
273
-
274
-
275
-
276
-
277
-
278
-
279
-
280
-
281
-
282
-
283
-
284
-
285
-
286
-
287
-
288
-
289
-
290
-
291
-
292
-
293
-
294
-
295
-
296
-
297
-
298
-
299
-
300
-
301
-
302
-
303
-
304
-
305
-
306
-
307
-
308
-
309
-
310
-
311
-
312
-
313
-
314
-
315
-
316
-
317
-
318
-
319
-
320
-
321
-
322
-
323
-
324
-
325
-
326
-
327
-
328
-
329
-
330
-
331
-
332
-
333
-
334
-
335
-
336
-
337
-
338
-
339
-
340
-
341
-
342
-
343
-
344
-
345
-
346
-
347
-
348
-
349
-
350
-
351
-
352
-
353
-
354
-
355
-
356
-
357
-
358
-
359
-
360
-
361
-
362
-
363
-
364
-
365
-
366
-
367
-
368
-
369
-
370
-
371
-
372
-
373
-
374
-
375
-
376
-
377
-
378
-
379
-
380
-
381
-
382
-
383
-
384
-
385
-
386
-
387
-
388
-
389
-
390
-
391
-
392
-
393
-
394
-
395
-
396
-
397
-
398
-
399
-
400
-
401
-
402
-
403
-
404
-
405
-
406
 |
 |