HP StorageWorks 2/16V Brocade Fabric Manager Administrator's Guide (53-1000019 - Page 98
Creating and Populating Switch Groups, To create a group of switches or ports
 |
View all HP StorageWorks 2/16V manuals
Add to My Manuals
Save this manual to your list of manuals |
Page 98 highlights
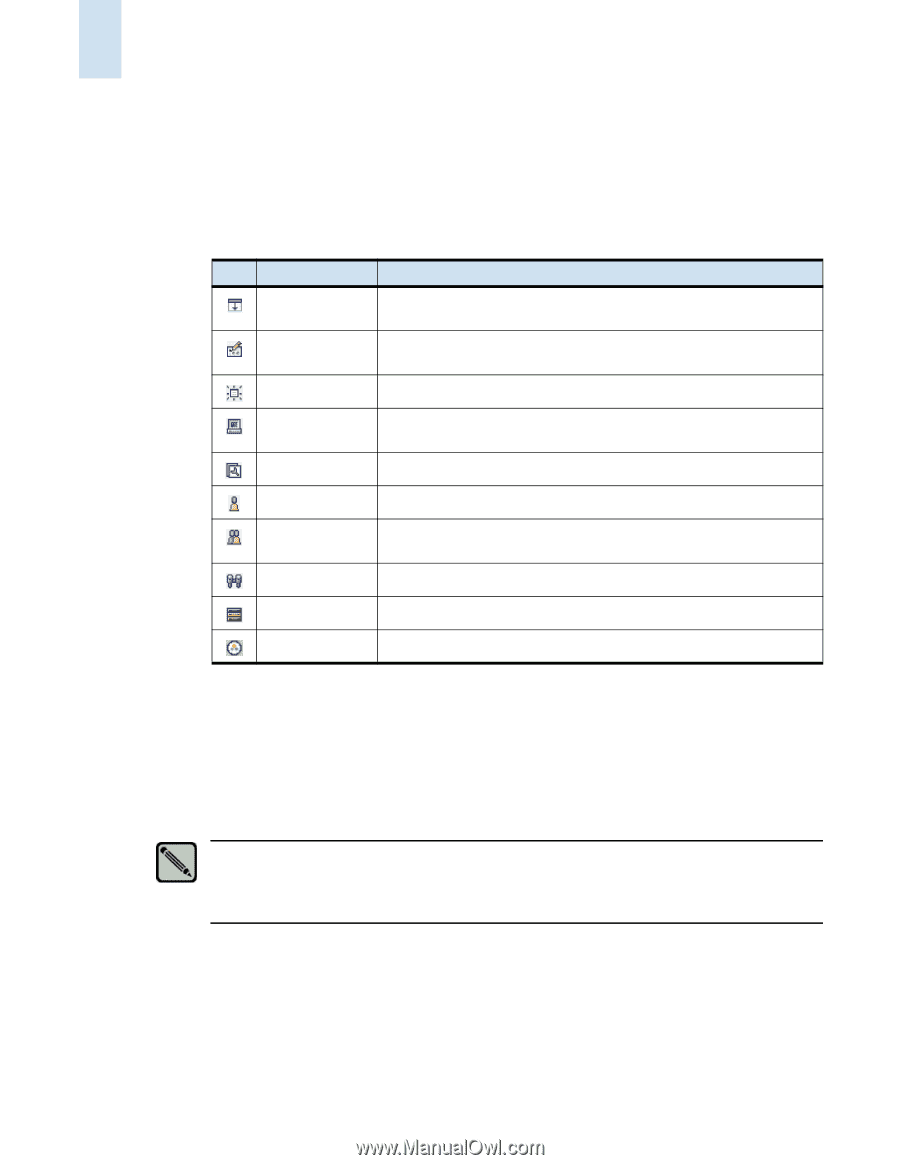
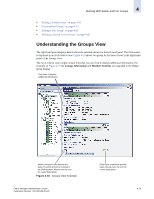
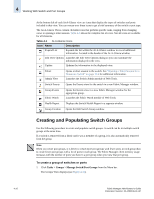
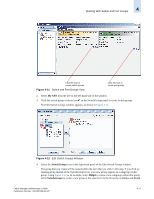
4 Working With Switch and Port Groups At the bottom left of each At-A-Glance view are icons that display the types of switches and ports included in that view. You can mouse-over these icons to get a brief summary of the switch or port type. The At-A-Glance Views contain clickable icons that perform specific tasks, ranging from changing views to opening a telnet session. Table 4-1 shows the complete list of icons. Not all icons are available for all elements. Table 4-1 At-A-Glance Icons Icon Name Description Expand List Expands the list within the At-A-Glance window to reveal additional information. Located in the header of the At-A-Glance window. Edit View Options Launches the Edit View Options dialog so you can customize the information displayed in the view. Update Updates the information in the displayed view. Telnet Admin View Opens a telnet session to the switch. See "Opening a Telnet Session for a Nonsecure Switch" on page 11-6 for additional information. Launches the Switch Admin module of Web Tools. Switch Events Opens the Events view for the switch in a new Fabric Manager window. Group Events Fabric Watch Opens the Events view in a new Fabric Manager window for the appropriate group. Launches the Fabric Watch module of Web Tools. Health Report Displays the Switch Health Report in a separate window. Group Creation Opens the Edit Switch Group window. Creating and Populating Switch Groups Use the following procedure to create and populate switch groups. A switch can be in multiple switch groups at the same time. If a switch is removed from a fabric and it was a member of a group, it is also automatically removed from the group. Note When you create port groups, it is better to create more port groups with fewer ports in each group than to create fewer port groups with a lot of ports in each group. The Fabric Manager client memory usage increases with the number of ports you have in a port group when you view that port group. To create a group of switches or ports 1. Click Tasks > Groups > Manage Switch/Port Groups from the Menu bar. The Groups View displays (see Figure 4-11). 4-16 Fabric Manager Administrator's Guide Publication Number: 53-1000196-01-HP
-
 1
1 -
2
-
3
-
4
-
5
-
6
-
7
-
8
-
9
-
10
-
11
-
12
-
13
-
14
-
15
-
16
-
17
-
18
-
19
-
20
-
21
-
22
-
23
-
24
-
25
-
26
-
27
-
28
-
29
-
30
-
31
-
32
-
33
-
34
-
35
-
36
-
37
-
38
-
39
-
40
-
41
-
42
-
43
-
44
-
45
-
46
-
47
-
48
-
49
-
50
-
51
-
52
-
53
-
54
-
55
-
56
-
57
-
58
-
59
-
60
-
61
-
62
-
63
-
64
-
65
-
66
-
67
-
68
-
69
-
70
-
71
-
72
-
73
-
74
-
75
-
76
-
77
-
78
-
79
-
80
-
81
-
82
-
83
-
84
-
85
-
86
-
87
-
88
-
89
-
90
-
91
-
92
-
 93
93 -
 94
94 -
 95
95 -
 96
96 -
 97
97 -
 98
98 -
 99
99 -
 100
100 -
 101
101 -
 102
102 -
 103
103 -
104
-
105
-
106
-
107
-
108
-
109
-
110
-
111
-
112
-
113
-
114
-
115
-
116
-
117
-
118
-
119
-
120
-
121
-
122
-
123
-
124
-
125
-
126
-
127
-
128
-
129
-
130
-
131
-
132
-
133
-
134
-
135
-
136
-
137
-
138
-
139
-
140
-
141
-
142
-
143
-
144
-
145
-
146
-
147
-
148
-
149
-
150
-
151
-
152
-
153
-
154
-
155
-
156
-
157
-
158
-
159
-
160
-
161
-
162
-
163
-
164
-
165
-
166
-
167
-
168
-
169
-
170
-
171
-
172
-
173
-
174
-
175
-
176
-
177
-
178
-
179
-
180
-
181
-
182
-
183
-
184
-
185
-
186
-
187
-
188
-
189
-
190
-
191
-
192
-
193
-
194
-
195
-
196
-
197
-
198
-
199
-
200
-
201
-
202
-
203
-
204
-
205
-
206
-
207
-
208
-
209
-
210
-
211
-
212
-
213
-
214
-
215
-
216
-
217
-
218
-
219
-
220
-
221
-
222
-
223
-
224
-
225
-
226
-
227
-
228
-
229
-
230
-
231
-
232
-
233
-
234
-
235
-
236
-
237
-
238
-
239
-
240
-
241
-
242
-
243
-
244
-
245
-
246
-
247
-
248
-
249
-
250
-
251
-
252
-
253
-
254
-
255
-
256
-
257
-
258
-
259
-
260
-
261
-
262
-
263
-
264
-
265
-
266
-
267
-
268
-
269
-
270
-
271
-
272
-
273
-
274
-
275
-
276
-
277
-
278
-
279
-
280
-
281
-
282
-
283
-
284
-
285
-
286
-
287
-
288
-
289
-
290
-
291
-
292
-
293
-
294
-
295
-
296
-
297
-
298
-
299
-
300
-
301
-
302
-
303
-
304
-
305
-
306
-
307
-
308
-
309
-
310
-
311
-
312
-
313
-
314
-
315
-
316
-
317
-
318
-
319
-
320
-
321
-
322
-
323
-
324
-
325
-
326
-
327
-
328
-
329
-
330
-
331
-
332
-
333
-
334
-
335
-
336
-
337
-
338
-
339
-
340
-
341
-
342
-
343
-
344
-
345
-
346
-
347
-
348
-
349
-
350
-
351
-
352
-
353
-
354
-
355
-
356
-
357
-
358
-
359
-
360
-
361
-
362
-
363
-
364
-
365
-
366
-
367
-
368
-
369
-
370
-
371
-
372
-
373
-
374
-
375
-
376
-
377
-
378
-
379
-
380
-
381
-
382
-
383
-
384
-
385
-
386
-
387
-
388
-
389
-
390
-
391
-
392
-
393
-
394
-
395
-
396
-
397
-
398
-
399
-
400
-
401
-
402
-
403
-
404
-
405
-
406
 |
 |