HP StorageWorks 2/16V Brocade Fabric Manager Administrator's Guide (53-1000019 - Page 96
Importing FDMI Host Names, Working With Switch and Port Groups
 |
View all HP StorageWorks 2/16V manuals
Add to My Manuals
Save this manual to your list of manuals |
Page 96 highlights
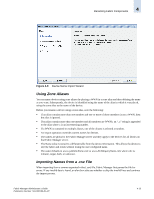
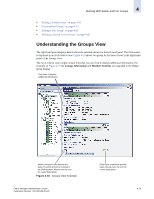
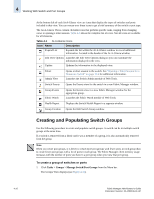
4 Working With Switch and Port Groups The format for the .csv file is: WWN, name, comment For example: 10:00:00:00:00:00:00:00, test_node, device node for testing purposes only The parser ignores anything after the second comma to the end of the line. Importing FDMI Host Names You can import FDMI host names as device port names. All FDMI host names and their WWNs that are currently in the device port database table for the selected fabric are imported. Device port names that match the WWN are renamed to the corresponding host name. Working With Switch and Port Groups This section describes how to use Fabric Manager to create groups of SAN elements (switch groups or port groups) that you can monitor and manage as a group. Groups are global across Fabric Manager and are available only at the physical fabric level. Only users that have physical fabric access to all of the managed fabrics can view the switch and port groups. Users that are using the same Fabric Manager server see the same groups and can make changes to these groups. Creating groups allows you to organize switches or ports by function, type, firmware version, or any other criteria that you select. You can also create functional hierarchies of groups. Using switch or port groups simplifies your management tasks. For example, you can log in to all switches in a group or activate licenses on all group members simultaneously. Additional reasons for creating groups include the following: • Create groups of switch model types or firmware versions to expedite firmware downloads. • Activate licenses on all group members simultaneously. • Group switches by function to monitor switches that belong to different departments or that serve as a backbone to the SAN. • Group switches by physical location to monitor fabrics in disparate locations. • Group switches by SAN island to monitor or update individual islands. • Group switches by redundancy so you can maintain one half of a fabric while the other half continues to carry traffic. • Nest fabrics to drill down to the source of a problem; for instance, if you create a switch group for a campus and then nest within that switch groups for departments, you can move down the hierarchy to determine the source of any status change. • Create separate groups for monitoring and management to reduce unnecessary levels of nesting. • Group ports by certain devices and hosts to more easily monitor those elements. • Use groups to simplify the monitoring view of a large or complex fabric. See the following sections for information about working with switch and port groups: • "Understanding the Groups View" on page 4-15 • "Creating and Populating Switch Groups" on page 4-16 4-14 Fabric Manager Administrator's Guide Publication Number: 53-1000196-01-HP
-
 1
1 -
2
-
3
-
4
-
5
-
6
-
7
-
8
-
9
-
10
-
11
-
12
-
13
-
14
-
15
-
16
-
17
-
18
-
19
-
20
-
21
-
22
-
23
-
24
-
25
-
26
-
27
-
28
-
29
-
30
-
31
-
32
-
33
-
34
-
35
-
36
-
37
-
38
-
39
-
40
-
41
-
42
-
43
-
44
-
45
-
46
-
47
-
48
-
49
-
50
-
51
-
52
-
53
-
54
-
55
-
56
-
57
-
58
-
59
-
60
-
61
-
62
-
63
-
64
-
65
-
66
-
67
-
68
-
69
-
70
-
71
-
72
-
73
-
74
-
75
-
76
-
77
-
78
-
79
-
80
-
81
-
82
-
83
-
84
-
85
-
86
-
87
-
88
-
89
-
90
-
 91
91 -
 92
92 -
 93
93 -
 94
94 -
 95
95 -
 96
96 -
 97
97 -
 98
98 -
 99
99 -
 100
100 -
 101
101 -
102
-
103
-
104
-
105
-
106
-
107
-
108
-
109
-
110
-
111
-
112
-
113
-
114
-
115
-
116
-
117
-
118
-
119
-
120
-
121
-
122
-
123
-
124
-
125
-
126
-
127
-
128
-
129
-
130
-
131
-
132
-
133
-
134
-
135
-
136
-
137
-
138
-
139
-
140
-
141
-
142
-
143
-
144
-
145
-
146
-
147
-
148
-
149
-
150
-
151
-
152
-
153
-
154
-
155
-
156
-
157
-
158
-
159
-
160
-
161
-
162
-
163
-
164
-
165
-
166
-
167
-
168
-
169
-
170
-
171
-
172
-
173
-
174
-
175
-
176
-
177
-
178
-
179
-
180
-
181
-
182
-
183
-
184
-
185
-
186
-
187
-
188
-
189
-
190
-
191
-
192
-
193
-
194
-
195
-
196
-
197
-
198
-
199
-
200
-
201
-
202
-
203
-
204
-
205
-
206
-
207
-
208
-
209
-
210
-
211
-
212
-
213
-
214
-
215
-
216
-
217
-
218
-
219
-
220
-
221
-
222
-
223
-
224
-
225
-
226
-
227
-
228
-
229
-
230
-
231
-
232
-
233
-
234
-
235
-
236
-
237
-
238
-
239
-
240
-
241
-
242
-
243
-
244
-
245
-
246
-
247
-
248
-
249
-
250
-
251
-
252
-
253
-
254
-
255
-
256
-
257
-
258
-
259
-
260
-
261
-
262
-
263
-
264
-
265
-
266
-
267
-
268
-
269
-
270
-
271
-
272
-
273
-
274
-
275
-
276
-
277
-
278
-
279
-
280
-
281
-
282
-
283
-
284
-
285
-
286
-
287
-
288
-
289
-
290
-
291
-
292
-
293
-
294
-
295
-
296
-
297
-
298
-
299
-
300
-
301
-
302
-
303
-
304
-
305
-
306
-
307
-
308
-
309
-
310
-
311
-
312
-
313
-
314
-
315
-
316
-
317
-
318
-
319
-
320
-
321
-
322
-
323
-
324
-
325
-
326
-
327
-
328
-
329
-
330
-
331
-
332
-
333
-
334
-
335
-
336
-
337
-
338
-
339
-
340
-
341
-
342
-
343
-
344
-
345
-
346
-
347
-
348
-
349
-
350
-
351
-
352
-
353
-
354
-
355
-
356
-
357
-
358
-
359
-
360
-
361
-
362
-
363
-
364
-
365
-
366
-
367
-
368
-
369
-
370
-
371
-
372
-
373
-
374
-
375
-
376
-
377
-
378
-
379
-
380
-
381
-
382
-
383
-
384
-
385
-
386
-
387
-
388
-
389
-
390
-
391
-
392
-
393
-
394
-
395
-
396
-
397
-
398
-
399
-
400
-
401
-
402
-
403
-
404
-
405
-
406
 |
 |