HP StorageWorks 2/16V Brocade Fabric Manager Administrator's Guide (53-1000019 - Page 53
Installing Fabric Manager Server on Linux
 |
View all HP StorageWorks 2/16V manuals
Add to My Manuals
Save this manual to your list of manuals |
Page 53 highlights
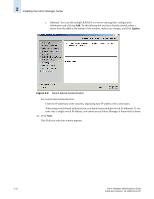
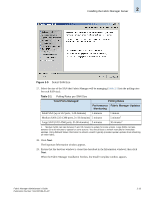
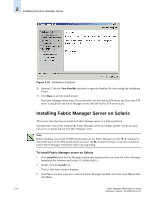
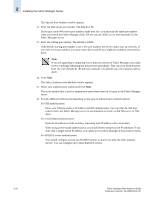
Installing the Fabric Manager Server 2 a. Enter values for the following: - RADIUS server IP address or DNS name. - RADIUS authentication port number. - Authentication type. The authentication type should match the setting on your RADIUS server. - Shared secret and confirm shared secret. The shared secret is a password for the RADIUS client and server. It is used in an encryption process to obscure details in RADIUS messages like user passwords. - It is recommended that the shared secret should be at least 22 characters containing mixed case letters with numeric and symbol or punctuation characters. - Timeout. The number of seconds the client waits for the RADIUS server to reply. - Retry. The number of attempts to connect to the RADIUS server before giving up. b. Click Add. c. Optional: You can add multiple RADIUS servers by entering their configuration information and clicking Add. To edit the information you have already entered, select it from the list, make your changes, and then click Update. For password file authentication: No additional information is required. 17. Click Next. The SAN size selection window appears. 18. Select the size of the SAN that Fabric Manager will be managing (Table 2-1 lists the polling rates for each SAN size). 19. Click Next. When the Fabric Manager installation finishes, the Install Complete window appears. 20. Click Done to exit the install wizard. Installing Fabric Manager Server on Linux This section describes how to install the Fabric Manager server on a Linux platform. You must have root access to install Fabric Manager server on a Linux system. You do not need root access to install and run the Fabric Manager client. Note Before installing, ensure that all NFS mount points are up. Fabric Manager uses the df -k command to check disk space. If the NFS mount points are down, the df command can take a long time to respond and the Fabric Manager installation might stop responding. To install Fabric Manager server on Linux 1. Click install.bin from the File Manager window that displays when you insert the Fabric Manager Installation for Linux CD-ROM (disk 2). 2. Double-click the Install icon. Fabric Manager Administrator's Guide Publication Number: 53-1000196-01-HP 2-17
-
 1
1 -
2
-
3
-
4
-
5
-
6
-
7
-
8
-
9
-
10
-
11
-
12
-
13
-
14
-
15
-
16
-
17
-
18
-
19
-
20
-
21
-
22
-
23
-
24
-
25
-
26
-
27
-
28
-
29
-
30
-
31
-
32
-
33
-
34
-
35
-
36
-
37
-
38
-
39
-
40
-
41
-
42
-
43
-
44
-
45
-
46
-
47
-
 48
48 -
 49
49 -
 50
50 -
 51
51 -
 52
52 -
 53
53 -
 54
54 -
 55
55 -
 56
56 -
 57
57 -
 58
58 -
59
-
60
-
61
-
62
-
63
-
64
-
65
-
66
-
67
-
68
-
69
-
70
-
71
-
72
-
73
-
74
-
75
-
76
-
77
-
78
-
79
-
80
-
81
-
82
-
83
-
84
-
85
-
86
-
87
-
88
-
89
-
90
-
91
-
92
-
93
-
94
-
95
-
96
-
97
-
98
-
99
-
100
-
101
-
102
-
103
-
104
-
105
-
106
-
107
-
108
-
109
-
110
-
111
-
112
-
113
-
114
-
115
-
116
-
117
-
118
-
119
-
120
-
121
-
122
-
123
-
124
-
125
-
126
-
127
-
128
-
129
-
130
-
131
-
132
-
133
-
134
-
135
-
136
-
137
-
138
-
139
-
140
-
141
-
142
-
143
-
144
-
145
-
146
-
147
-
148
-
149
-
150
-
151
-
152
-
153
-
154
-
155
-
156
-
157
-
158
-
159
-
160
-
161
-
162
-
163
-
164
-
165
-
166
-
167
-
168
-
169
-
170
-
171
-
172
-
173
-
174
-
175
-
176
-
177
-
178
-
179
-
180
-
181
-
182
-
183
-
184
-
185
-
186
-
187
-
188
-
189
-
190
-
191
-
192
-
193
-
194
-
195
-
196
-
197
-
198
-
199
-
200
-
201
-
202
-
203
-
204
-
205
-
206
-
207
-
208
-
209
-
210
-
211
-
212
-
213
-
214
-
215
-
216
-
217
-
218
-
219
-
220
-
221
-
222
-
223
-
224
-
225
-
226
-
227
-
228
-
229
-
230
-
231
-
232
-
233
-
234
-
235
-
236
-
237
-
238
-
239
-
240
-
241
-
242
-
243
-
244
-
245
-
246
-
247
-
248
-
249
-
250
-
251
-
252
-
253
-
254
-
255
-
256
-
257
-
258
-
259
-
260
-
261
-
262
-
263
-
264
-
265
-
266
-
267
-
268
-
269
-
270
-
271
-
272
-
273
-
274
-
275
-
276
-
277
-
278
-
279
-
280
-
281
-
282
-
283
-
284
-
285
-
286
-
287
-
288
-
289
-
290
-
291
-
292
-
293
-
294
-
295
-
296
-
297
-
298
-
299
-
300
-
301
-
302
-
303
-
304
-
305
-
306
-
307
-
308
-
309
-
310
-
311
-
312
-
313
-
314
-
315
-
316
-
317
-
318
-
319
-
320
-
321
-
322
-
323
-
324
-
325
-
326
-
327
-
328
-
329
-
330
-
331
-
332
-
333
-
334
-
335
-
336
-
337
-
338
-
339
-
340
-
341
-
342
-
343
-
344
-
345
-
346
-
347
-
348
-
349
-
350
-
351
-
352
-
353
-
354
-
355
-
356
-
357
-
358
-
359
-
360
-
361
-
362
-
363
-
364
-
365
-
366
-
367
-
368
-
369
-
370
-
371
-
372
-
373
-
374
-
375
-
376
-
377
-
378
-
379
-
380
-
381
-
382
-
383
-
384
-
385
-
386
-
387
-
388
-
389
-
390
-
391
-
392
-
393
-
394
-
395
-
396
-
397
-
398
-
399
-
400
-
401
-
402
-
403
-
404
-
405
-
406
 |
 |