Brother International WP7550JPLUS Owner's Manual - English - Page 127
Cursor, Right, Return.
 |
View all Brother International WP7550JPLUS manuals
Add to My Manuals
Save this manual to your list of manuals |
Page 127 highlights
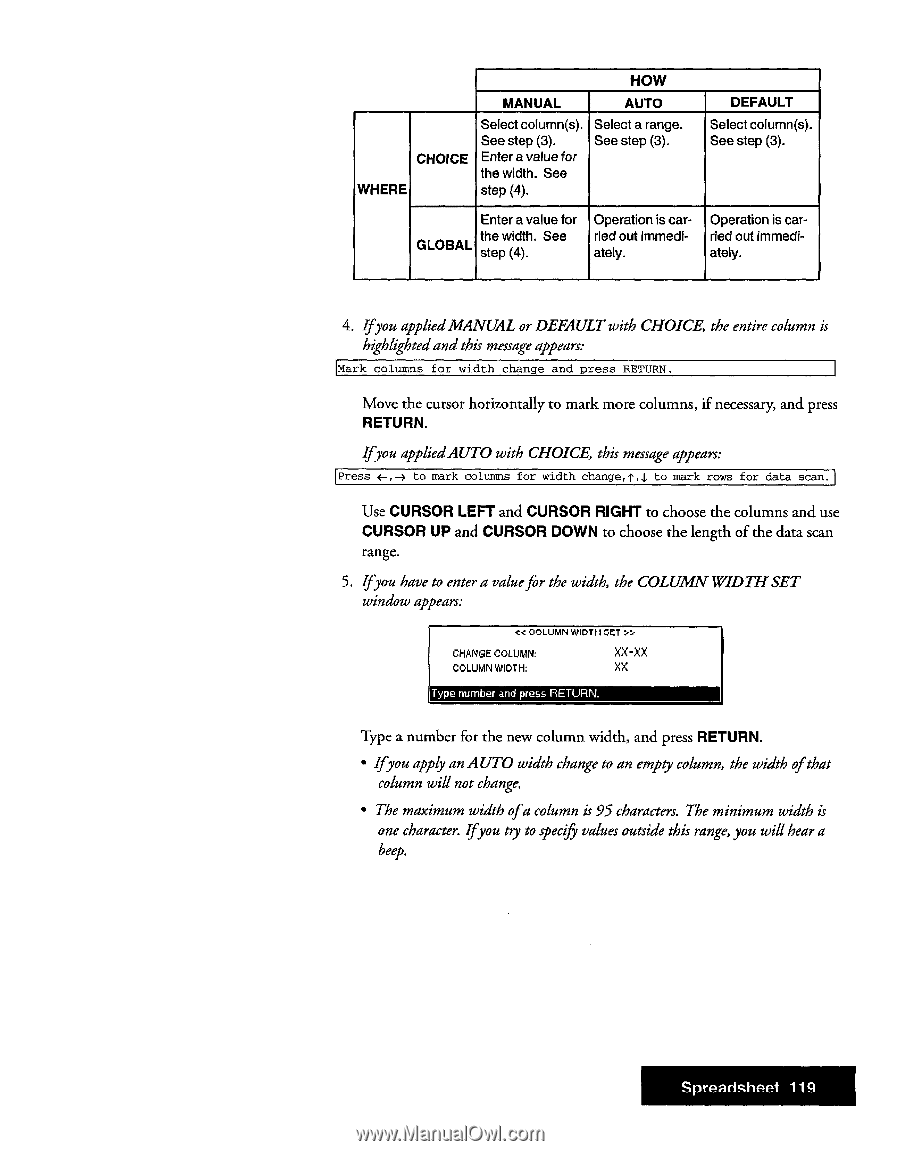
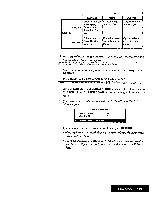
HOW MANUAL AUTO CHOICE WHERE Select column(s). See step (3). Enter a value for the width. See step (4). Select a range. See step (3). DEFAULT Select column(s). See step (3). Enter a value for Operation is car- Operation is car- GLOBALthe width. See vied out immedi- ried out immedi- step (4). ately. ately. 4. Ifyou appliedMANUAL or DEFAULT with CHOICE, the entire column is highlightedand this message appears: Mark columns for width change and press RETURN. Move the cursor horizontally to mark more columns, if necessary, and press RETURN. Ifyou appliedAUTO with CHOICE, this message appears: Press *-,-+ to mark columns for width change,f4 to mark rows for data scan. Use CURSOR LEFT and CURSOR RIGHT to choose the columns and use CURSOR UP and CURSOR DOWN to choose the length of the data scan range. 5. Ifyou have to enter a valuefor the width, the COLUMN WIDTHSET window appears: < COLUMN WIDTH SET 31 CHANGE COLUMN: COLUMN WIDTH: XX-XX XX Type number and press RETURN. Type a number for the new column width, and press RETURN. • Ifyou apply an AUTO width change to an empty column, the width ofthat column will not change. • The maximum width ofa column is 95 characters. The minimum width is one character. Ifyou try to specify values outside this range, you will hear a beep. Spreadsheet 119
-
 1
1 -
2
-
3
-
4
-
5
-
6
-
7
-
8
-
9
-
10
-
11
-
12
-
13
-
14
-
15
-
16
-
17
-
18
-
19
-
20
-
21
-
22
-
23
-
24
-
25
-
26
-
27
-
28
-
29
-
30
-
31
-
32
-
33
-
34
-
35
-
36
-
37
-
38
-
39
-
40
-
41
-
42
-
43
-
44
-
45
-
46
-
47
-
48
-
49
-
50
-
51
-
52
-
53
-
54
-
55
-
56
-
57
-
58
-
59
-
60
-
61
-
62
-
63
-
64
-
65
-
66
-
67
-
68
-
69
-
70
-
71
-
72
-
73
-
74
-
75
-
76
-
77
-
78
-
79
-
80
-
81
-
82
-
83
-
84
-
85
-
86
-
87
-
88
-
89
-
90
-
91
-
92
-
93
-
94
-
95
-
96
-
97
-
98
-
99
-
100
-
101
-
102
-
103
-
104
-
105
-
106
-
107
-
108
-
109
-
110
-
111
-
112
-
113
-
114
-
115
-
116
-
117
-
118
-
119
-
120
-
121
-
 122
122 -
 123
123 -
 124
124 -
 125
125 -
 126
126 -
 127
127 -
 128
128 -
 129
129 -
 130
130 -
 131
131 -
 132
132 -
133
-
134
-
135
-
136
-
137
-
138
-
139
-
140
-
141
-
142
-
143
-
144
-
145
-
146
-
147
-
148
-
149
-
150
-
151
-
152
-
153
-
154
-
155
-
156
-
157
-
158
-
159
-
160
-
161
-
162
-
163
-
164
-
165
-
166
-
167
-
168
-
169
-
170
-
171
-
172
-
173
-
174
-
175
-
176
-
177
-
178
-
179
-
180
-
181
-
182
-
183
-
184
-
185
-
186
-
187
-
188
-
189
-
190
-
191
-
192
-
193
-
194
-
195
-
196
-
197
-
198
-
199
-
200
-
201
-
202
-
203
-
204
-
205
-
206
-
207
-
208
-
209
-
210
-
211
-
212
-
213
-
214
-
215
-
216
-
217
-
218
-
219
-
220
-
221
-
222
-
223
-
224
-
225
-
226
-
227
-
228
-
229
-
230
-
231
-
232
-
233
-
234
-
235
-
236
-
237
-
238
-
239
-
240
-
241
-
242
-
243
-
244
-
245
-
246
-
247
-
248
-
249
-
250
-
251
-
252
 |
 |