Brother International WP7550JPLUS Owner's Manual - English - Page 151
Changing, setup, CURSOR, RIGHT, RESET., BACKSPACE, DELETE, Addressbook
 |
View all Brother International WP7550JPLUS manuals
Add to My Manuals
Save this manual to your list of manuals |
Page 151 highlights
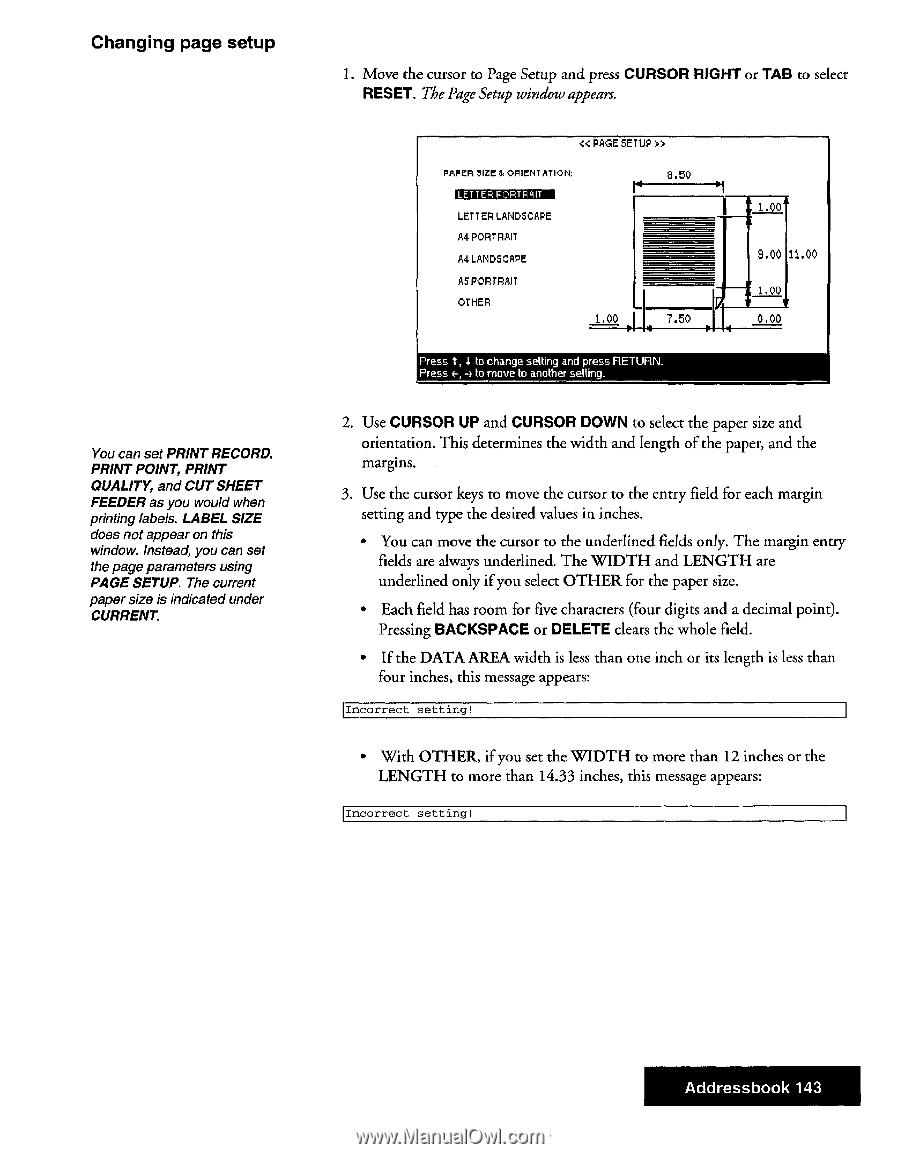
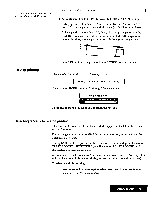
Changing page setup You can set PRINT RECORD, PRINT POINT, PRINT QUALITY, and CUT SHEET FEEDER as you would when printing labels. LABEL SIZE does not appear on this window. Instead, you can set the page parameters using PAGE SETUP. The current paper size is indicated under CURRENT. 1. Move the cursor to Page Setup and press CURSOR RIGHT or TAB to select RESET. The Page Setup window appears. > PAPER SIZE 84 ORIENTATION: 8.50 4 LETTER LANDSCAPE Ad PORTRAIT A4 LANDSCAPE AS PORTRAIT OTHER 1.00 7.50 Press t, 1 to change selling and press RETURN. Press 4-, 4 la move to another setting. 1.00 9.00 11.00 1.00 0.00 2. Use CURSOR UP and CURSOR DOWN to select the paper size and orientation. This determines the width and length of the paper, and the margins. 3. Use the cursor keys to move the cursor to the entry field for each margin setting and type the desired values in inches. • You can move the cursor to the underlined fields only. The margin entry fields are always underlined. The WIDTH and LENGTH are underlined only if you select OTHER for the paper size. • Each field has room for five characters (four digits and a decimal point). Pressing BACKSPACE or DELETE clears the whole field. • If the DATA AREA width is less than one inch or its length is less than four inches, this message appears: Incorrect setting! • With OTHER, if you set the WIDTH to more than 12 inches or the LENGTH to more than 14.33 inches, this message appears: Incorrect setting! Addressbook 143
-
 1
1 -
2
-
3
-
4
-
5
-
6
-
7
-
8
-
9
-
10
-
11
-
12
-
13
-
14
-
15
-
16
-
17
-
18
-
19
-
20
-
21
-
22
-
23
-
24
-
25
-
26
-
27
-
28
-
29
-
30
-
31
-
32
-
33
-
34
-
35
-
36
-
37
-
38
-
39
-
40
-
41
-
42
-
43
-
44
-
45
-
46
-
47
-
48
-
49
-
50
-
51
-
52
-
53
-
54
-
55
-
56
-
57
-
58
-
59
-
60
-
61
-
62
-
63
-
64
-
65
-
66
-
67
-
68
-
69
-
70
-
71
-
72
-
73
-
74
-
75
-
76
-
77
-
78
-
79
-
80
-
81
-
82
-
83
-
84
-
85
-
86
-
87
-
88
-
89
-
90
-
91
-
92
-
93
-
94
-
95
-
96
-
97
-
98
-
99
-
100
-
101
-
102
-
103
-
104
-
105
-
106
-
107
-
108
-
109
-
110
-
111
-
112
-
113
-
114
-
115
-
116
-
117
-
118
-
119
-
120
-
121
-
122
-
123
-
124
-
125
-
126
-
127
-
128
-
129
-
130
-
131
-
132
-
133
-
134
-
135
-
136
-
137
-
138
-
139
-
140
-
141
-
142
-
143
-
144
-
145
-
 146
146 -
 147
147 -
 148
148 -
 149
149 -
 150
150 -
 151
151 -
 152
152 -
 153
153 -
 154
154 -
 155
155 -
 156
156 -
157
-
158
-
159
-
160
-
161
-
162
-
163
-
164
-
165
-
166
-
167
-
168
-
169
-
170
-
171
-
172
-
173
-
174
-
175
-
176
-
177
-
178
-
179
-
180
-
181
-
182
-
183
-
184
-
185
-
186
-
187
-
188
-
189
-
190
-
191
-
192
-
193
-
194
-
195
-
196
-
197
-
198
-
199
-
200
-
201
-
202
-
203
-
204
-
205
-
206
-
207
-
208
-
209
-
210
-
211
-
212
-
213
-
214
-
215
-
216
-
217
-
218
-
219
-
220
-
221
-
222
-
223
-
224
-
225
-
226
-
227
-
228
-
229
-
230
-
231
-
232
-
233
-
234
-
235
-
236
-
237
-
238
-
239
-
240
-
241
-
242
-
243
-
244
-
245
-
246
-
247
-
248
-
249
-
250
-
251
-
252
 |
 |