Brother International WP7550JPLUS Owner's Manual - English - Page 13
Attaching, Monitor, Stand
 |
View all Brother International WP7550JPLUS manuals
Add to My Manuals
Save this manual to your list of manuals |
Page 13 highlights
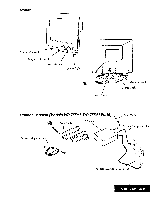
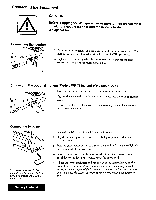
Set Up • WARNING: [11jDo not plug your Whisperwriter or monitor into an electrical outlet until you have completely assembled it. Attaching the Monitor Stand Before making electrical connections, attach the monitor stand to the monitor: 1. Carefully set the monitor on its side as shown below. 2. Align the hooks on the monitor stand with the matching slots in the base of the monitor. 3. Slide the monitor stand toward the front of the monitor until the stand clicks into the locked position. 4. Set the monitor on its stand. You can now tilt and rotate the monitor. JO 0 U 0 Getting Started 5
-
 1
1 -
2
-
3
-
4
-
5
-
6
-
7
-
 8
8 -
 9
9 -
 10
10 -
 11
11 -
 12
12 -
 13
13 -
 14
14 -
 15
15 -
 16
16 -
 17
17 -
 18
18 -
19
-
20
-
21
-
22
-
23
-
24
-
25
-
26
-
27
-
28
-
29
-
30
-
31
-
32
-
33
-
34
-
35
-
36
-
37
-
38
-
39
-
40
-
41
-
42
-
43
-
44
-
45
-
46
-
47
-
48
-
49
-
50
-
51
-
52
-
53
-
54
-
55
-
56
-
57
-
58
-
59
-
60
-
61
-
62
-
63
-
64
-
65
-
66
-
67
-
68
-
69
-
70
-
71
-
72
-
73
-
74
-
75
-
76
-
77
-
78
-
79
-
80
-
81
-
82
-
83
-
84
-
85
-
86
-
87
-
88
-
89
-
90
-
91
-
92
-
93
-
94
-
95
-
96
-
97
-
98
-
99
-
100
-
101
-
102
-
103
-
104
-
105
-
106
-
107
-
108
-
109
-
110
-
111
-
112
-
113
-
114
-
115
-
116
-
117
-
118
-
119
-
120
-
121
-
122
-
123
-
124
-
125
-
126
-
127
-
128
-
129
-
130
-
131
-
132
-
133
-
134
-
135
-
136
-
137
-
138
-
139
-
140
-
141
-
142
-
143
-
144
-
145
-
146
-
147
-
148
-
149
-
150
-
151
-
152
-
153
-
154
-
155
-
156
-
157
-
158
-
159
-
160
-
161
-
162
-
163
-
164
-
165
-
166
-
167
-
168
-
169
-
170
-
171
-
172
-
173
-
174
-
175
-
176
-
177
-
178
-
179
-
180
-
181
-
182
-
183
-
184
-
185
-
186
-
187
-
188
-
189
-
190
-
191
-
192
-
193
-
194
-
195
-
196
-
197
-
198
-
199
-
200
-
201
-
202
-
203
-
204
-
205
-
206
-
207
-
208
-
209
-
210
-
211
-
212
-
213
-
214
-
215
-
216
-
217
-
218
-
219
-
220
-
221
-
222
-
223
-
224
-
225
-
226
-
227
-
228
-
229
-
230
-
231
-
232
-
233
-
234
-
235
-
236
-
237
-
238
-
239
-
240
-
241
-
242
-
243
-
244
-
245
-
246
-
247
-
248
-
249
-
250
-
251
-
252
 |
 |

Set
Up
[11j
•
WARNING:
Do
not
plug
your
Whisperwriter
or
monitor
into
an
electrical
outlet
until
you
have
completely
assembled
it.
Attaching
the
Monitor
Stand
Before
making
electrical
connections,
attach
the
monitor
stand
to
the
monitor:
1.
Carefully
set
the
monitor
on
its
side
as
shown
below.
2.
Align
the
hooks
on
the
monitor
stand
with
the
matching
slots
in
the
base
of
the
monitor.
3.
Slide
the
monitor
stand
toward
the
front
of
the
monitor
until
the
stand
clicks
into
the
locked
position.
4.
Set
the
monitor
on
its
stand.
You
can
now
tilt
and
rotate
the
monitor.
JO
0
0
U
Getting
Started
5