Brother International WP7550JPLUS Owner's Manual - English - Page 59
Using, merge, function, Inserting, symbols, document
 |
View all Brother International WP7550JPLUS manuals
Add to My Manuals
Save this manual to your list of manuals |
Page 59 highlights
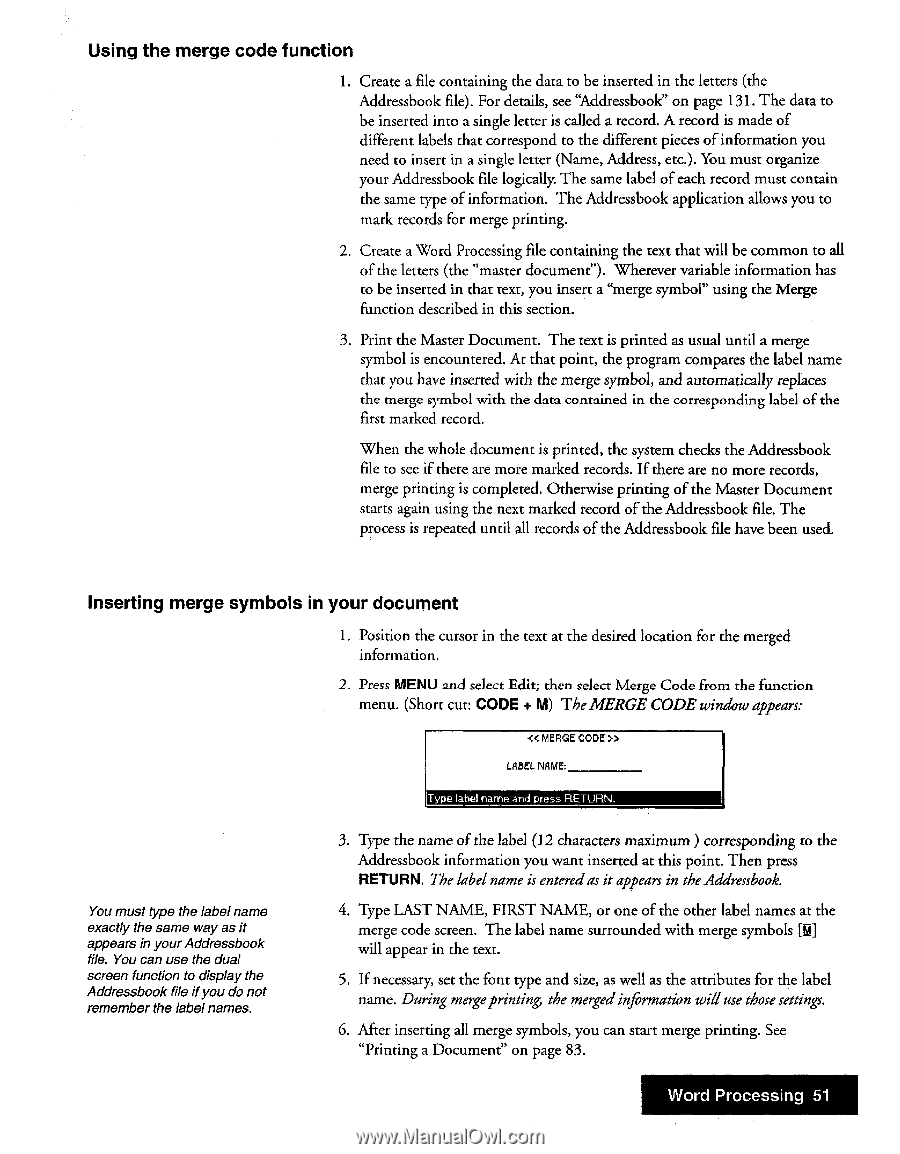
Using the merge code function 1. Create a file containing the data to be inserted in the letters (the Addressbook file). For details, see "Addressbook" on page 131. The data to be inserted into a single letter is called a record. A record is made of different labels that correspond to the different pieces of information you need to insert in a single letter (Name, Address, etc.). You must organize your Addressbook file logically. The same label of each record must contain the same type of information. The Addressbook application allows you to mark records for merge printing. 2. Create a Word Processing file containing the text that will be common to all of the letters (the "master document"). Wherever variable information has to be inserted in that text, you insert a "merge symbol" using the Merge function described in this section. 3. Print the Master Document. The text is printed as usual until a merge symbol is encountered. At that point, the program compares the label name that you have inserted with the merge symbol, and automatically replaces the merge symbol with the data contained in the corresponding label of the first marked record. When the whole document is printed, the system checks the Addressbook file to see if there are more marked records. If there are no more records, merge printing is completed. Otherwise printing of the Master Document starts again using the next marked record of the Addressbook file. The process is repeated until all records of the Addressbook file have been used. Inserting merge symbols in your document 1. Position the cursor in the text at the desired location for the merged information. 2. Press MENU and select Edit; then select Merge Code from the function menu. (Short cut: CODE + M) The MERGE CODE window appears: > LABEL NAME: Type label name and press RETURN. You must type the label name exactly the same way as it appears in your Addressbook file. You can use the dual screen function to display the Addressbook file ifyou do not remember the label names. 3. Type the name of the label (12 characters maximum ) corresponding to the Addressbook information you want inserted at this point. Then press RETURN. The label name is entered as it appears in the Addressbook. 4. Type LAST NAME, FIRST NAME, or one of the other label names at the merge code screen. The label name surrounded with merge symbols [M] will appear in the text. 5. If necessary, set the font type and size, as well as the attributes for the label name. During mergeprinting, the merged information will use those settings. 6. After inserting all merge symbols, you can start merge printing. See "Printing a Document" on page 83. Word Processing 51
-
 1
1 -
2
-
3
-
4
-
5
-
6
-
7
-
8
-
9
-
10
-
11
-
12
-
13
-
14
-
15
-
16
-
17
-
18
-
19
-
20
-
21
-
22
-
23
-
24
-
25
-
26
-
27
-
28
-
29
-
30
-
31
-
32
-
33
-
34
-
35
-
36
-
37
-
38
-
39
-
40
-
41
-
42
-
43
-
44
-
45
-
46
-
47
-
48
-
49
-
50
-
51
-
52
-
53
-
 54
54 -
 55
55 -
 56
56 -
 57
57 -
 58
58 -
 59
59 -
 60
60 -
 61
61 -
 62
62 -
 63
63 -
 64
64 -
65
-
66
-
67
-
68
-
69
-
70
-
71
-
72
-
73
-
74
-
75
-
76
-
77
-
78
-
79
-
80
-
81
-
82
-
83
-
84
-
85
-
86
-
87
-
88
-
89
-
90
-
91
-
92
-
93
-
94
-
95
-
96
-
97
-
98
-
99
-
100
-
101
-
102
-
103
-
104
-
105
-
106
-
107
-
108
-
109
-
110
-
111
-
112
-
113
-
114
-
115
-
116
-
117
-
118
-
119
-
120
-
121
-
122
-
123
-
124
-
125
-
126
-
127
-
128
-
129
-
130
-
131
-
132
-
133
-
134
-
135
-
136
-
137
-
138
-
139
-
140
-
141
-
142
-
143
-
144
-
145
-
146
-
147
-
148
-
149
-
150
-
151
-
152
-
153
-
154
-
155
-
156
-
157
-
158
-
159
-
160
-
161
-
162
-
163
-
164
-
165
-
166
-
167
-
168
-
169
-
170
-
171
-
172
-
173
-
174
-
175
-
176
-
177
-
178
-
179
-
180
-
181
-
182
-
183
-
184
-
185
-
186
-
187
-
188
-
189
-
190
-
191
-
192
-
193
-
194
-
195
-
196
-
197
-
198
-
199
-
200
-
201
-
202
-
203
-
204
-
205
-
206
-
207
-
208
-
209
-
210
-
211
-
212
-
213
-
214
-
215
-
216
-
217
-
218
-
219
-
220
-
221
-
222
-
223
-
224
-
225
-
226
-
227
-
228
-
229
-
230
-
231
-
232
-
233
-
234
-
235
-
236
-
237
-
238
-
239
-
240
-
241
-
242
-
243
-
244
-
245
-
246
-
247
-
248
-
249
-
250
-
251
-
252
 |
 |