Brother International WP7550JPLUS Owner's Manual - English - Page 140
Addressbook, Screens
 |
View all Brother International WP7550JPLUS manuals
Add to My Manuals
Save this manual to your list of manuals |
Page 140 highlights
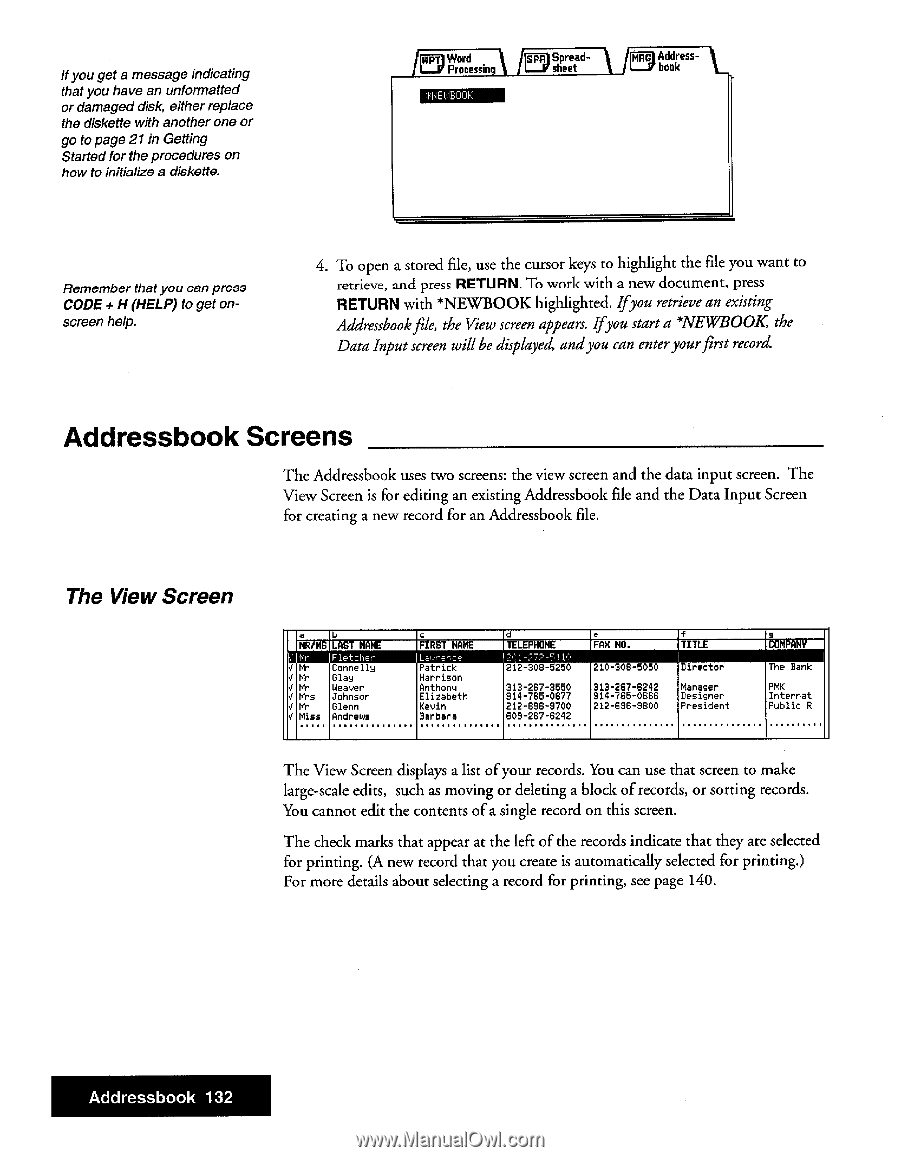
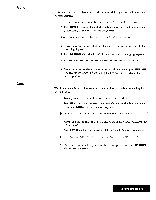
If you get a message indicating that you have an unformatted or damaged disk, either replace the diskette with another one or go to page 21in Getting Started for the procedures on how to initialize a diskette. Word Processin IJEilBuOK Spreadsheet Addressbook Remember that you can press CODE + H (HELP) to get onscreen help. 4. To open a stored file, use the cursor keys to highlight the file you want to retrieve, and press RETURN. To work with a new document, press RETURN with *NEW/BOOK highlighted. Ifyou retrieve an existing Addressbookfile, the View screen appears. Ifyou start a *NEWBOOK, the Data Input screen will be displayed, andyou can enteryourfirst record. Addressbook Screens The Addressbook uses two screens: the view screen and the data input screen. The View Screen is for editing an existing Addressbook file and the Data Input Screen for creating a new record for an Addressbook file. The View Screen a LI MR/MS LAST NAME Ikli. Fl, f , hPr I 4 Mmrr Connelly. Glay 4 Mr Weaver 4 Mrs Johnson 4 Mr Glenn V Miss Andrews , FIRST NAME Patrick Harrison Anthony Elizabeth Kevin Barbara d TELEPHONE 12(1-272-511:: 212-308-5250 313-267-3550 214-765-0677 212-696-9700 609-267-6242 e FAH HO. 210-308-5050 313-267-6242 914-765-066G 212-69G-2600 4 TITLE Director Manager Designer President a COMPANY The Bank PMK Internet Public R The View Screen displays a list of your records. You can use that screen to make large-scale edits, such as moving or deleting a block of records, or sorting records. You cannot edit the contents of a single record on this screen. The check marks that appear at the left of the records indicate that they are selected for printing. (A new record that you create is automatically selected for printing.) For more details about selecting a record for printing, see page 140. Addressbook 132
-
 1
1 -
2
-
3
-
4
-
5
-
6
-
7
-
8
-
9
-
10
-
11
-
12
-
13
-
14
-
15
-
16
-
17
-
18
-
19
-
20
-
21
-
22
-
23
-
24
-
25
-
26
-
27
-
28
-
29
-
30
-
31
-
32
-
33
-
34
-
35
-
36
-
37
-
38
-
39
-
40
-
41
-
42
-
43
-
44
-
45
-
46
-
47
-
48
-
49
-
50
-
51
-
52
-
53
-
54
-
55
-
56
-
57
-
58
-
59
-
60
-
61
-
62
-
63
-
64
-
65
-
66
-
67
-
68
-
69
-
70
-
71
-
72
-
73
-
74
-
75
-
76
-
77
-
78
-
79
-
80
-
81
-
82
-
83
-
84
-
85
-
86
-
87
-
88
-
89
-
90
-
91
-
92
-
93
-
94
-
95
-
96
-
97
-
98
-
99
-
100
-
101
-
102
-
103
-
104
-
105
-
106
-
107
-
108
-
109
-
110
-
111
-
112
-
113
-
114
-
115
-
116
-
117
-
118
-
119
-
120
-
121
-
122
-
123
-
124
-
125
-
126
-
127
-
128
-
129
-
130
-
131
-
132
-
133
-
134
-
 135
135 -
 136
136 -
 137
137 -
 138
138 -
 139
139 -
 140
140 -
 141
141 -
 142
142 -
 143
143 -
 144
144 -
 145
145 -
146
-
147
-
148
-
149
-
150
-
151
-
152
-
153
-
154
-
155
-
156
-
157
-
158
-
159
-
160
-
161
-
162
-
163
-
164
-
165
-
166
-
167
-
168
-
169
-
170
-
171
-
172
-
173
-
174
-
175
-
176
-
177
-
178
-
179
-
180
-
181
-
182
-
183
-
184
-
185
-
186
-
187
-
188
-
189
-
190
-
191
-
192
-
193
-
194
-
195
-
196
-
197
-
198
-
199
-
200
-
201
-
202
-
203
-
204
-
205
-
206
-
207
-
208
-
209
-
210
-
211
-
212
-
213
-
214
-
215
-
216
-
217
-
218
-
219
-
220
-
221
-
222
-
223
-
224
-
225
-
226
-
227
-
228
-
229
-
230
-
231
-
232
-
233
-
234
-
235
-
236
-
237
-
238
-
239
-
240
-
241
-
242
-
243
-
244
-
245
-
246
-
247
-
248
-
249
-
250
-
251
-
252
 |
 |