Brother International WP7550JPLUS Owner's Manual - English - Page 138
Printing
 |
View all Brother International WP7550JPLUS manuals
Add to My Manuals
Save this manual to your list of manuals |
Page 138 highlights
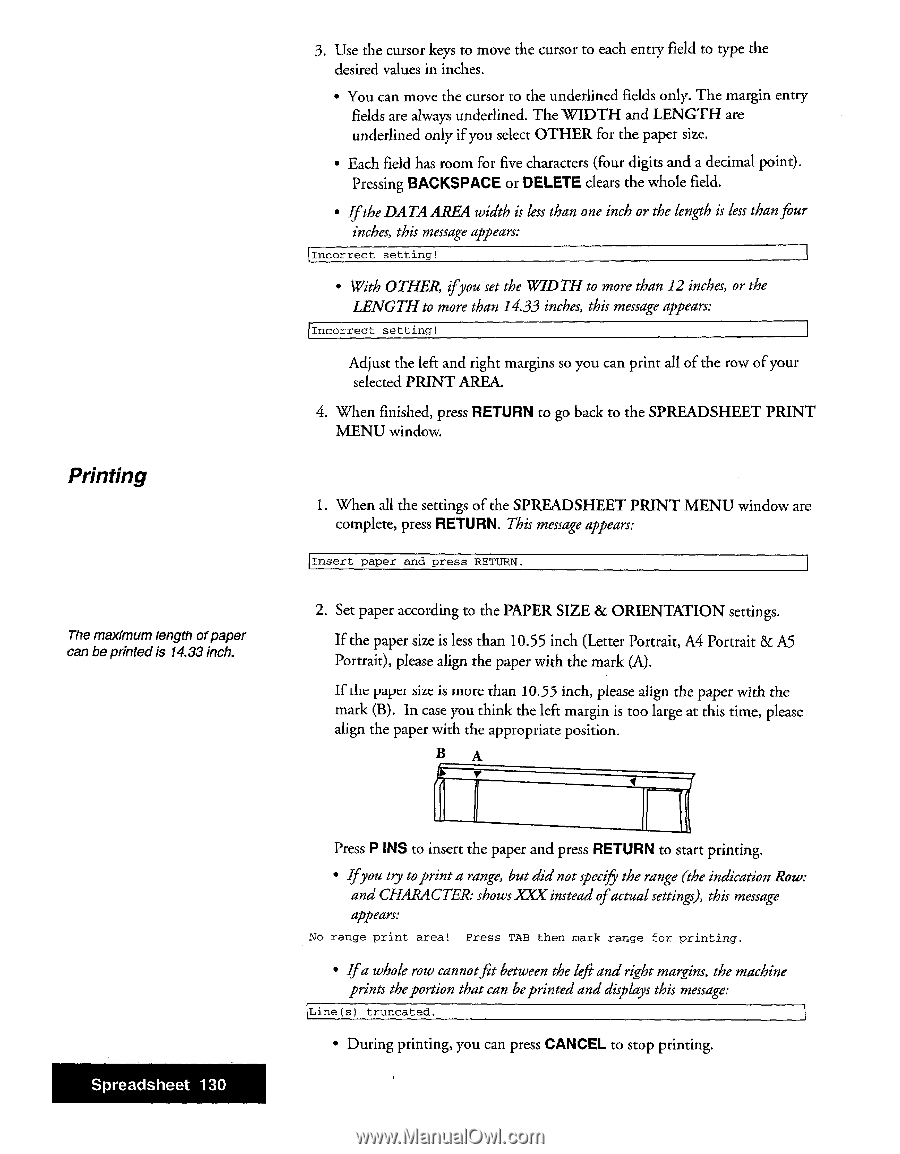
Printing The maximum length ofpaper can be printed is 14.33 inch. 3. Use the cursor keys to move the cursor to each entry field to type the desired values in inches. • You can move the cursor to the underlined fields only. The margin entry fields are always underlined. The WIDTH and LENGTH are underlined only if you select OTHER for the paper size. • Each field has room for five characters (four digits and a decimal point). Pressing BACKSPACE or DELETE clears the whole field. • If the DATA AREA width is less than one inch or the length is less than four inches, this message appears: Incorrect setting! • With OTHER, ifyou set the WIDTH to more than 12 inches, or the LENGTH to more than 14.33 inches, this message appears: Incorrect setting! Adjust the left and right margins so you can print all of the row of your selected PRINT AREA. 4. When finished, press RETURN to go back to the SPREADSHEET PRINT MENU window. 1. When all the settings of the SPREADSHEET PRINT MENU window are complete, press RETURN. This message appears: Insert paper and press RETURN. 2. Set paper according to the PAPER SIZE & ORIENTATION settings. If the paper size is less than 10.55 inch (Letter Portrait, A4 Portrait 8c A5 Portrait), please align the paper with the mark (A). If die palm' lice is inure than 10.55 inch, please align the paper with the mark (B). In case you think the left margin is too large at this time, please align the paper with the appropriate position. B A Spreadsheet 130 Press P INS to insert the paper and press RETURN to start printing. • Ifyou try toprint a range, but did not specify the range (the indication Row: and CHARACTER: shows XXX instead ofactual settings), this message appears: No range print area! Press TAB then nark range for printing. • Ifa whole row cannotfit between the left and right margins, the machine prints the portion that can be printed and displays this message: Line(s) truncated. • During printing, you can press CANCEL to stop printing.
-
 1
1 -
2
-
3
-
4
-
5
-
6
-
7
-
8
-
9
-
10
-
11
-
12
-
13
-
14
-
15
-
16
-
17
-
18
-
19
-
20
-
21
-
22
-
23
-
24
-
25
-
26
-
27
-
28
-
29
-
30
-
31
-
32
-
33
-
34
-
35
-
36
-
37
-
38
-
39
-
40
-
41
-
42
-
43
-
44
-
45
-
46
-
47
-
48
-
49
-
50
-
51
-
52
-
53
-
54
-
55
-
56
-
57
-
58
-
59
-
60
-
61
-
62
-
63
-
64
-
65
-
66
-
67
-
68
-
69
-
70
-
71
-
72
-
73
-
74
-
75
-
76
-
77
-
78
-
79
-
80
-
81
-
82
-
83
-
84
-
85
-
86
-
87
-
88
-
89
-
90
-
91
-
92
-
93
-
94
-
95
-
96
-
97
-
98
-
99
-
100
-
101
-
102
-
103
-
104
-
105
-
106
-
107
-
108
-
109
-
110
-
111
-
112
-
113
-
114
-
115
-
116
-
117
-
118
-
119
-
120
-
121
-
122
-
123
-
124
-
125
-
126
-
127
-
128
-
129
-
130
-
131
-
132
-
 133
133 -
 134
134 -
 135
135 -
 136
136 -
 137
137 -
 138
138 -
 139
139 -
 140
140 -
 141
141 -
 142
142 -
 143
143 -
144
-
145
-
146
-
147
-
148
-
149
-
150
-
151
-
152
-
153
-
154
-
155
-
156
-
157
-
158
-
159
-
160
-
161
-
162
-
163
-
164
-
165
-
166
-
167
-
168
-
169
-
170
-
171
-
172
-
173
-
174
-
175
-
176
-
177
-
178
-
179
-
180
-
181
-
182
-
183
-
184
-
185
-
186
-
187
-
188
-
189
-
190
-
191
-
192
-
193
-
194
-
195
-
196
-
197
-
198
-
199
-
200
-
201
-
202
-
203
-
204
-
205
-
206
-
207
-
208
-
209
-
210
-
211
-
212
-
213
-
214
-
215
-
216
-
217
-
218
-
219
-
220
-
221
-
222
-
223
-
224
-
225
-
226
-
227
-
228
-
229
-
230
-
231
-
232
-
233
-
234
-
235
-
236
-
237
-
238
-
239
-
240
-
241
-
242
-
243
-
244
-
245
-
246
-
247
-
248
-
249
-
250
-
251
-
252
 |
 |