Brother International WP7550JPLUS Owner's Manual - English - Page 57
Hyphen
 |
View all Brother International WP7550JPLUS manuals
Add to My Manuals
Save this manual to your list of manuals |
Page 57 highlights
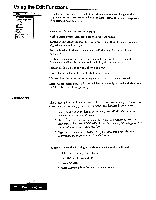
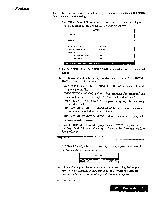
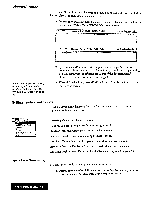
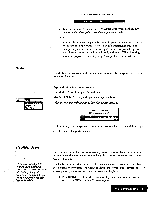
style Edit rp-iP Fcnt & Size Margins & Tabs START NUMBERING WITH PAGE NUMBER: 1 Type number and press RETURN. 2. Type the number of the first page. Press RETURN when finished. The number will be displayed between double quotation marks. OR You can also automatically number pages in your document in another way. To do this, include a number between double quotation marks. For example, if your header or footer is Page "1", the first printed page will show Page 1, the second will show Page 2, and so on. When inserting additional pages, use centering or right margin flush and insert them. Use the Style functions from the function menu to modify the appearance of your header or footer text. Type Style: Switches attributes on/off. Font & Size: Select font type, size and mode. Margins & Tabs: Set, left, and right margins, and tab stops. When the text cannotfit on a single line, this window appears: Data wilt be truncated! DK to change margins? Use cursor to select and press RETURN • YES: Changes the margin and truncates the data which exceeds the right margin. • NO: Do not change the margin. Hyphen Scan A hyphen inserted with the Hyphen Scan function is treated as a soft hyphen. When reformatting, if a word containing a soft hyphen fits within the margins, the soft hyphen is deleted. Since the word wrap function automatically transfers a word that cannot fit in the current line to the next line, excessively long blank spaces may appear and a poor layout will result. The hyphen scan function automatically detects such long blank spaces and gives you a chance to hyphenate long words. It allows you to type your text without inserting any hyphens manually (except permanent hyphens). 1 Press MENU and select Edit; then select Hyphen Scan from the function menu. 1he1-1'THEN SCAN window appears: Word Processing 49
-
 1
1 -
2
-
3
-
4
-
5
-
6
-
7
-
8
-
9
-
10
-
11
-
12
-
13
-
14
-
15
-
16
-
17
-
18
-
19
-
20
-
21
-
22
-
23
-
24
-
25
-
26
-
27
-
28
-
29
-
30
-
31
-
32
-
33
-
34
-
35
-
36
-
37
-
38
-
39
-
40
-
41
-
42
-
43
-
44
-
45
-
46
-
47
-
48
-
49
-
50
-
51
-
 52
52 -
 53
53 -
 54
54 -
 55
55 -
 56
56 -
 57
57 -
 58
58 -
 59
59 -
 60
60 -
 61
61 -
 62
62 -
63
-
64
-
65
-
66
-
67
-
68
-
69
-
70
-
71
-
72
-
73
-
74
-
75
-
76
-
77
-
78
-
79
-
80
-
81
-
82
-
83
-
84
-
85
-
86
-
87
-
88
-
89
-
90
-
91
-
92
-
93
-
94
-
95
-
96
-
97
-
98
-
99
-
100
-
101
-
102
-
103
-
104
-
105
-
106
-
107
-
108
-
109
-
110
-
111
-
112
-
113
-
114
-
115
-
116
-
117
-
118
-
119
-
120
-
121
-
122
-
123
-
124
-
125
-
126
-
127
-
128
-
129
-
130
-
131
-
132
-
133
-
134
-
135
-
136
-
137
-
138
-
139
-
140
-
141
-
142
-
143
-
144
-
145
-
146
-
147
-
148
-
149
-
150
-
151
-
152
-
153
-
154
-
155
-
156
-
157
-
158
-
159
-
160
-
161
-
162
-
163
-
164
-
165
-
166
-
167
-
168
-
169
-
170
-
171
-
172
-
173
-
174
-
175
-
176
-
177
-
178
-
179
-
180
-
181
-
182
-
183
-
184
-
185
-
186
-
187
-
188
-
189
-
190
-
191
-
192
-
193
-
194
-
195
-
196
-
197
-
198
-
199
-
200
-
201
-
202
-
203
-
204
-
205
-
206
-
207
-
208
-
209
-
210
-
211
-
212
-
213
-
214
-
215
-
216
-
217
-
218
-
219
-
220
-
221
-
222
-
223
-
224
-
225
-
226
-
227
-
228
-
229
-
230
-
231
-
232
-
233
-
234
-
235
-
236
-
237
-
238
-
239
-
240
-
241
-
242
-
243
-
244
-
245
-
246
-
247
-
248
-
249
-
250
-
251
-
252
 |
 |
