Brother International WP7550JPLUS Owner's Manual - English - Page 136
Print, Functions
 |
View all Brother International WP7550JPLUS manuals
Add to My Manuals
Save this manual to your list of manuals |
Page 136 highlights
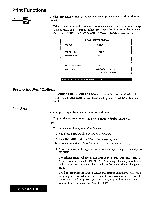
Print Functions Screen Pun Use the Print function from the function menu to print a range of cells or the entire worksheet. When you want to specify print area, move the cursor to one corner of the range to be printed and press MENU, select Print; then select Print from the submenu. (Short cut: PRINT) The SPREADSHEET PRINTMENU window appears: PRINT AREA:
-
 1
1 -
2
-
3
-
4
-
5
-
6
-
7
-
8
-
9
-
10
-
11
-
12
-
13
-
14
-
15
-
16
-
17
-
18
-
19
-
20
-
21
-
22
-
23
-
24
-
25
-
26
-
27
-
28
-
29
-
30
-
31
-
32
-
33
-
34
-
35
-
36
-
37
-
38
-
39
-
40
-
41
-
42
-
43
-
44
-
45
-
46
-
47
-
48
-
49
-
50
-
51
-
52
-
53
-
54
-
55
-
56
-
57
-
58
-
59
-
60
-
61
-
62
-
63
-
64
-
65
-
66
-
67
-
68
-
69
-
70
-
71
-
72
-
73
-
74
-
75
-
76
-
77
-
78
-
79
-
80
-
81
-
82
-
83
-
84
-
85
-
86
-
87
-
88
-
89
-
90
-
91
-
92
-
93
-
94
-
95
-
96
-
97
-
98
-
99
-
100
-
101
-
102
-
103
-
104
-
105
-
106
-
107
-
108
-
109
-
110
-
111
-
112
-
113
-
114
-
115
-
116
-
117
-
118
-
119
-
120
-
121
-
122
-
123
-
124
-
125
-
126
-
127
-
128
-
129
-
130
-
 131
131 -
 132
132 -
 133
133 -
 134
134 -
 135
135 -
 136
136 -
 137
137 -
 138
138 -
 139
139 -
 140
140 -
 141
141 -
142
-
143
-
144
-
145
-
146
-
147
-
148
-
149
-
150
-
151
-
152
-
153
-
154
-
155
-
156
-
157
-
158
-
159
-
160
-
161
-
162
-
163
-
164
-
165
-
166
-
167
-
168
-
169
-
170
-
171
-
172
-
173
-
174
-
175
-
176
-
177
-
178
-
179
-
180
-
181
-
182
-
183
-
184
-
185
-
186
-
187
-
188
-
189
-
190
-
191
-
192
-
193
-
194
-
195
-
196
-
197
-
198
-
199
-
200
-
201
-
202
-
203
-
204
-
205
-
206
-
207
-
208
-
209
-
210
-
211
-
212
-
213
-
214
-
215
-
216
-
217
-
218
-
219
-
220
-
221
-
222
-
223
-
224
-
225
-
226
-
227
-
228
-
229
-
230
-
231
-
232
-
233
-
234
-
235
-
236
-
237
-
238
-
239
-
240
-
241
-
242
-
243
-
244
-
245
-
246
-
247
-
248
-
249
-
250
-
251
-
252
 |
 |

Print
Functions
Screen
Pun
Use
the
Print
function
from
the
function
menu
to
print
a
range
of
cells
or
the
entire
worksheet.
When
you
want
to
specify
print
area,
move
the
cursor
to
one
corner
of
the
range
to
be
printed
and
press
MENU,
select
Print;
then
select
Print
from
the
submenu.
(Short
cut:
PRINT)
The
SPREADSHEET
PRINT
MENU
window
appears:
Setting
the
Print
Options
Print
Area
PRINT
AREA:
PRINT
POINT.
PRINT
QUALITY.
CUT
SHEET
FEEDER:
PAGE
SETUP:
<<
SPREADSHEET
PRINT
MENU
»
GLOBAL
12
POINT
FINE
OFF
4
RESET
(LETTER
PORTRAIT)
Press
TAB
to
change
setting
and
press
RETURN.
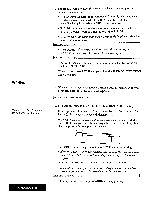
Use
CURSOR
UP
and
CURSOR
DOWN
to
move
the
cursor
to
the
desired
setting.
Use
SPACE
BAR
to
select
the
desired
options.
Press
RETURN
when
finished.
You
can
print
a
specified
range
or
the
entire
worksheet.
To
print
the
entire
worksheet,
use
SPACE
BAR
to
display
GLOBAL
OR
To
print
a
range
of
cells,
proceed
as
follows:
1.
Use
SPACE
BAR
to
display
RANGE
(XX..XX).
2.
Press
CURSOR
RIGHT
or
TAB.
This
message
appears:
Move
cursor
to
end
of
block
to
be
printed
and
press
RETURN.
3.
Move
the
cursor
to
the
opposite
corner
of
the
range
to
be
printed,
and
press
RETURN.
The
selected
range
will
now
be
displayed
in
the
SPREADSHEET
PRINT
MENU
window
beside
the
PRINT
AREA
heading.
This
range
specification
will
be
saved
along
with
your
file
and
will
not
be
reset
until
you
change
it
again.
The
line
just
under
the
PRINT
AREA
specification
shows
how
many
rows
are
going
to
be
printed,
as
well
as
the
number
of
characters
in
the
rows.
This
indication
is
useful
to
prevent
you
from
trying
to
print
longer
rows
than
you
can
fit
on
the
paper
(see
PAGE
SETUP).
Spreadsheet
128