Brother International WP7550JPLUS Owner's Manual - English - Page 150
Changing, label, settings, Printing
 |
View all Brother International WP7550JPLUS manuals
Add to My Manuals
Save this manual to your list of manuals |
Page 150 highlights
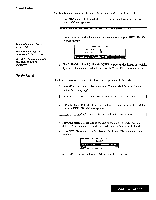
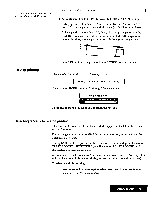
Changing label settings ifyoupress CANCEL while the cursor is in the right box, the setting of the current label name is cancelled and you return to the left box. If you press CANCEL while the cursor is not in the right box, you return to the ADDRESSBOOK PRINT MENU window. The default settings for the label structure and contents appear only when you are working with an Addressbook file in which you have not changed the standard label names. Printing a list 1. Use CURSOR UP and CURSOR DOWN to move the cursor to the desired label name in the left box of the window. 2. To remove a label name that is already set, press DELETE. The check mark on the left ofthe label name disappears, and the small letter corresponding to that label is removedfrom the right box. To set a label name, press SPACE BAR and the cursor appears in the right box. Use the cursor keys to move the cursor in the right box to the desired position, and press RETURN to confirm the setting. When the cursor appears in the left box, a mark appears. 3. Repeat steps 1 and 2 to get all necessary items at the correct location. 4. To start printing, press RETURN when there is no cursor in the right box. The Addressbook asksyou to insertpaper. See "To Start Printing" on page 144. 1. Press MENU and select Print; then select Print from the function menu. (Short cut key: PRINT) The ADDRESSBOOKPRINTMEMIwindow below appears: « ADDRESSBOOK PRINT MENU » PRINT APPLICATION: PRINT RECORD: PRINT POINT: PRINT QUALITY: CUT SHEET FEEDER, LABEL SIZE: NUMBER OF LABELS ACROSS: ALL 12 POINT FINE OFF 2 518 51 3 Addressbook 142 2. Use CURSOR UP and CURSOR DOWN to move the cursor to PRINT APPLICATION and use SPACE BAR to select LIST The Addressbook Print Menu changes as shoum be_low: « ADDRESSBOOK PRINT MENU » PRINT APPLICATION: PRINT RECORD: PRINT POINT. PRINT QUALITY: CUT SHEET FEEDER: PAGE SETUP: ALL 12 POINT FINE OFF CURRENT i RESET (LETTER PORTRAIT) Press SPACE la change selling and press RETURN_
-
 1
1 -
2
-
3
-
4
-
5
-
6
-
7
-
8
-
9
-
10
-
11
-
12
-
13
-
14
-
15
-
16
-
17
-
18
-
19
-
20
-
21
-
22
-
23
-
24
-
25
-
26
-
27
-
28
-
29
-
30
-
31
-
32
-
33
-
34
-
35
-
36
-
37
-
38
-
39
-
40
-
41
-
42
-
43
-
44
-
45
-
46
-
47
-
48
-
49
-
50
-
51
-
52
-
53
-
54
-
55
-
56
-
57
-
58
-
59
-
60
-
61
-
62
-
63
-
64
-
65
-
66
-
67
-
68
-
69
-
70
-
71
-
72
-
73
-
74
-
75
-
76
-
77
-
78
-
79
-
80
-
81
-
82
-
83
-
84
-
85
-
86
-
87
-
88
-
89
-
90
-
91
-
92
-
93
-
94
-
95
-
96
-
97
-
98
-
99
-
100
-
101
-
102
-
103
-
104
-
105
-
106
-
107
-
108
-
109
-
110
-
111
-
112
-
113
-
114
-
115
-
116
-
117
-
118
-
119
-
120
-
121
-
122
-
123
-
124
-
125
-
126
-
127
-
128
-
129
-
130
-
131
-
132
-
133
-
134
-
135
-
136
-
137
-
138
-
139
-
140
-
141
-
142
-
143
-
144
-
 145
145 -
 146
146 -
 147
147 -
 148
148 -
 149
149 -
 150
150 -
 151
151 -
 152
152 -
 153
153 -
 154
154 -
 155
155 -
156
-
157
-
158
-
159
-
160
-
161
-
162
-
163
-
164
-
165
-
166
-
167
-
168
-
169
-
170
-
171
-
172
-
173
-
174
-
175
-
176
-
177
-
178
-
179
-
180
-
181
-
182
-
183
-
184
-
185
-
186
-
187
-
188
-
189
-
190
-
191
-
192
-
193
-
194
-
195
-
196
-
197
-
198
-
199
-
200
-
201
-
202
-
203
-
204
-
205
-
206
-
207
-
208
-
209
-
210
-
211
-
212
-
213
-
214
-
215
-
216
-
217
-
218
-
219
-
220
-
221
-
222
-
223
-
224
-
225
-
226
-
227
-
228
-
229
-
230
-
231
-
232
-
233
-
234
-
235
-
236
-
237
-
238
-
239
-
240
-
241
-
242
-
243
-
244
-
245
-
246
-
247
-
248
-
249
-
250
-
251
-
252
 |
 |
