Brother International WP7550JPLUS Owner's Manual - English - Page 26
Cleaning, Print, Cartridge, Nozzles, Contacts
 |
View all Brother International WP7550JPLUS manuals
Add to My Manuals
Save this manual to your list of manuals |
Page 26 highlights
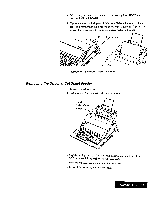
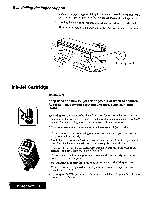
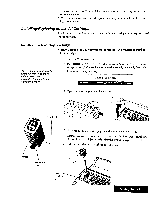
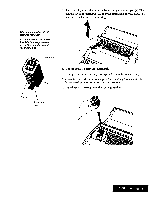
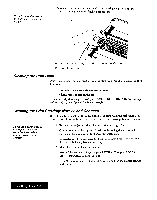
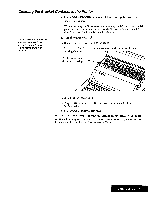
You willnot be able toprint if the cartridge is not correctly locked. 8. Squeeze the ink-jet cartridge bracket and cartridge together until the cartridge snaps under the latch on the bracket. I 9. Press the RETURN key. The ink-jet cartridge is ready to use. 10. Close the top cover. Cleaning the Print Head From time to time, you may need to clean the print head. You should clean the print head when: • die ink on the page looks splotchy or messy • blank spaces appear on the page To automatically dean the print head, press CODE + SHIFT + INK CHG. The cartridge will move slightly to the left and then back to the right. Cleaning the Print Cartridge Nozzles and Contacts If print quality does not improve after cleaning the print head, the problem may be caused by dried ink on the nozzles, contacts, or the print cartridge bracket contacts. Do not use a paper towel for cleaning because it can leave tiny fibers that can clog nozzles and cover contacts. 1. Remove the ink-jet cartridge. (See instructions on page 16.) 2. Gently clean the entire copper-colored area, including the nozzles and contacts with a clean cloth, dampened with water only. To dissolve any dried ink, hold the damp cloth against the nozzles for about three seconds. Gently blot and wipe dry 3. Allow the copper-colored area to dry 4. Reinstall the ink-jet cartridge and press RETURN. Then press CODE + SHIFT + INK CHG and close the cover. If the Whisperwriter is still not printing correctly, clean the bracket contacts in the printer. Getting Started 18
-
 1
1 -
2
-
3
-
4
-
5
-
6
-
7
-
8
-
9
-
10
-
11
-
12
-
13
-
14
-
15
-
16
-
17
-
18
-
19
-
20
-
 21
21 -
 22
22 -
 23
23 -
 24
24 -
 25
25 -
 26
26 -
 27
27 -
 28
28 -
 29
29 -
 30
30 -
 31
31 -
32
-
33
-
34
-
35
-
36
-
37
-
38
-
39
-
40
-
41
-
42
-
43
-
44
-
45
-
46
-
47
-
48
-
49
-
50
-
51
-
52
-
53
-
54
-
55
-
56
-
57
-
58
-
59
-
60
-
61
-
62
-
63
-
64
-
65
-
66
-
67
-
68
-
69
-
70
-
71
-
72
-
73
-
74
-
75
-
76
-
77
-
78
-
79
-
80
-
81
-
82
-
83
-
84
-
85
-
86
-
87
-
88
-
89
-
90
-
91
-
92
-
93
-
94
-
95
-
96
-
97
-
98
-
99
-
100
-
101
-
102
-
103
-
104
-
105
-
106
-
107
-
108
-
109
-
110
-
111
-
112
-
113
-
114
-
115
-
116
-
117
-
118
-
119
-
120
-
121
-
122
-
123
-
124
-
125
-
126
-
127
-
128
-
129
-
130
-
131
-
132
-
133
-
134
-
135
-
136
-
137
-
138
-
139
-
140
-
141
-
142
-
143
-
144
-
145
-
146
-
147
-
148
-
149
-
150
-
151
-
152
-
153
-
154
-
155
-
156
-
157
-
158
-
159
-
160
-
161
-
162
-
163
-
164
-
165
-
166
-
167
-
168
-
169
-
170
-
171
-
172
-
173
-
174
-
175
-
176
-
177
-
178
-
179
-
180
-
181
-
182
-
183
-
184
-
185
-
186
-
187
-
188
-
189
-
190
-
191
-
192
-
193
-
194
-
195
-
196
-
197
-
198
-
199
-
200
-
201
-
202
-
203
-
204
-
205
-
206
-
207
-
208
-
209
-
210
-
211
-
212
-
213
-
214
-
215
-
216
-
217
-
218
-
219
-
220
-
221
-
222
-
223
-
224
-
225
-
226
-
227
-
228
-
229
-
230
-
231
-
232
-
233
-
234
-
235
-
236
-
237
-
238
-
239
-
240
-
241
-
242
-
243
-
244
-
245
-
246
-
247
-
248
-
249
-
250
-
251
-
252
 |
 |
