Brother International PDP350CJ Owner's Manual - English - Page 316
Entering Text, To move the insertion point with the mouse, To correct as you type
 |
View all Brother International PDP350CJ manuals
Add to My Manuals
Save this manual to your list of manuals |
Page 316 highlights
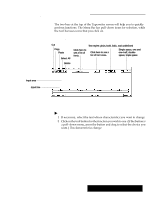
Entering Text If you are copying text which is longer than the available unused space, the text pasted is inserted at the insertion point and the characters at the end of the input line is truncated to the extent that there is no available unused space. Insertion point I-beam pointer If the text is to be pasted at the end of the line and there is not enough unused space, then the text will not be pasted. The normal method for entering text is called Insert Mode. In this mode, the characters you type appear at the insertion point, pushing all existing characters to the right to make room for the new characters. You can click on INS on the screen, or press INSERT MODE to switch between insert and overstrike mode, in which existing text will be deleted as new text is typed. The input line is one text line high, regardless of font size. You can edit text in this area only. However, you can copy text from the input area (above the input line) and paste it into the input line. When the input line is full, it prints (if you use Auto Carriage return); or, you can press ENTER. The insertion point is the blinking vertical line that indicates where the characters you type appear on the screen. On a blank input line, the insertion point appears at the left side. While you are typing, the insertion point moves to the right, appearing after the last character typed. When you need to make changes in the line, you can move the insertion point anywhere in the line by moving the I-beam pointer. You can quickly, and easily move the insertion point using the mouse; if you prefer, you can use your keyboard arrow keys. If there is no text in the text area, you cannot move the insertion point. If the text does not move over when you are pasting, then you are in the overstrike mode. Press the INSERT MODE key to switch between the insert and overstrike modes. "To move the insertion point with the mouse: 1. Move the I-beam pointer to the location in the text where you want to start the insertion. 2. Click the mouse. The insertion point moves to the new location. "To move the insertion point with the keyboard: Press the keyboard keys shown below: S HOME moves the insertion point to the beginning of the current line. S END moves the insertion point to the end of the input line of text. S LEFT ARROW and RIGHT ARROW move the insertion point one character to the left or right. S CODE + LEFT ARROW, CODE + RIGHT ARROW move the insertion point to the beginning or ending of a word. "To correct as you type: Press BACKSPACE to erase characters to the left of the insertion point. "To print a new line of text: Press ENTER. The insertion point moves to the left margin of the next line. The top line prints. Typewriter 296
-
 1
1 -
2
-
3
-
4
-
5
-
6
-
7
-
8
-
9
-
10
-
11
-
12
-
13
-
14
-
15
-
16
-
17
-
18
-
19
-
20
-
21
-
22
-
23
-
24
-
25
-
26
-
27
-
28
-
29
-
30
-
31
-
32
-
33
-
34
-
35
-
36
-
37
-
38
-
39
-
40
-
41
-
42
-
43
-
44
-
45
-
46
-
47
-
48
-
49
-
50
-
51
-
52
-
53
-
54
-
55
-
56
-
57
-
58
-
59
-
60
-
61
-
62
-
63
-
64
-
65
-
66
-
67
-
68
-
69
-
70
-
71
-
72
-
73
-
74
-
75
-
76
-
77
-
78
-
79
-
80
-
81
-
82
-
83
-
84
-
85
-
86
-
87
-
88
-
89
-
90
-
91
-
92
-
93
-
94
-
95
-
96
-
97
-
98
-
99
-
100
-
101
-
102
-
103
-
104
-
105
-
106
-
107
-
108
-
109
-
110
-
111
-
112
-
113
-
114
-
115
-
116
-
117
-
118
-
119
-
120
-
121
-
122
-
123
-
124
-
125
-
126
-
127
-
128
-
129
-
130
-
131
-
132
-
133
-
134
-
135
-
136
-
137
-
138
-
139
-
140
-
141
-
142
-
143
-
144
-
145
-
146
-
147
-
148
-
149
-
150
-
151
-
152
-
153
-
154
-
155
-
156
-
157
-
158
-
159
-
160
-
161
-
162
-
163
-
164
-
165
-
166
-
167
-
168
-
169
-
170
-
171
-
172
-
173
-
174
-
175
-
176
-
177
-
178
-
179
-
180
-
181
-
182
-
183
-
184
-
185
-
186
-
187
-
188
-
189
-
190
-
191
-
192
-
193
-
194
-
195
-
196
-
197
-
198
-
199
-
200
-
201
-
202
-
203
-
204
-
205
-
206
-
207
-
208
-
209
-
210
-
211
-
212
-
213
-
214
-
215
-
216
-
217
-
218
-
219
-
220
-
221
-
222
-
223
-
224
-
225
-
226
-
227
-
228
-
229
-
230
-
231
-
232
-
233
-
234
-
235
-
236
-
237
-
238
-
239
-
240
-
241
-
242
-
243
-
244
-
245
-
246
-
247
-
248
-
249
-
250
-
251
-
252
-
253
-
254
-
255
-
256
-
257
-
258
-
259
-
260
-
261
-
262
-
263
-
264
-
265
-
266
-
267
-
268
-
269
-
270
-
271
-
272
-
273
-
274
-
275
-
276
-
277
-
278
-
279
-
280
-
281
-
282
-
283
-
284
-
285
-
286
-
287
-
288
-
289
-
290
-
291
-
292
-
293
-
294
-
295
-
296
-
297
-
298
-
299
-
300
-
301
-
302
-
303
-
304
-
305
-
306
-
307
-
308
-
309
-
310
-
 311
311 -
 312
312 -
 313
313 -
 314
314 -
 315
315 -
 316
316 -
 317
317 -
 318
318 -
 319
319 -
 320
320 -
 321
321 -
322
-
323
-
324
-
325
-
326
-
327
-
328
-
329
-
330
-
331
-
332
-
333
-
334
-
335
-
336
-
337
-
338
-
339
-
340
-
341
-
342
-
343
-
344
-
345
-
346
-
347
-
348
-
349
-
350
-
351
-
352
-
353
-
354
-
355
-
356
-
357
-
358
-
359
-
360
-
361
-
362
-
363
-
364
-
365
-
366
-
367
-
368
-
369
-
370
-
371
-
372
-
373
-
374
-
375
-
376
-
377
-
378
-
379
-
380
-
381
-
382
-
383
-
384
-
385
-
386
-
387
-
388
-
389
-
390
-
391
-
392
-
393
-
394
-
395
-
396
-
397
-
398
-
399
-
400
-
401
-
402
-
403
-
404
-
405
-
406
-
407
-
408
-
409
-
410
-
411
-
412
-
413
-
414
-
415
-
416
-
417
-
418
-
419
-
420
-
421
-
422
-
423
-
424
-
425
-
426
-
427
-
428
-
429
-
430
-
431
-
432
-
433
-
434
-
435
-
436
-
437
-
438
-
439
-
440
 |
 |
